It was a beautiful day in July and Stampin’ Up UK’s business development Manager, Helen Slimm, had organized a crafting day for demonstrators in Lincoln. It was limited to 65 demonstrators and tickets for the event sold out in a day! I was lucky enough to be one of the 65!
The event took place in a bowls club in Lincoln (great social venue after a game), had plenty of parking and was ideal. Just not sure they were expecting 65 very excited, noisy women…..especially as some people were bowling during the day!
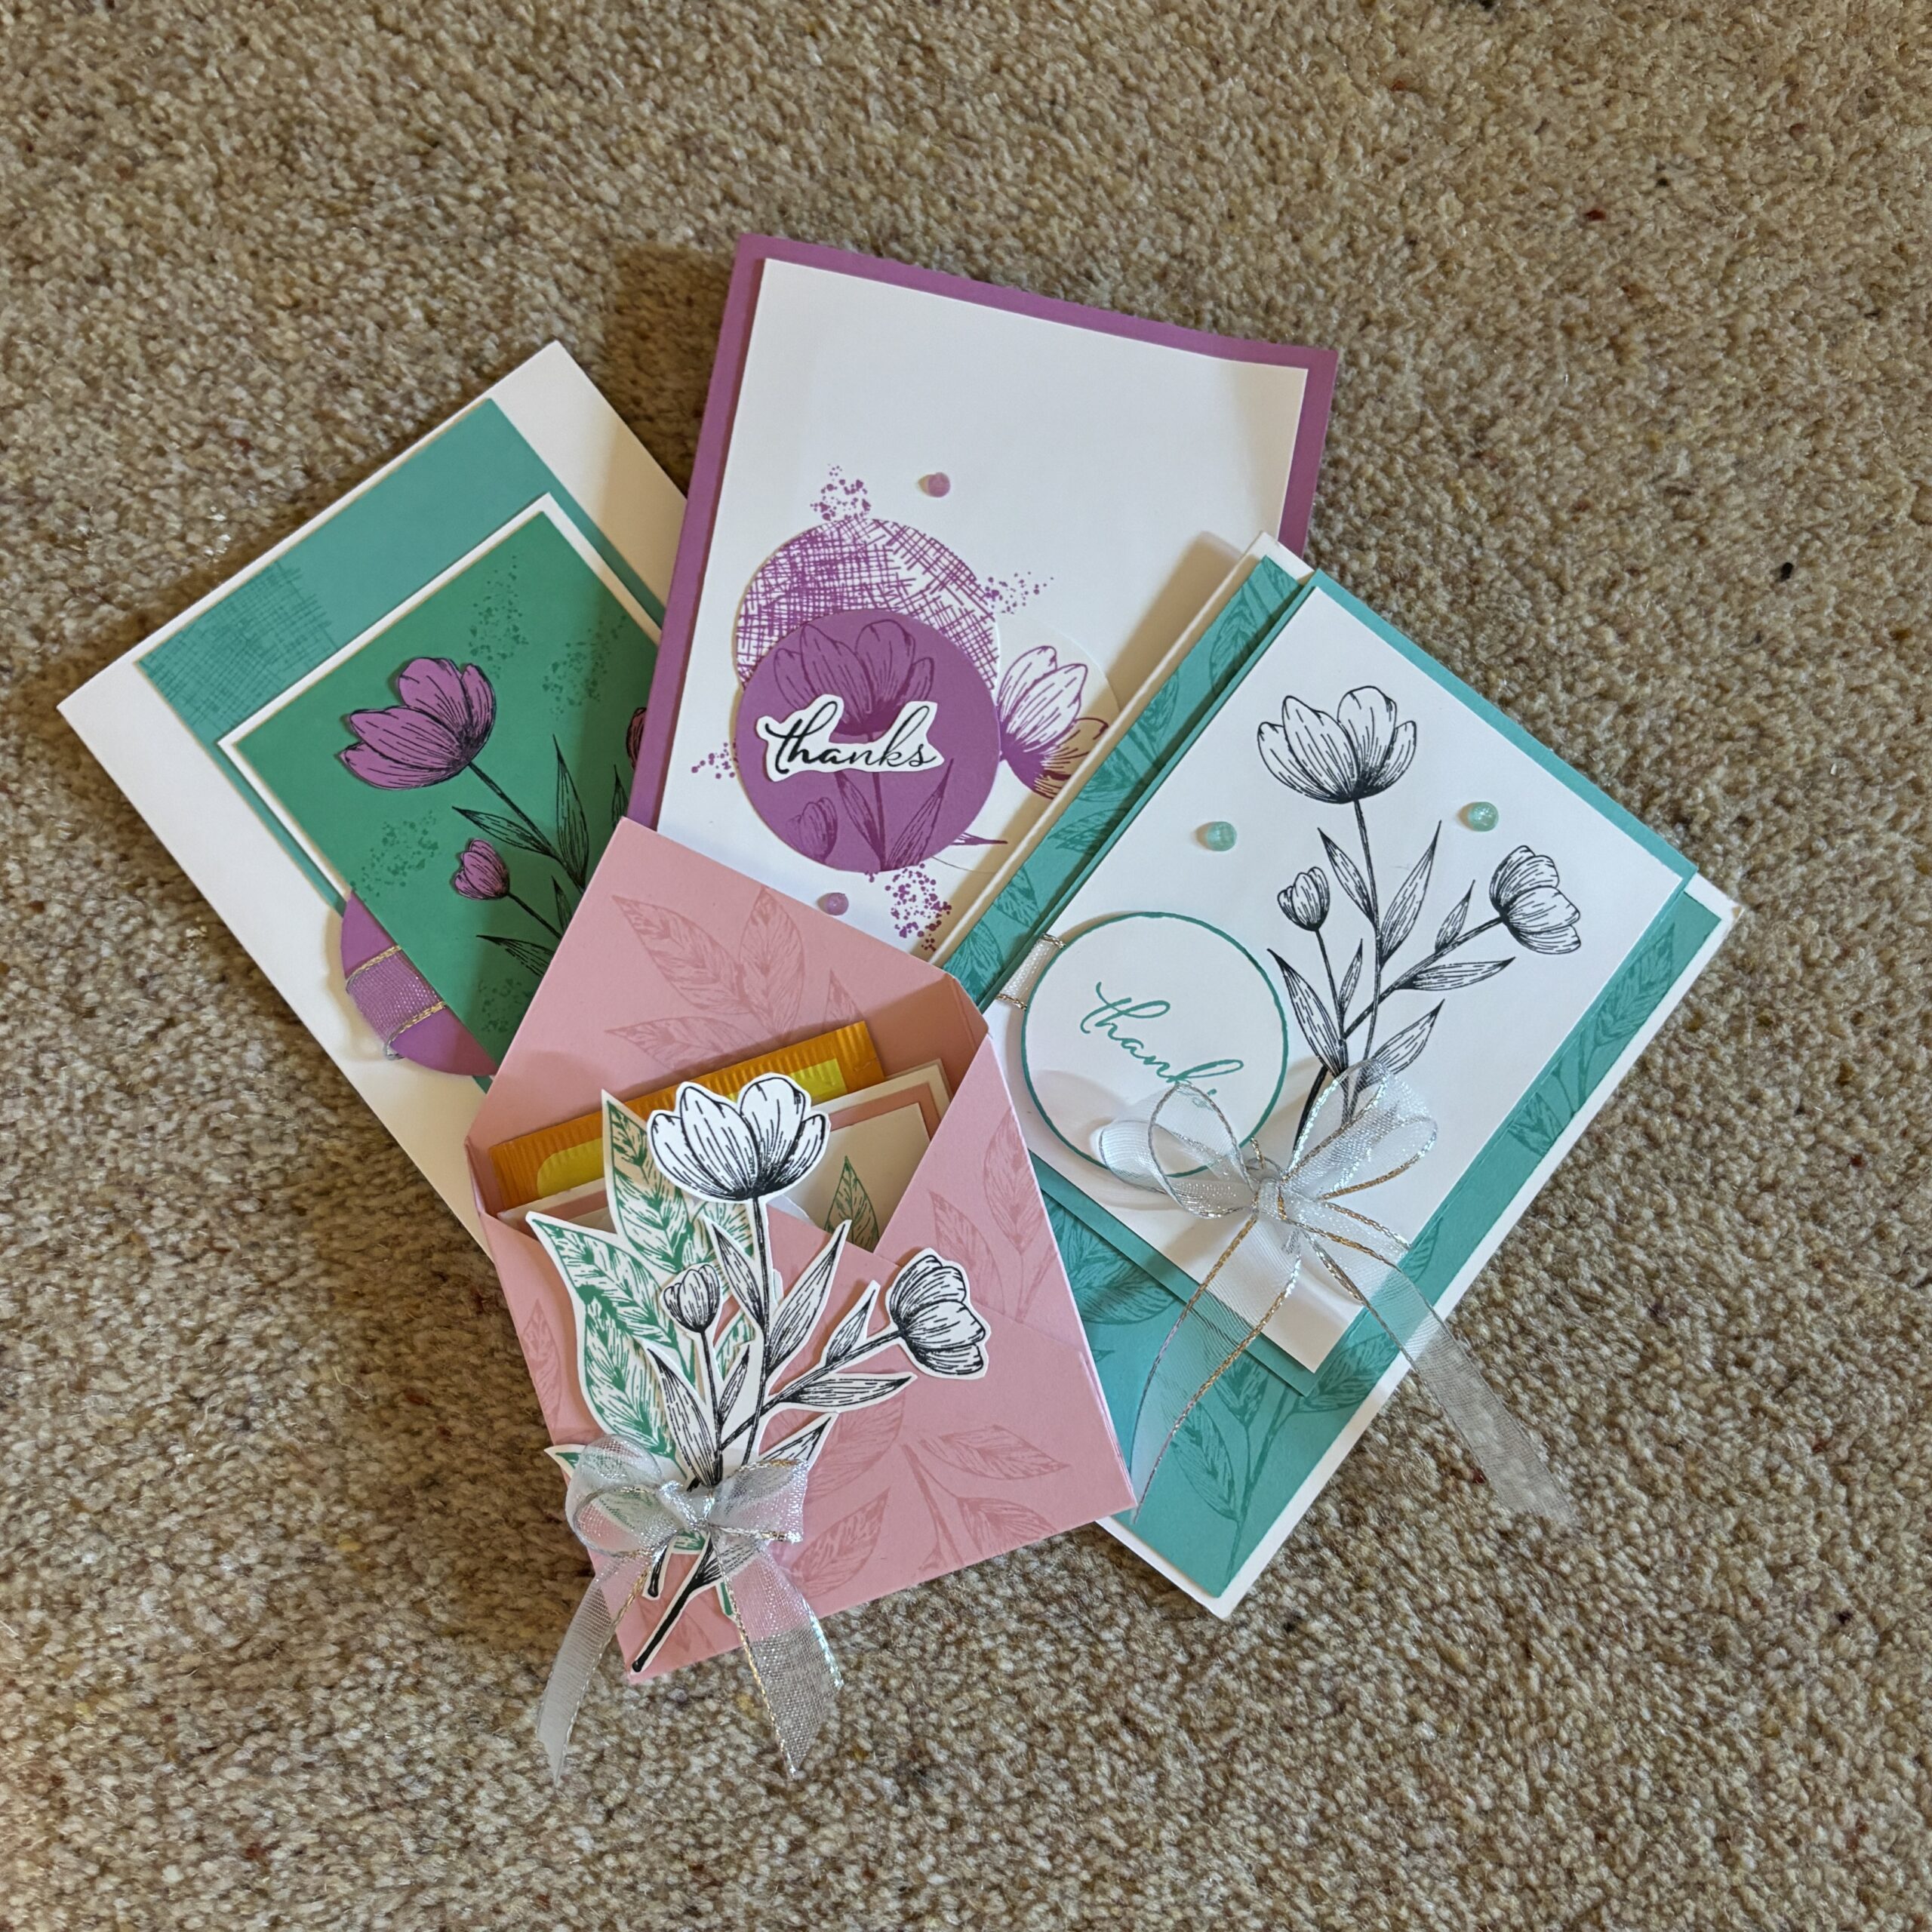
During the day, there was an opportunity to exchange ‘Swaps’ among other demonstrators. You decide whether to make any swaps, a few swaps or like me enough swaps for everybody there, including the lady from the kitchen who was cleaning up after us!
These are the swaps I made;
Make and Takes
During the day, 4 demonstrators had worked hard at making instructions for us all to make 4 different projects. the stamp set Spotlight on Nature was used on all 4 projects, and strangely I had used the same set for the majority of my swaps. We also used this years In color card and ink for the projects.
These are what we made on the day;
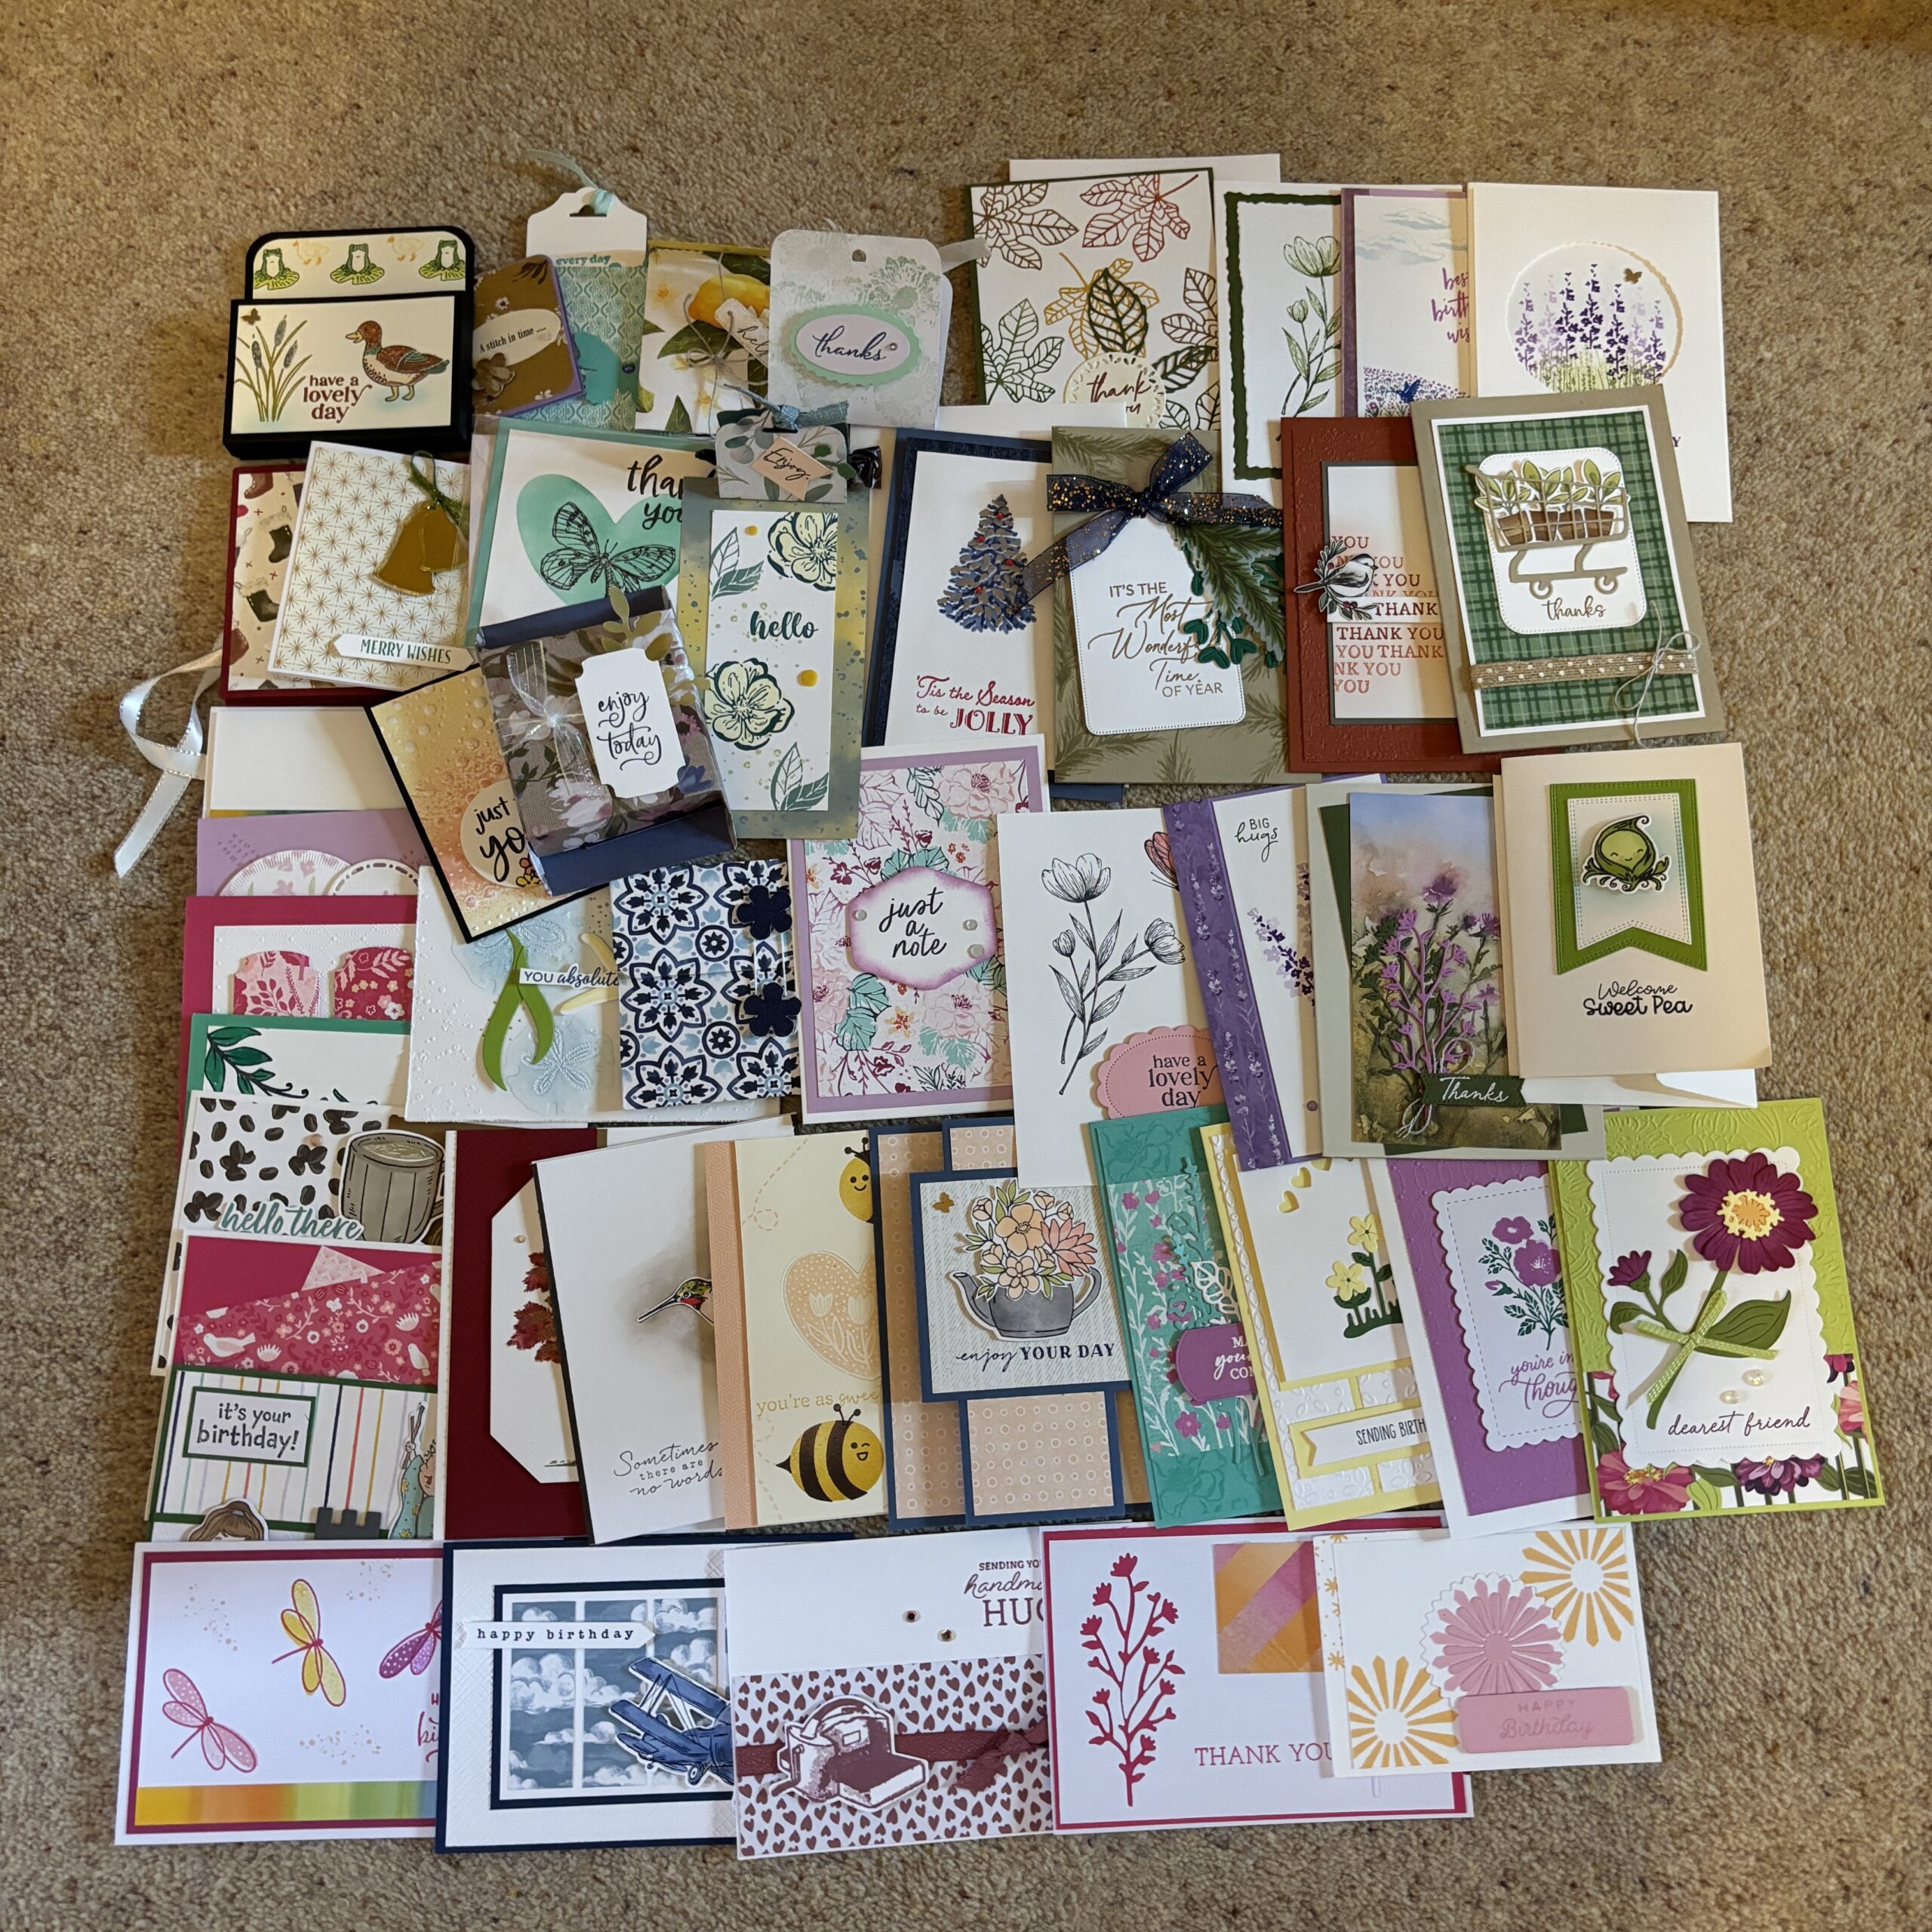
Swaps I Received;
Here are a selection of the swaps I received.
Lunch was a great time to talk to lots of people, share thoughts and ideas and generally put the world to rights!
During the afternoon, we had a couple of presentations, one about new products and workshop ideas and the other more about business building.
Over all, it was a fabulous day. I met lots of new people, got lots of inspiration and made several new friends. Here’s hoping they do more of these events!
Each month a lovely group of talented Stampin’Up! take part in a themed bloghop….its a great way to share our creativity with lots of people and hope you will follow the ‘hop’ by clicking on the links below. Some months I join in, but not always…..depending on other committments.
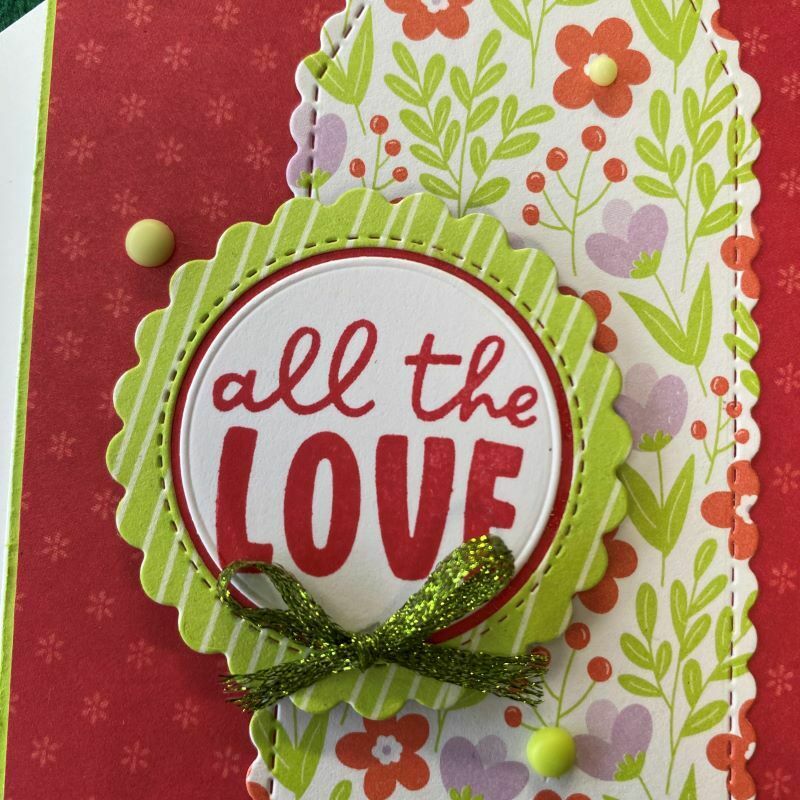
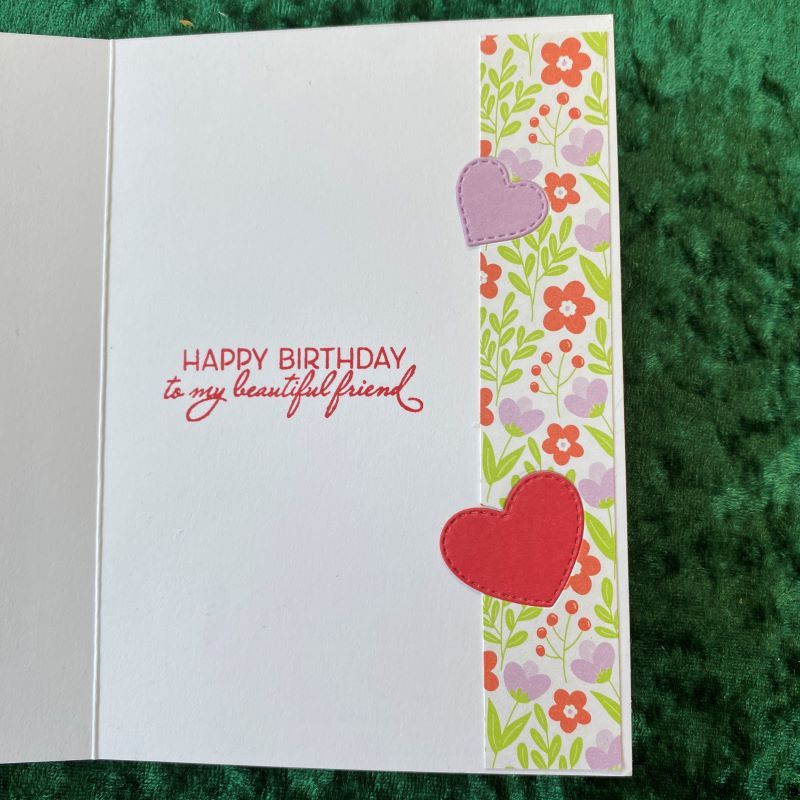
The theme for this months Bloghop is Love
I used the sentiment from Best Butterflies stamps and dies from the Give it a Whirl set for my card, and the colour palette of Sweet Sorbet and Parakeet Party. There is a full list of products that I used at the bottom of this post.
My card is inspired by my lovely friend, who is always bright and colourful and loves her ‘bling’.
The central panel is die cut using one of the Basic Border dies on a 5 1/2cm panel of designer series paper (DSP), from the Butterfly Kisses paper selection.
The back layer is using DSP from The Tea Boutique and the gorgeous Sweet Sorbet colour which I also used for the stamping on the front, inside and on the back panel.
I also added a panel of DSP to the inside of the card, but before adhering in place, I die cut 2 hearts from the edge of the panel, and then die cut a large heart in Sweet Sorbet and a smaller heart in Fresh Freesia and once the panel was stuck in place, I inlaid these hearts into the pre-cut ‘gaps’.
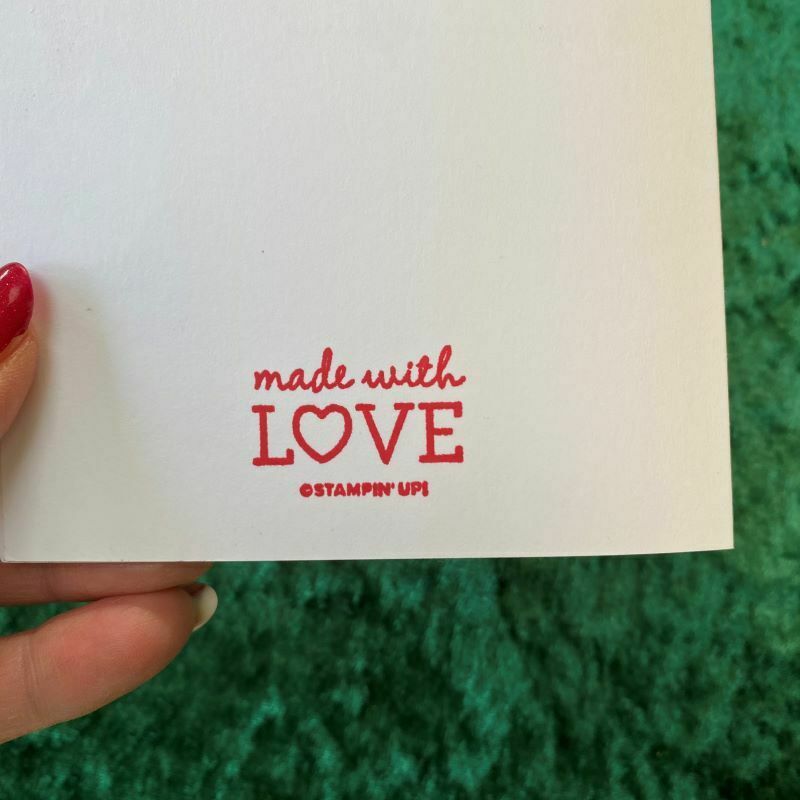
I die cut more hearts to embellish the front of the envelope, and then stamped on the back of the card with one of Stampin’ Up!s copyright stamped images. ‘Made with Love’ was very apt!!¬
I do love this years In colors and in particular, the lovely vivid Parakeet Party green and Sweet Sorbet. I used some of the Parakeet Party Metallic woven ribbon to embellish with a bow. I also added some Incolor Matte dots,
I do hope you enjoyed looking at my creation and it would be great if you could leave a comment – I love to read them! Don’t forget to support other demo’s by hopping over to their blogs using the links below;
Love the products that you’ve seen me use? You can order from me here or alternatively by clicking on any of the products that I’ve used that are listed below.
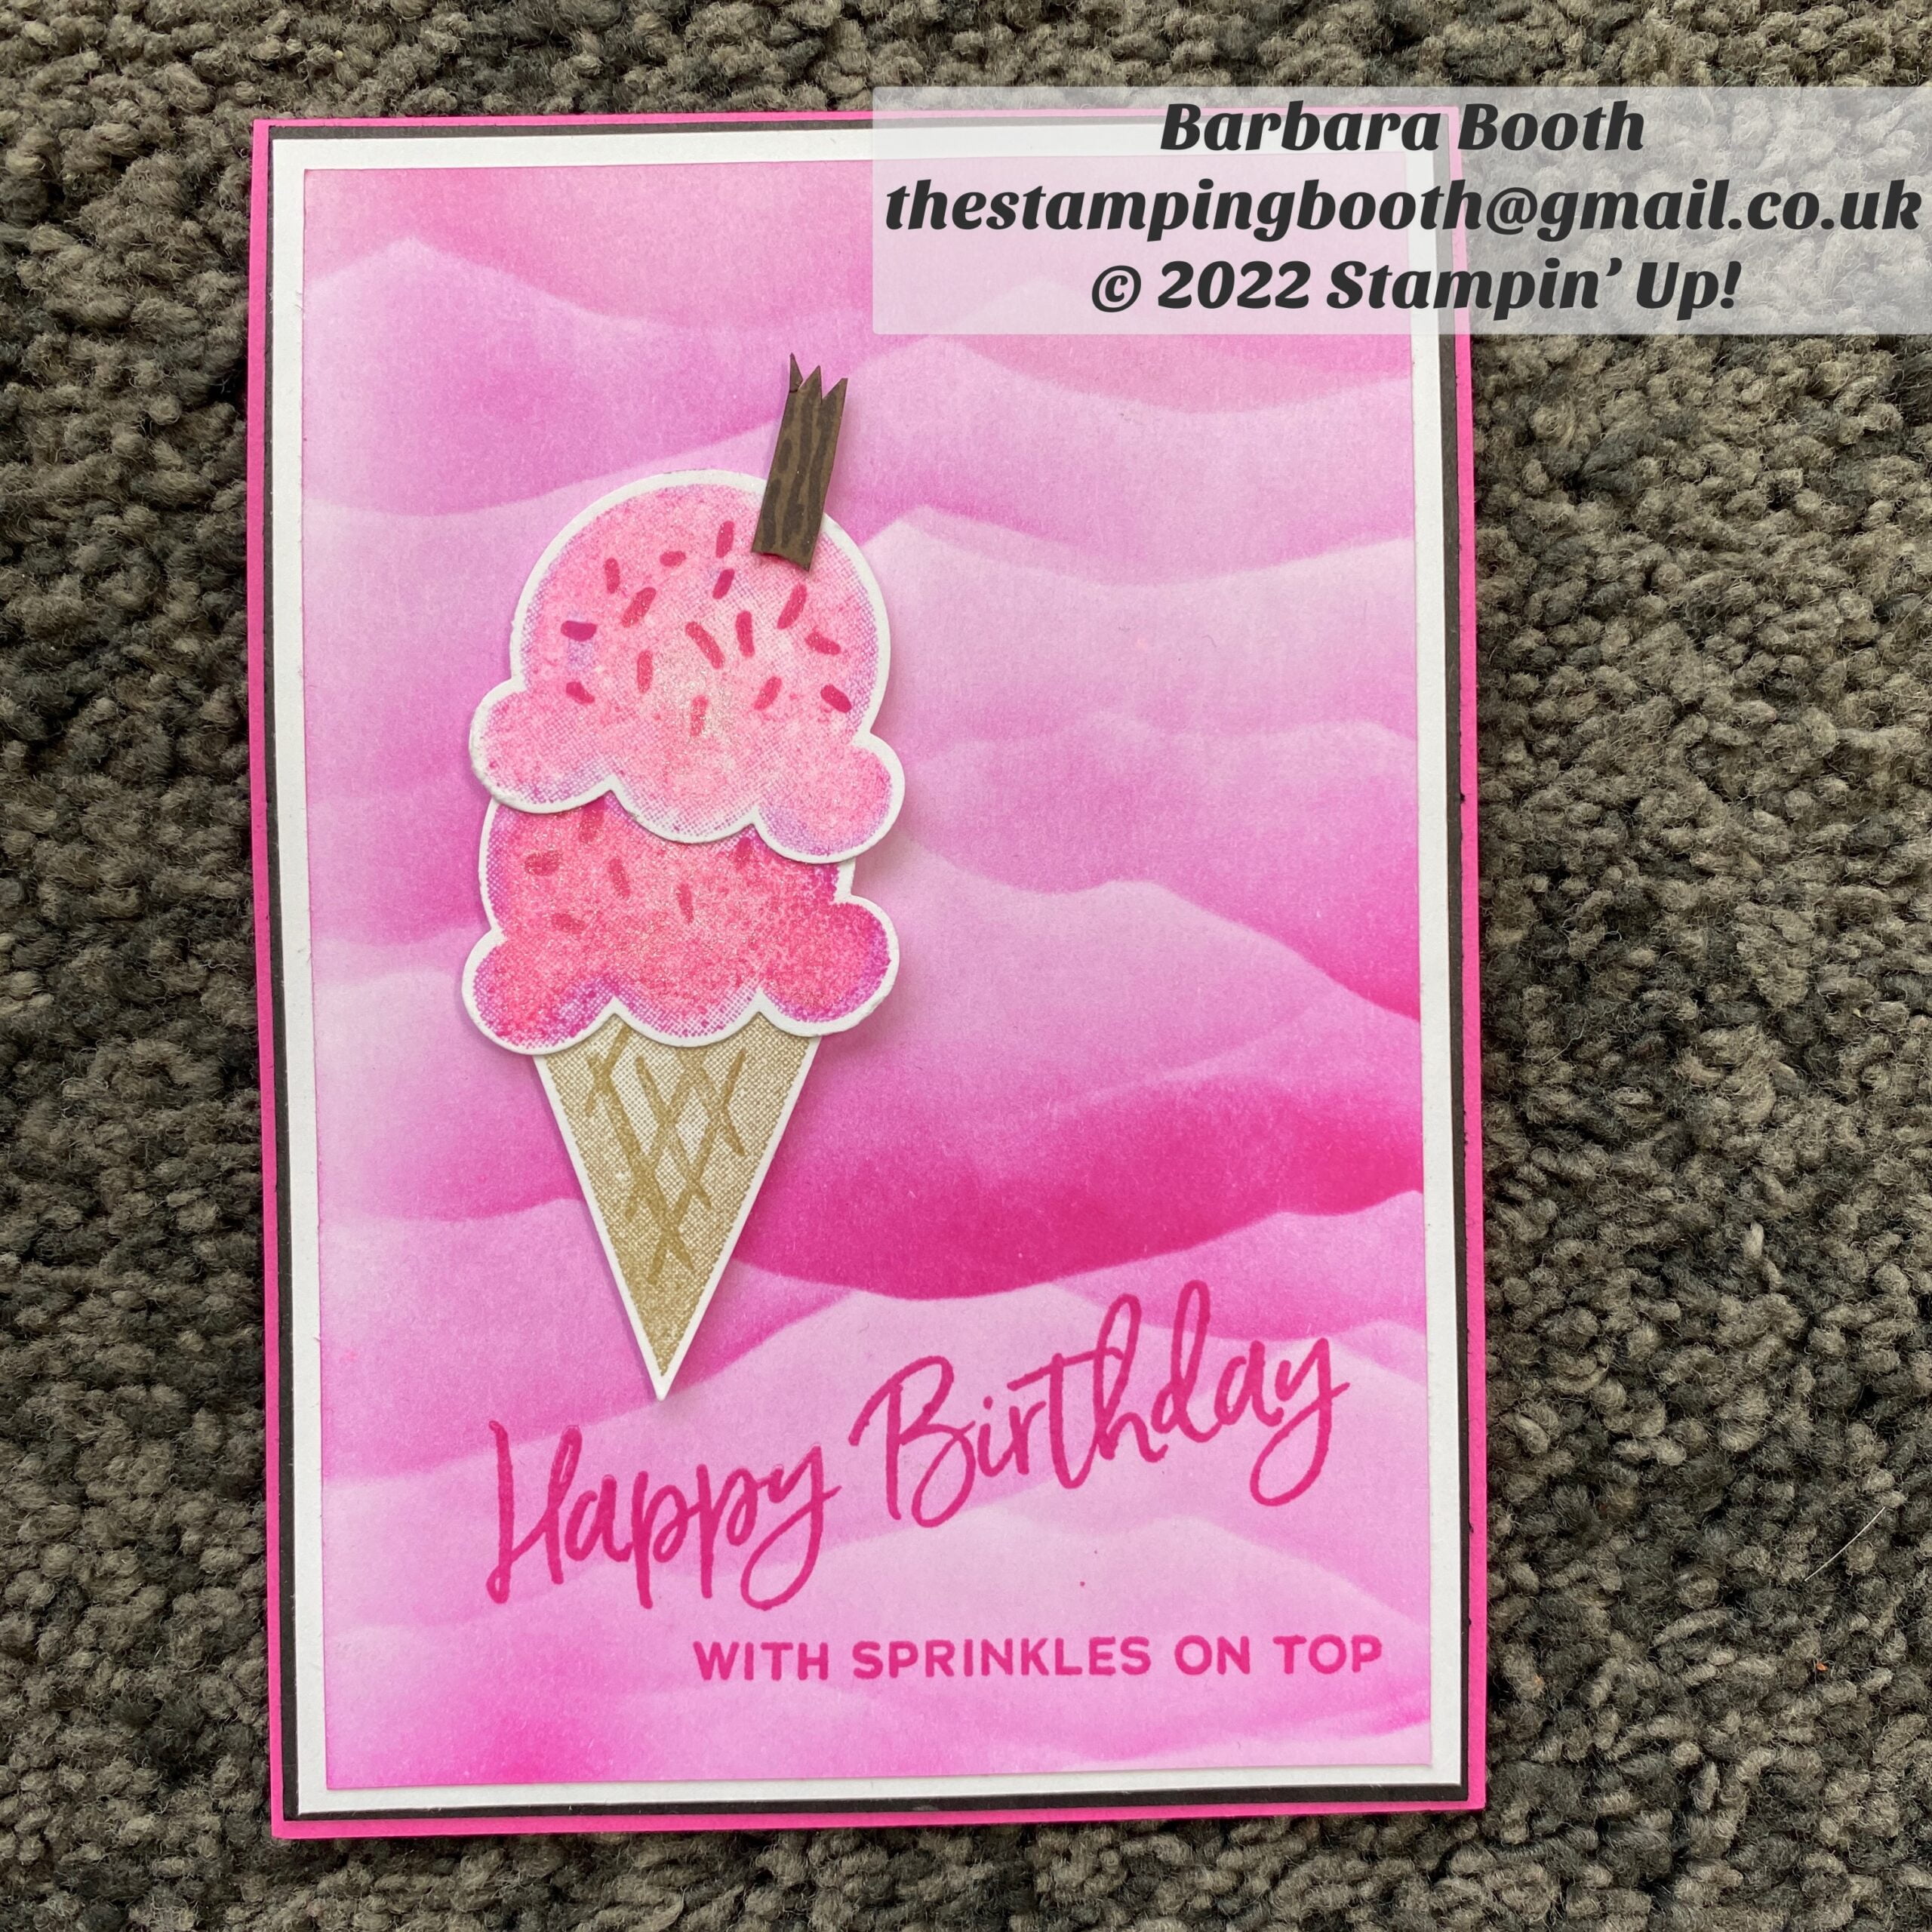
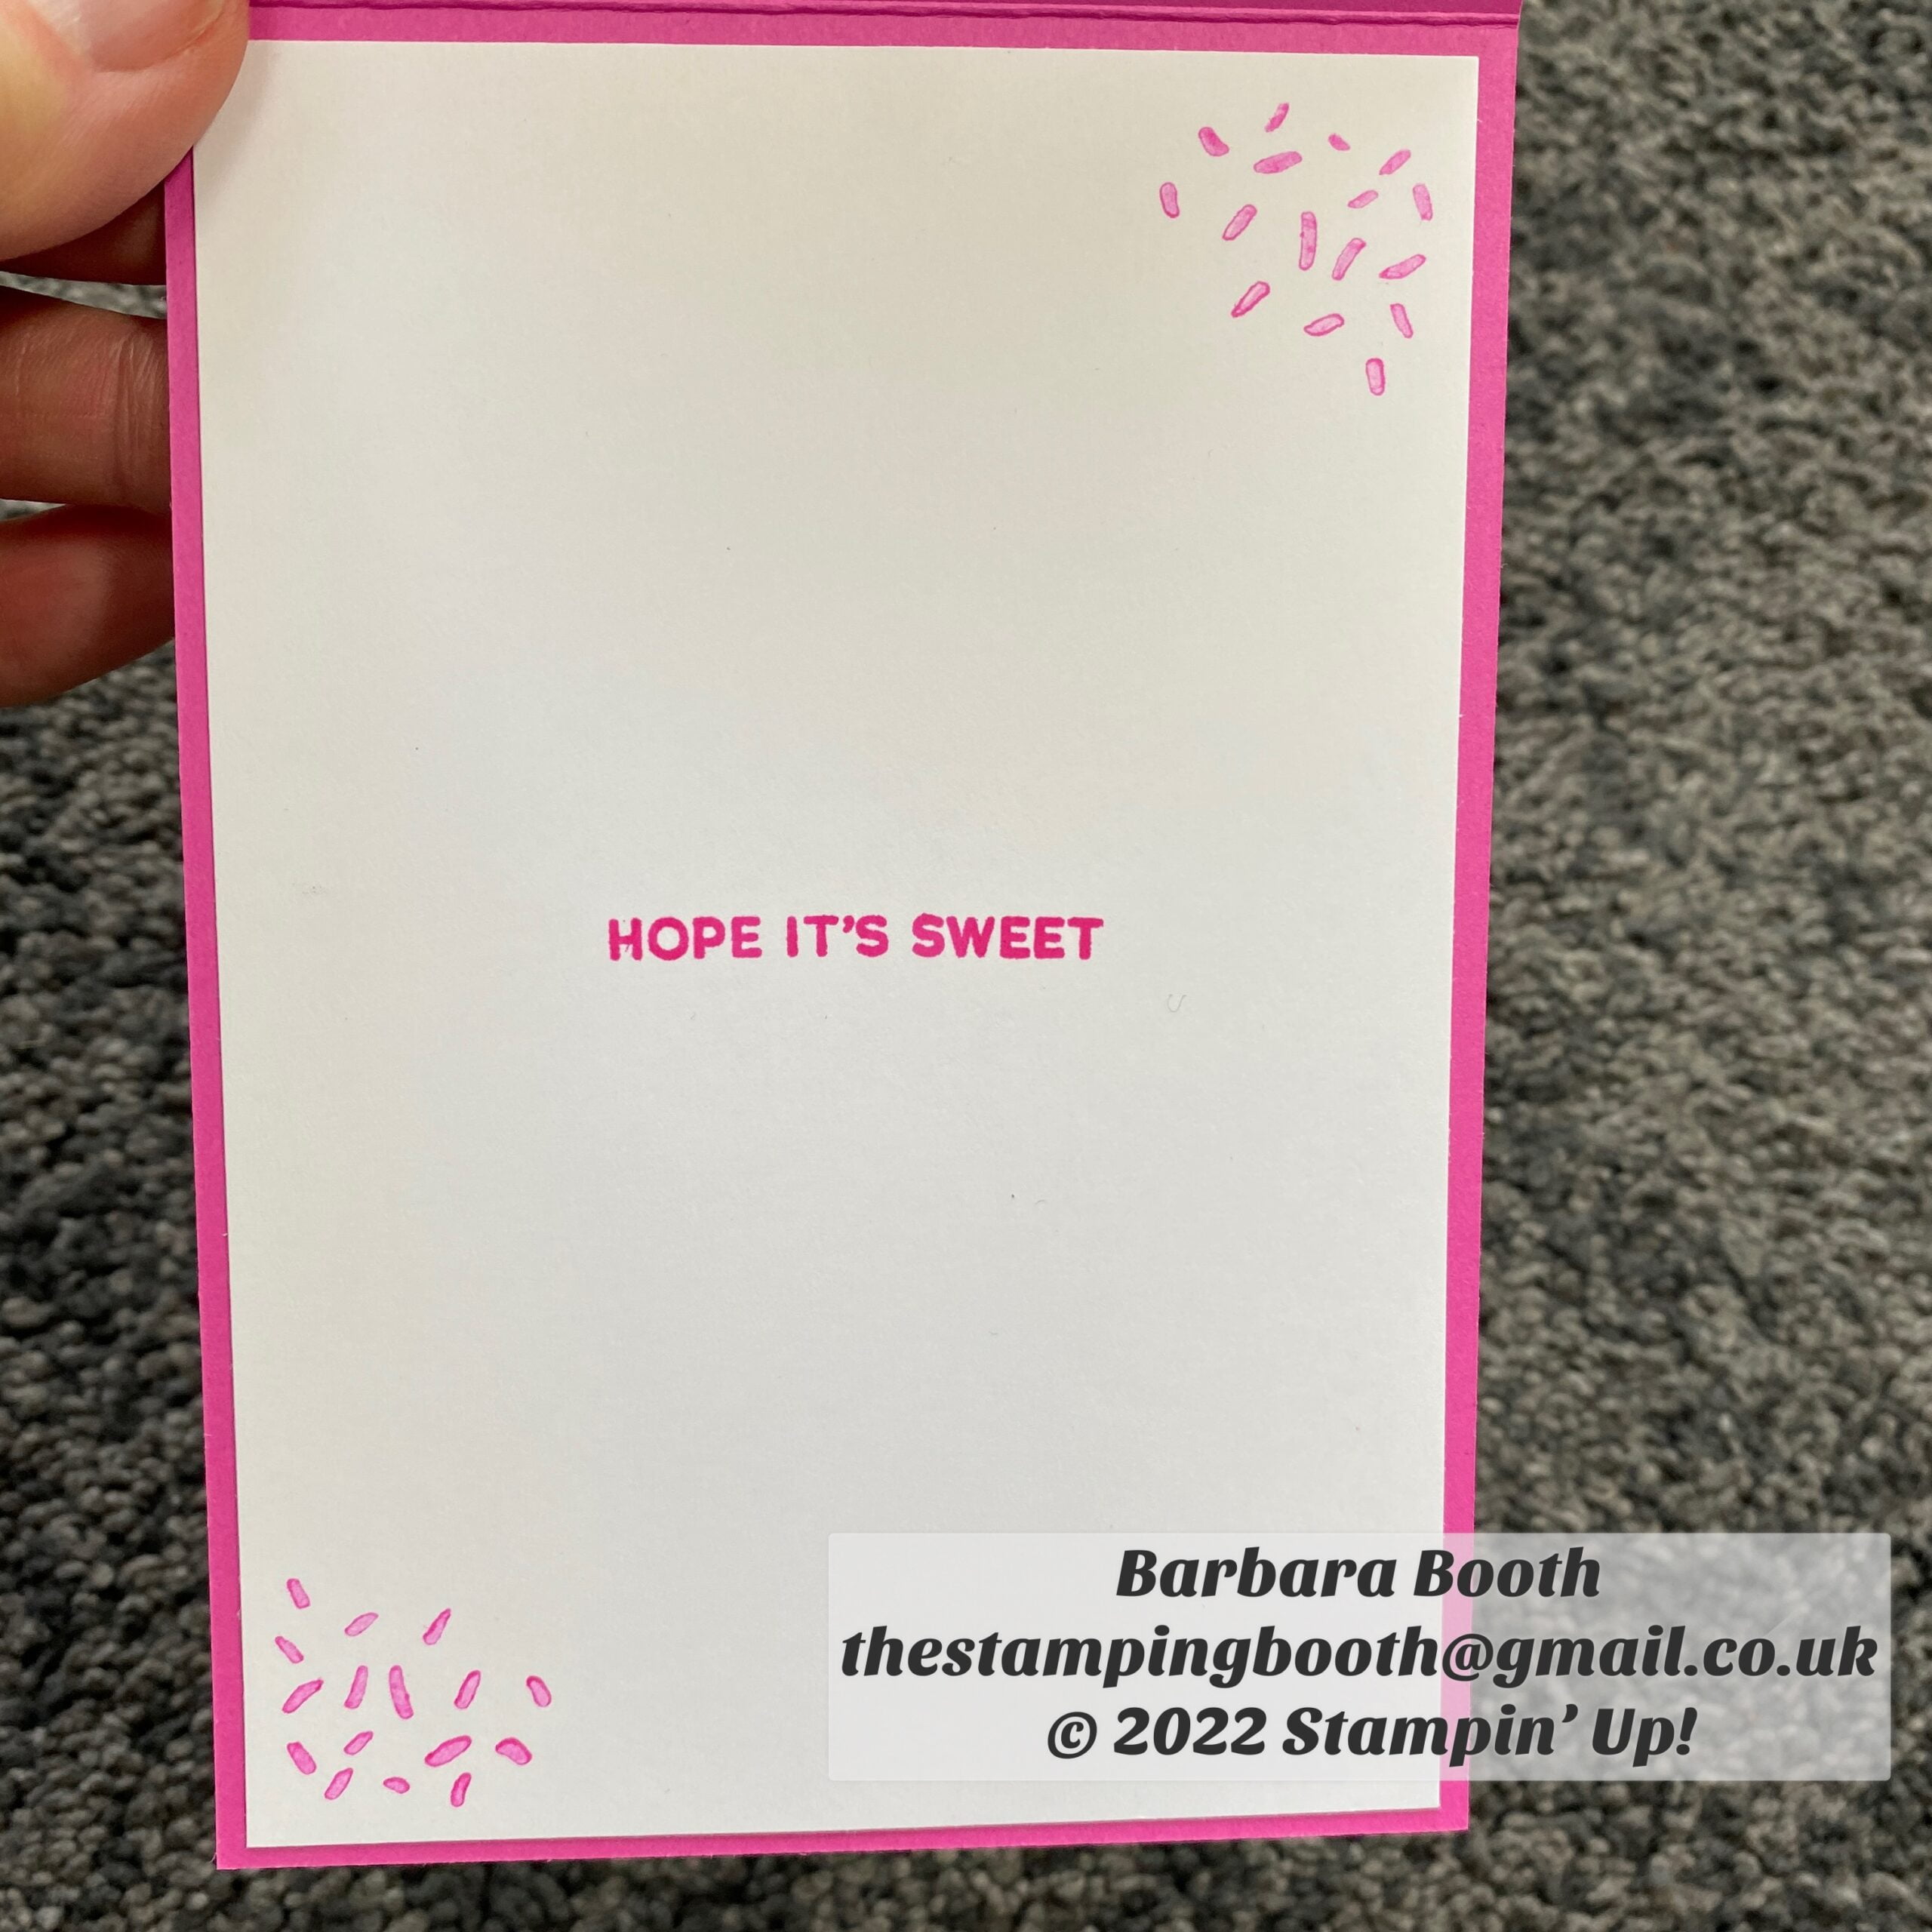
For the very first time, I’ve decided to join in the Tech 4 Stampers Academy bloghop. The theme this month is Pretty in Pink and there are so many pretty pinks to choose from from Stampin’ Up! The Sweet Ice Cream stamps and punch I thought were perfect for this, especially with the better weather approaching.
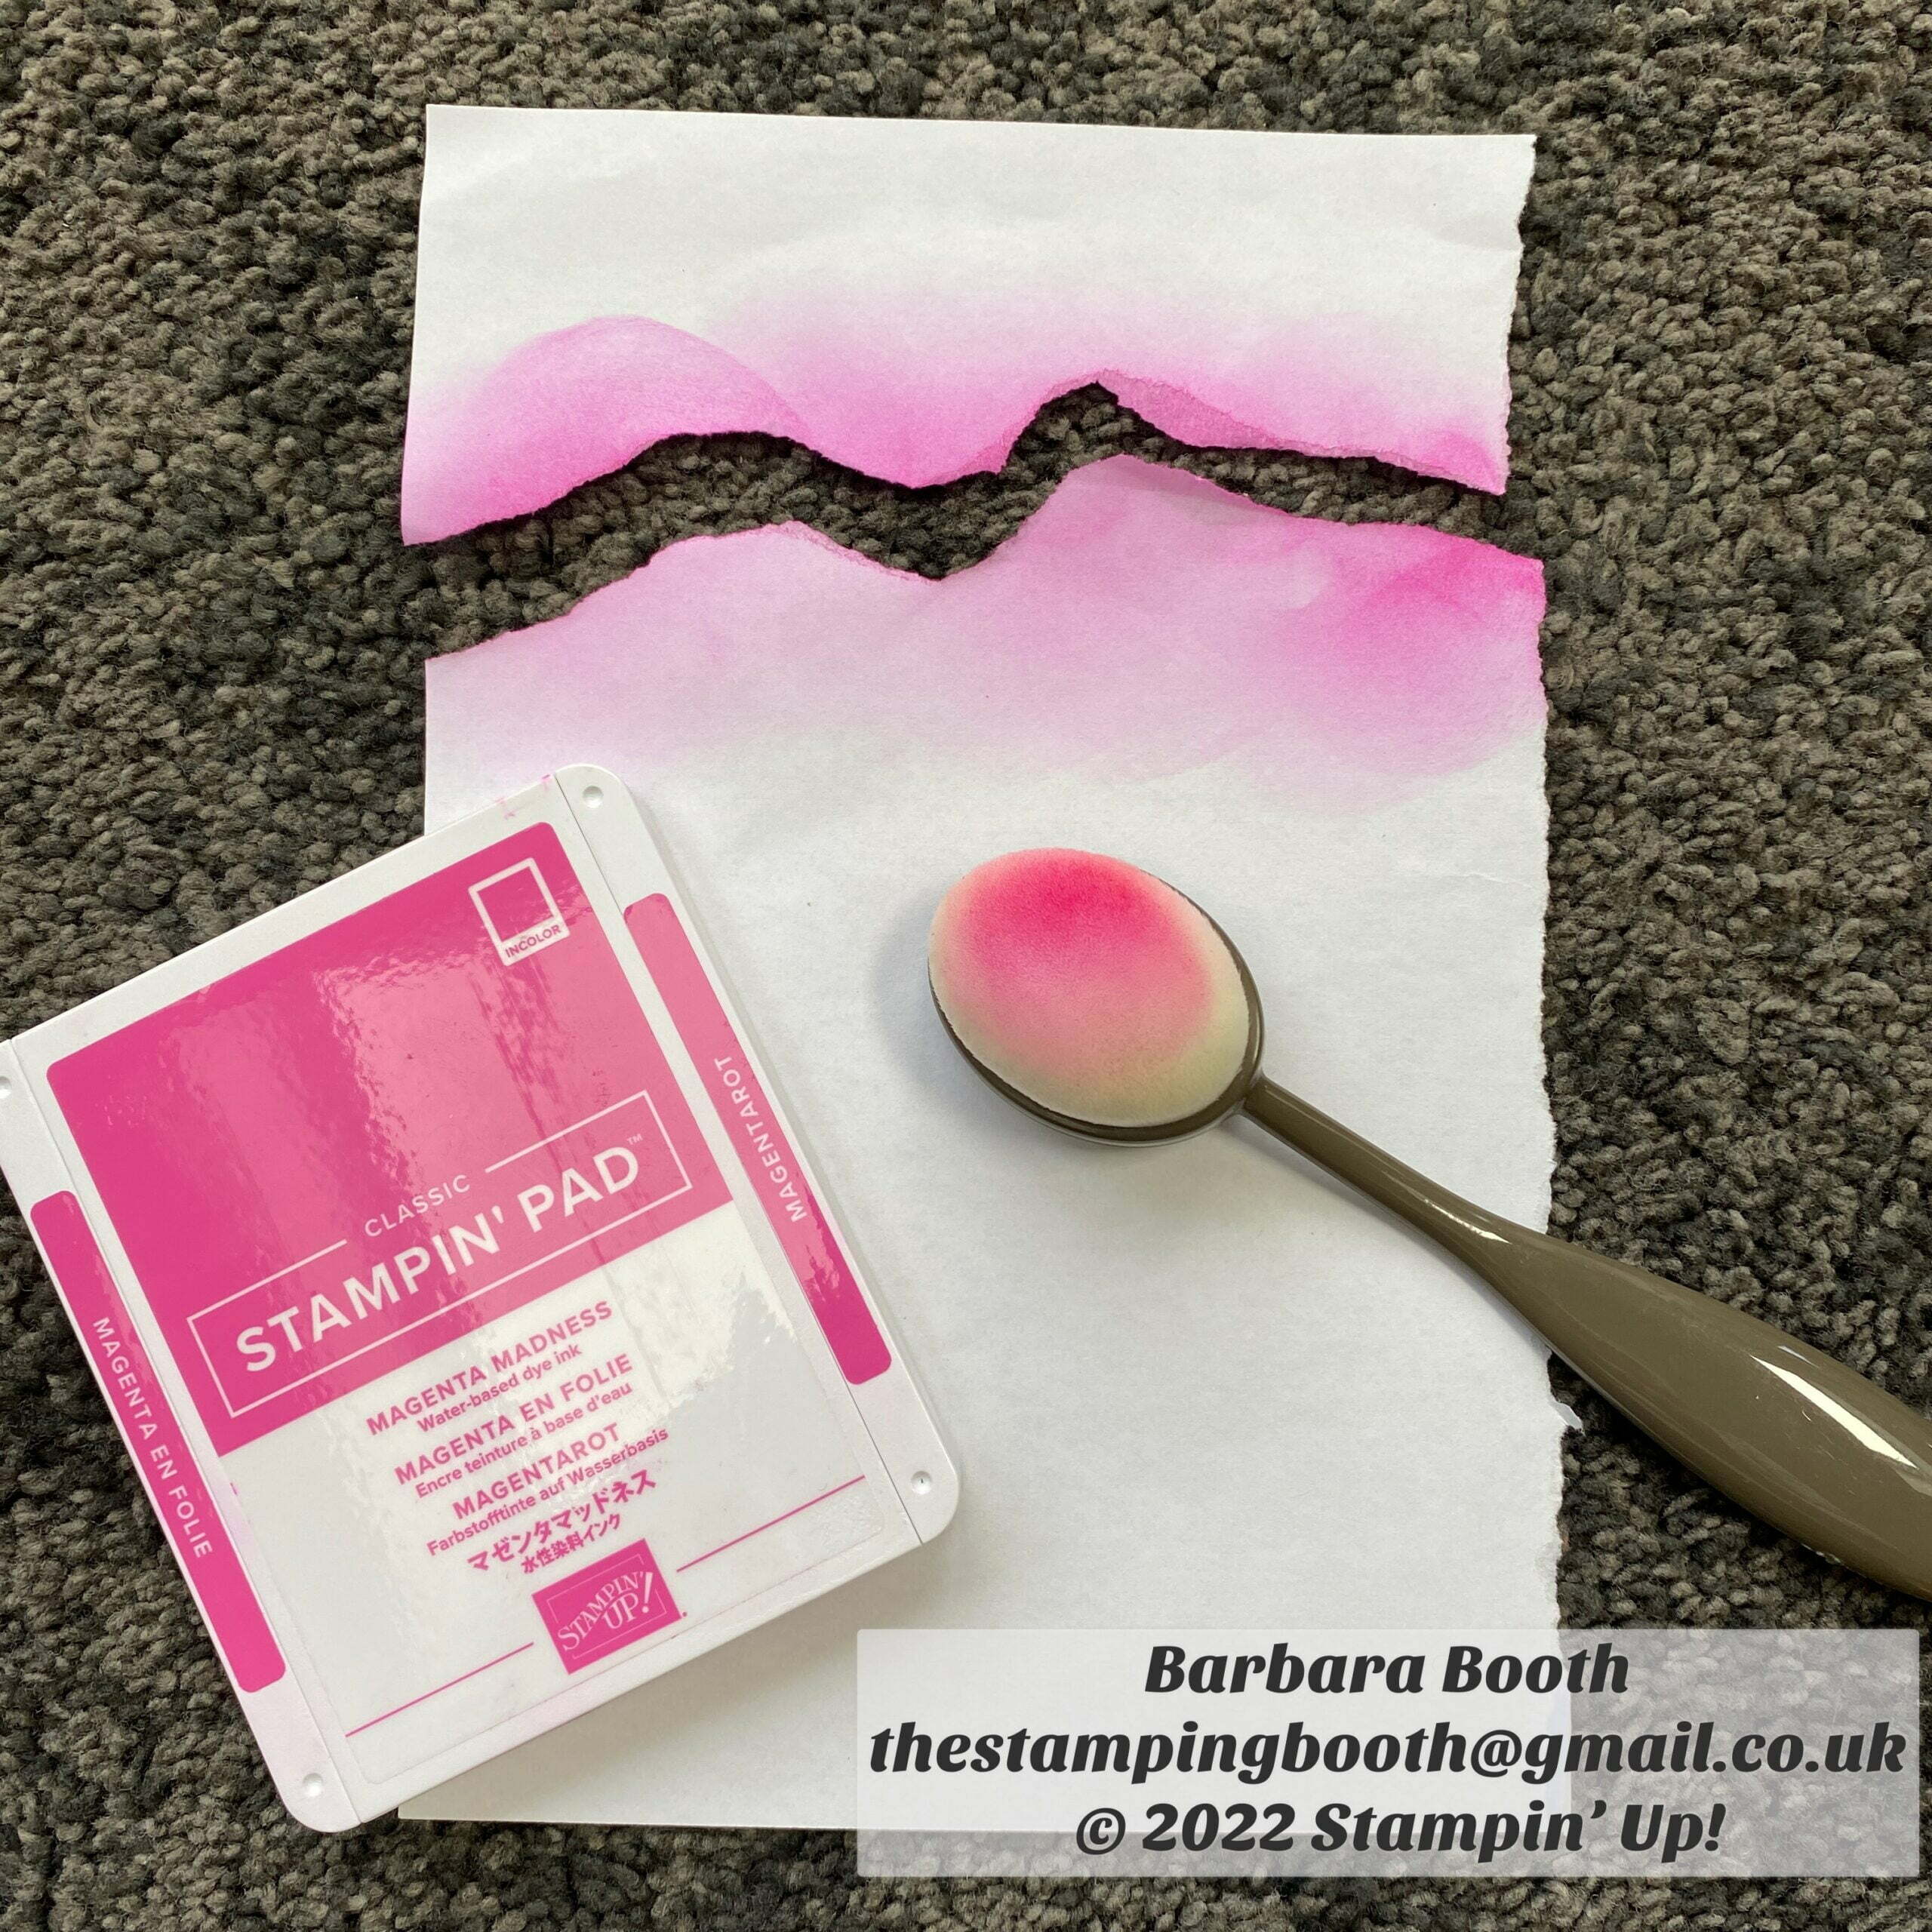
After much deliberation and playing with lots of shades from my collection, I plumped for using the soon to be retired Magenta Madness ink and card stock. Unfortunately, since I made my card, the Magenta Madness ink has sold out, but this technique would work with any bright shade of pink…..Polished Pink, Melon Mambo etc.
I wanted to make a birthday card for an Ice Cream loving friend, so opted for the Sweet Ice Cream stamps and punch.
I began by tearing a sheet of copier paper carefully in a zigzag motion to give a ragged edge to the paper. Starting at the top of a piece of basic white cardstock, I placed the jagged edge on the card and using a blending brush covered the visible card with Magenta Madness ink. I kept moving the card down and in different angles and used the other piece torn from the paper and turned them over to give different waves until all of the card was covered.
I stamped the cone for the Ice Cream in Crumb Cake ink and punched it out with the co ordinating punch. The Ice creams again are in Magenta Madness, but you may notice that the colour looks a little different. This is because I used Wink of Stella on them after I had punched them out and this softens the colour but gives a lovely glimmer to the Ice Cream.
I added an Early Espresso flake to my Ice Cream – you can’t have an Ice Cream without!!
The sentiment too is in Magenta Madness, and then the card was layered onto some basic white and black card, and finally adhered to the Magenta Madness card base.
On the inside I added a basic white insert and stamped a little greeting and some ‘sprinkles’, all from the same stamp set.
This Photopolymer stamp set is currently in the sale, and also features Ice Lolly stamps. Want to find out more, then click here.
I hope my friend loves it…..I might take her an Ice Cream around with her birthday card…that would be fun!
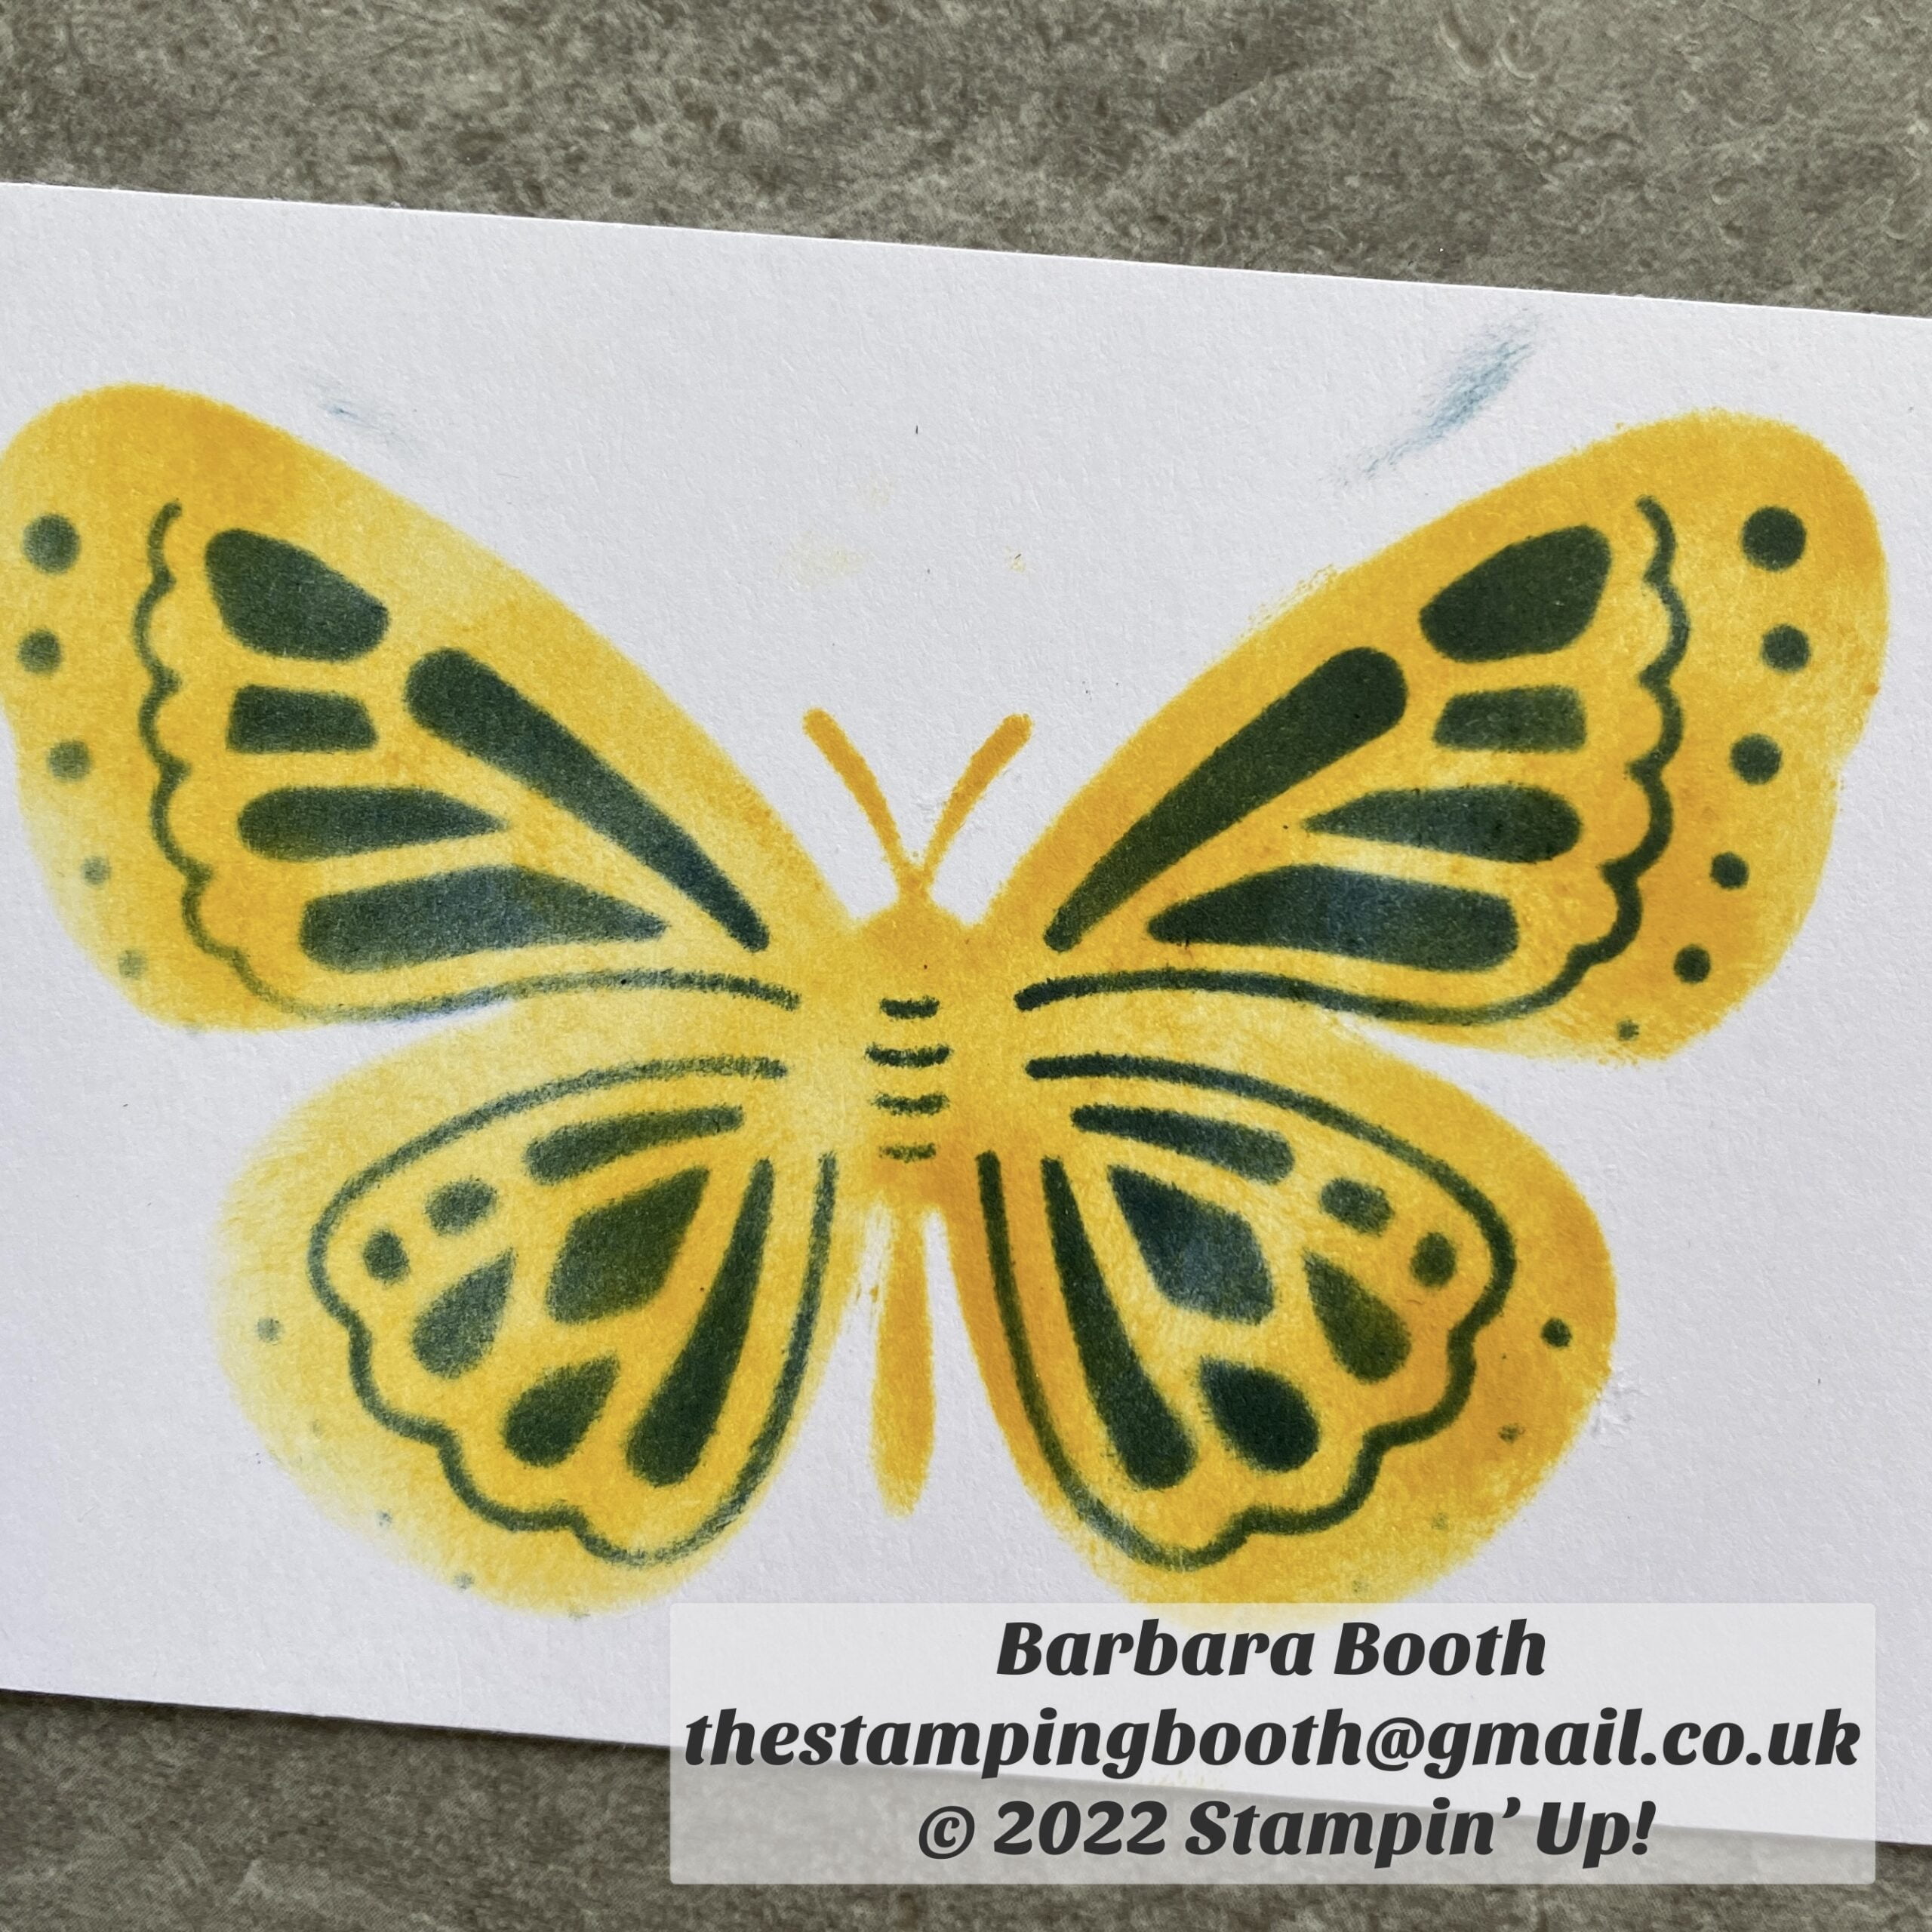
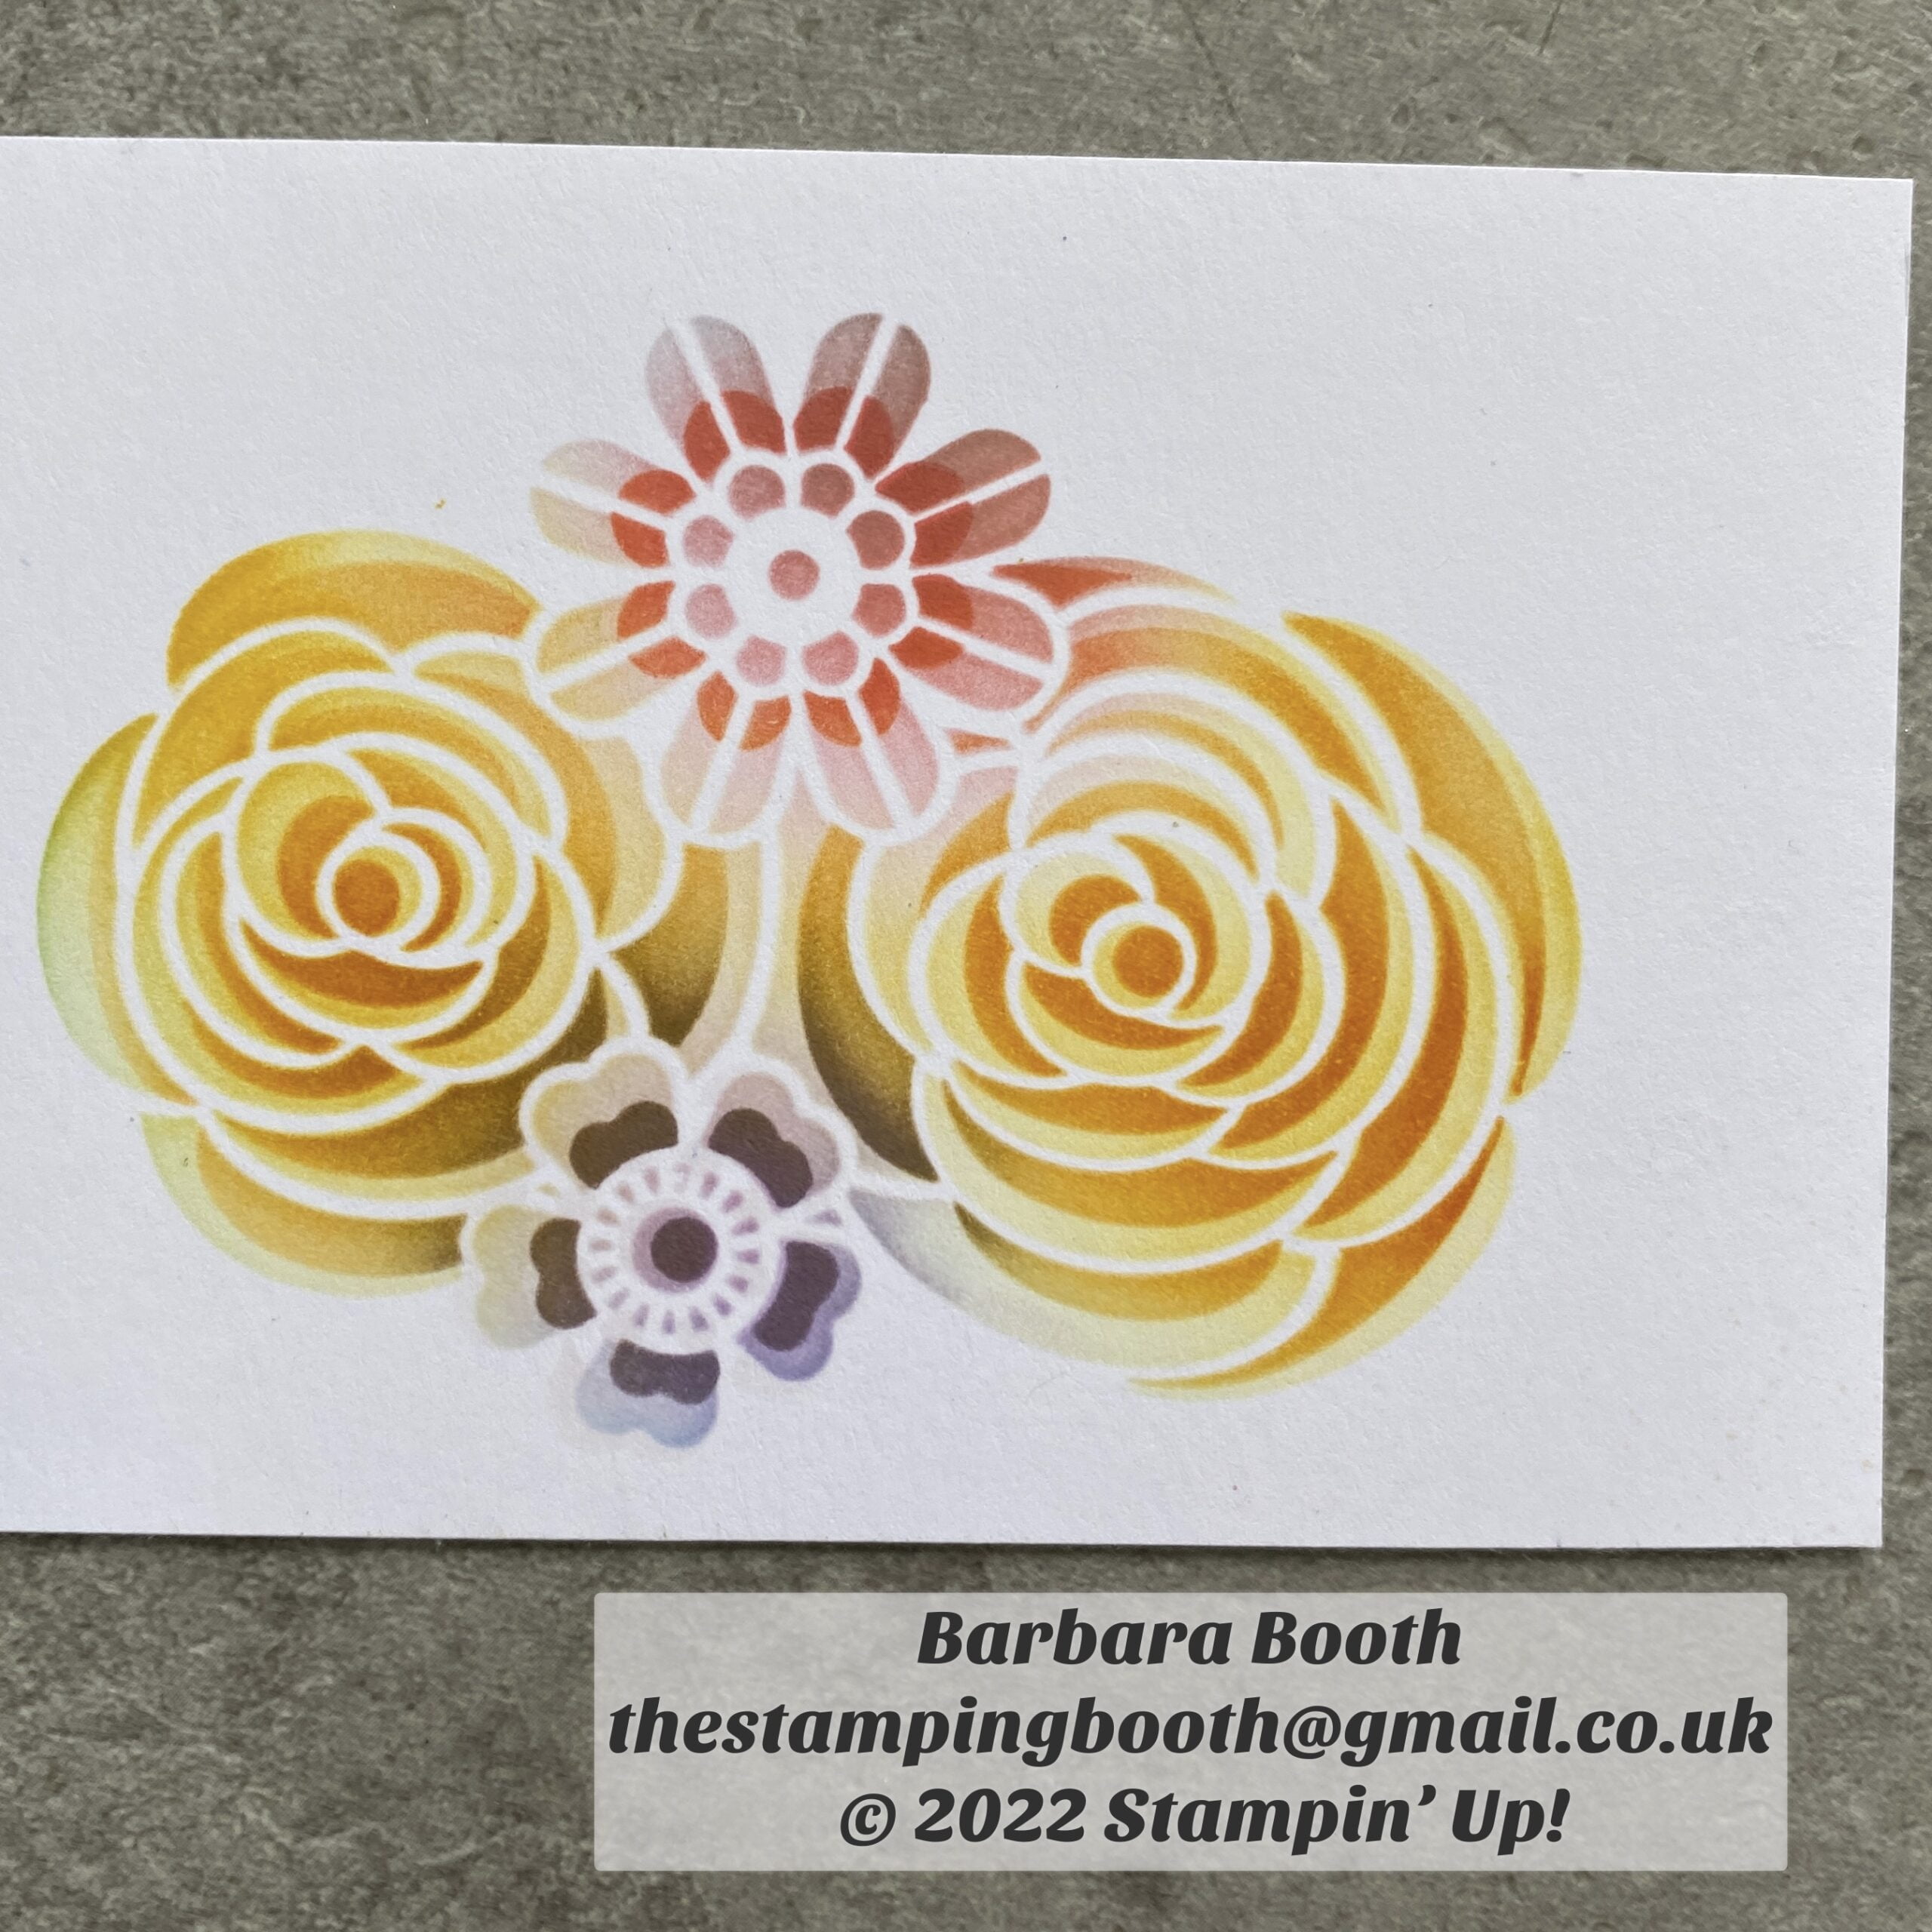
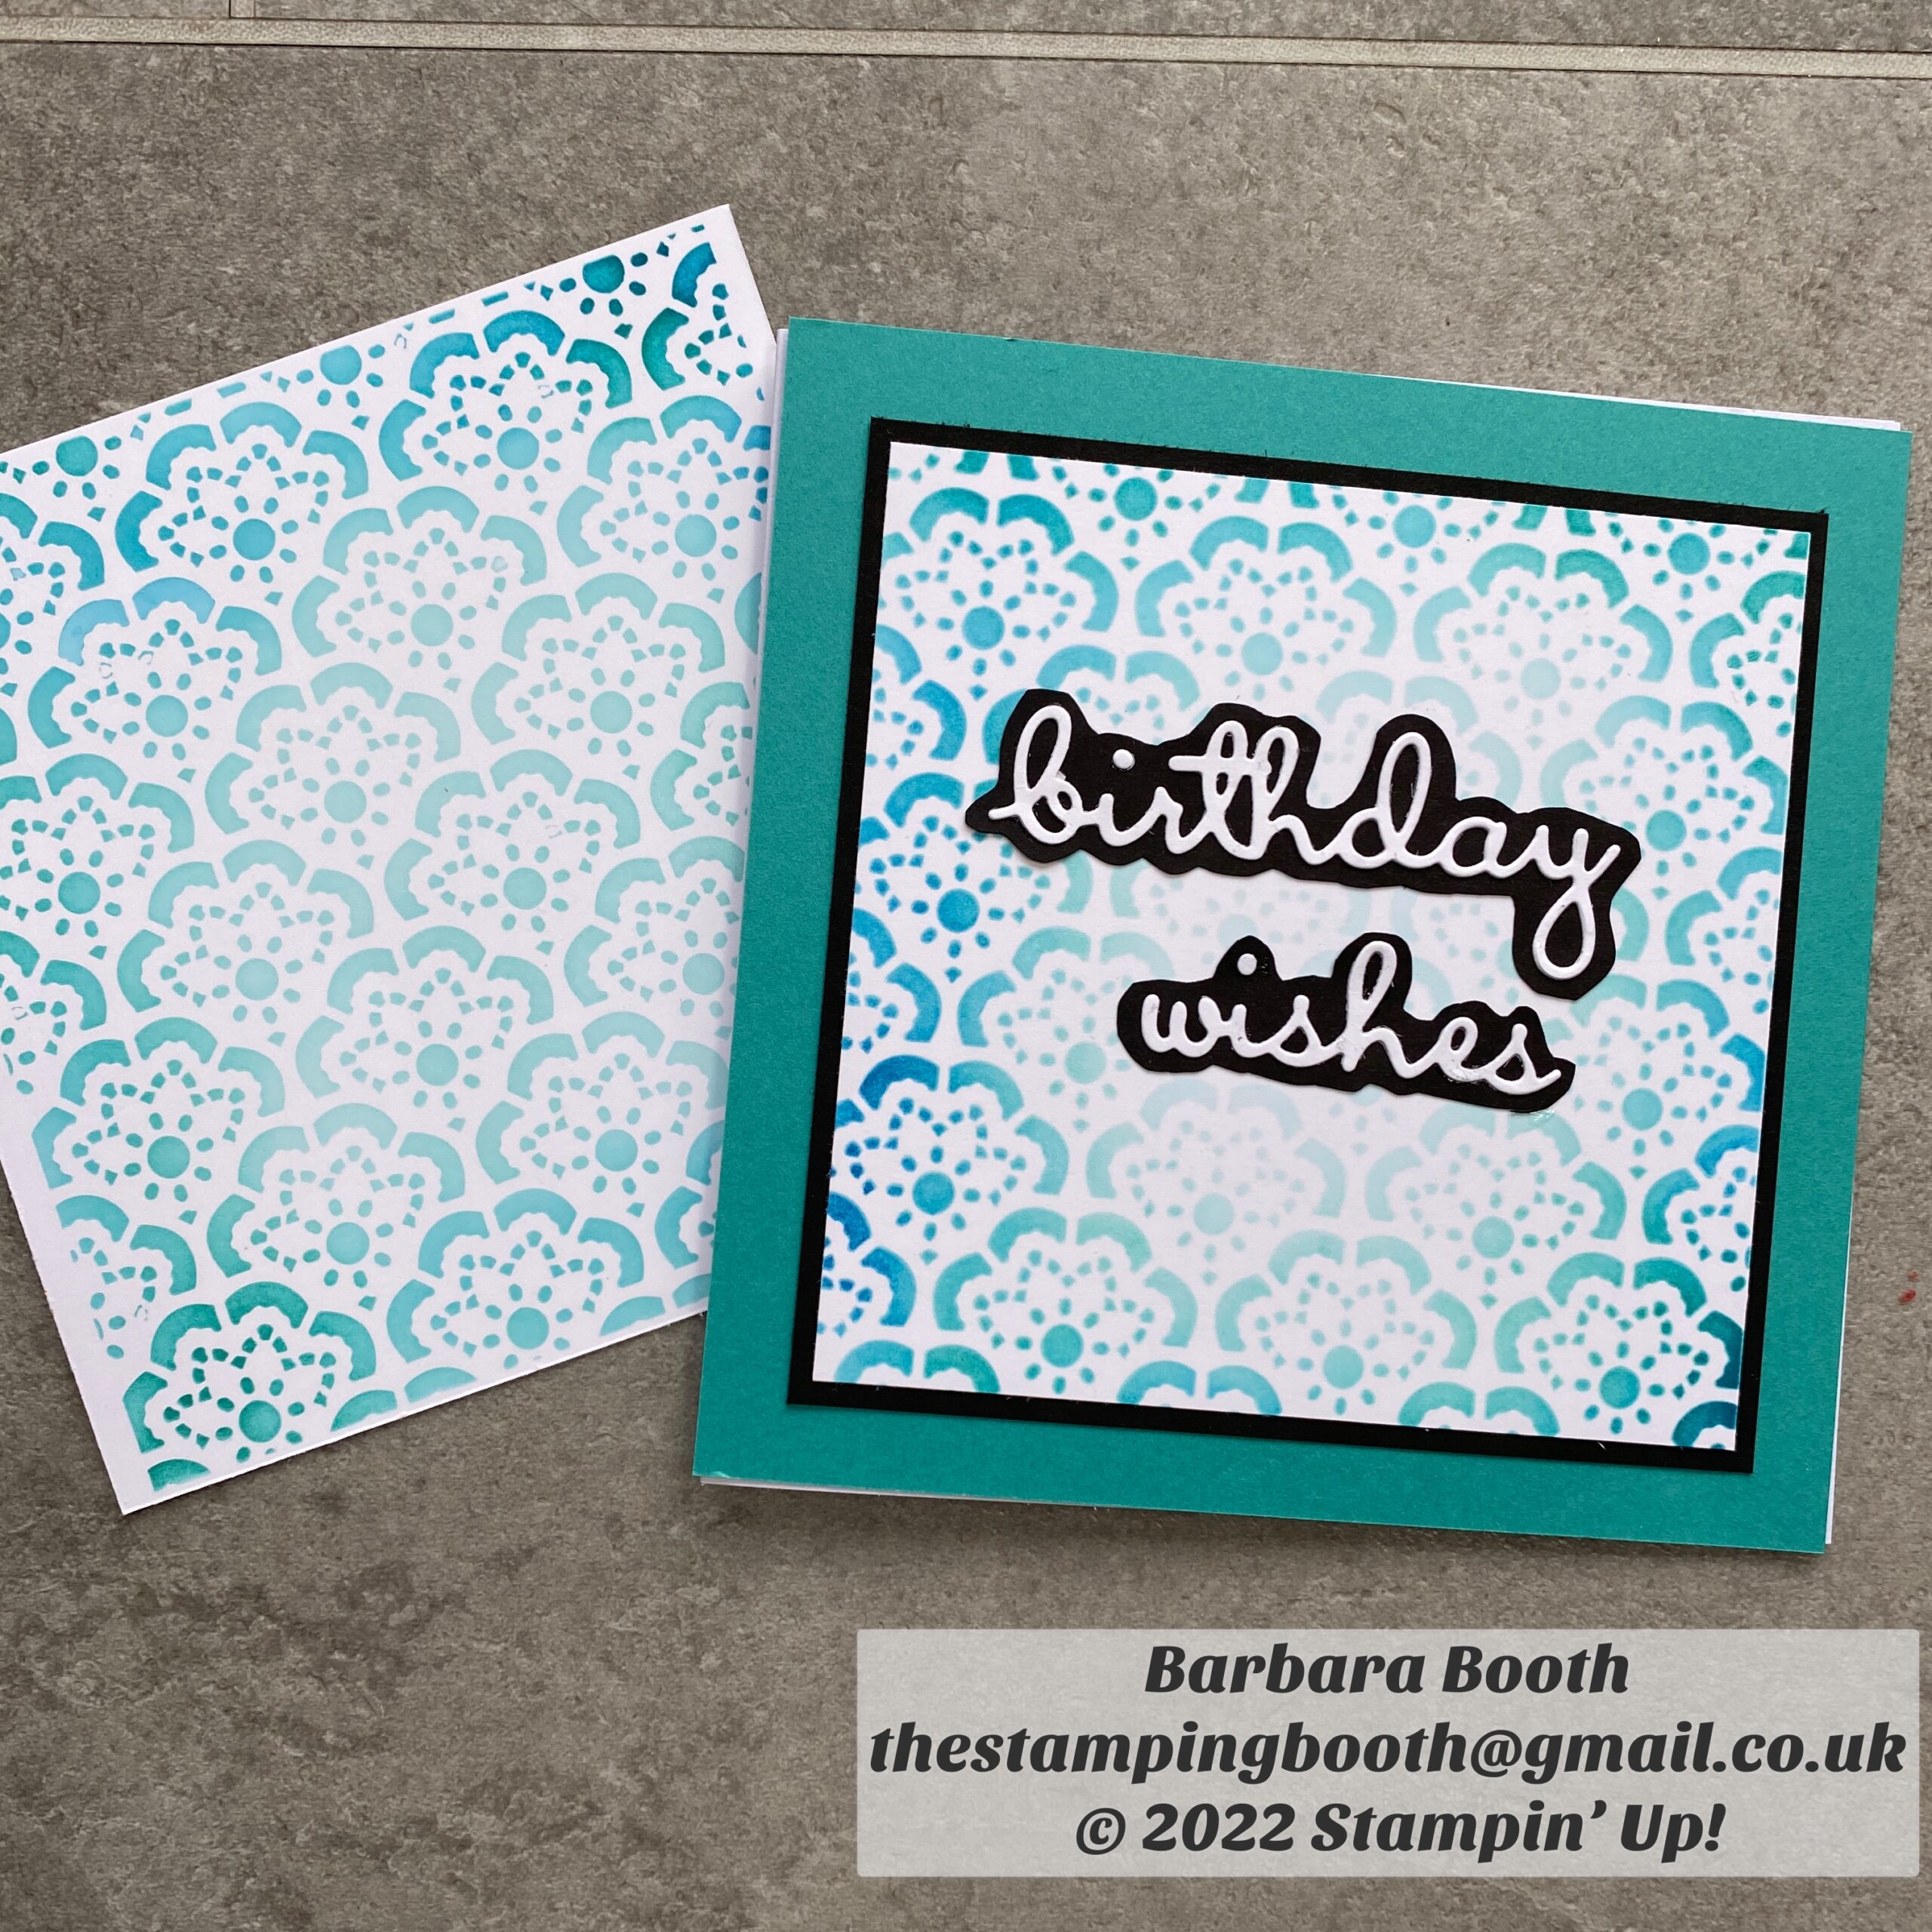
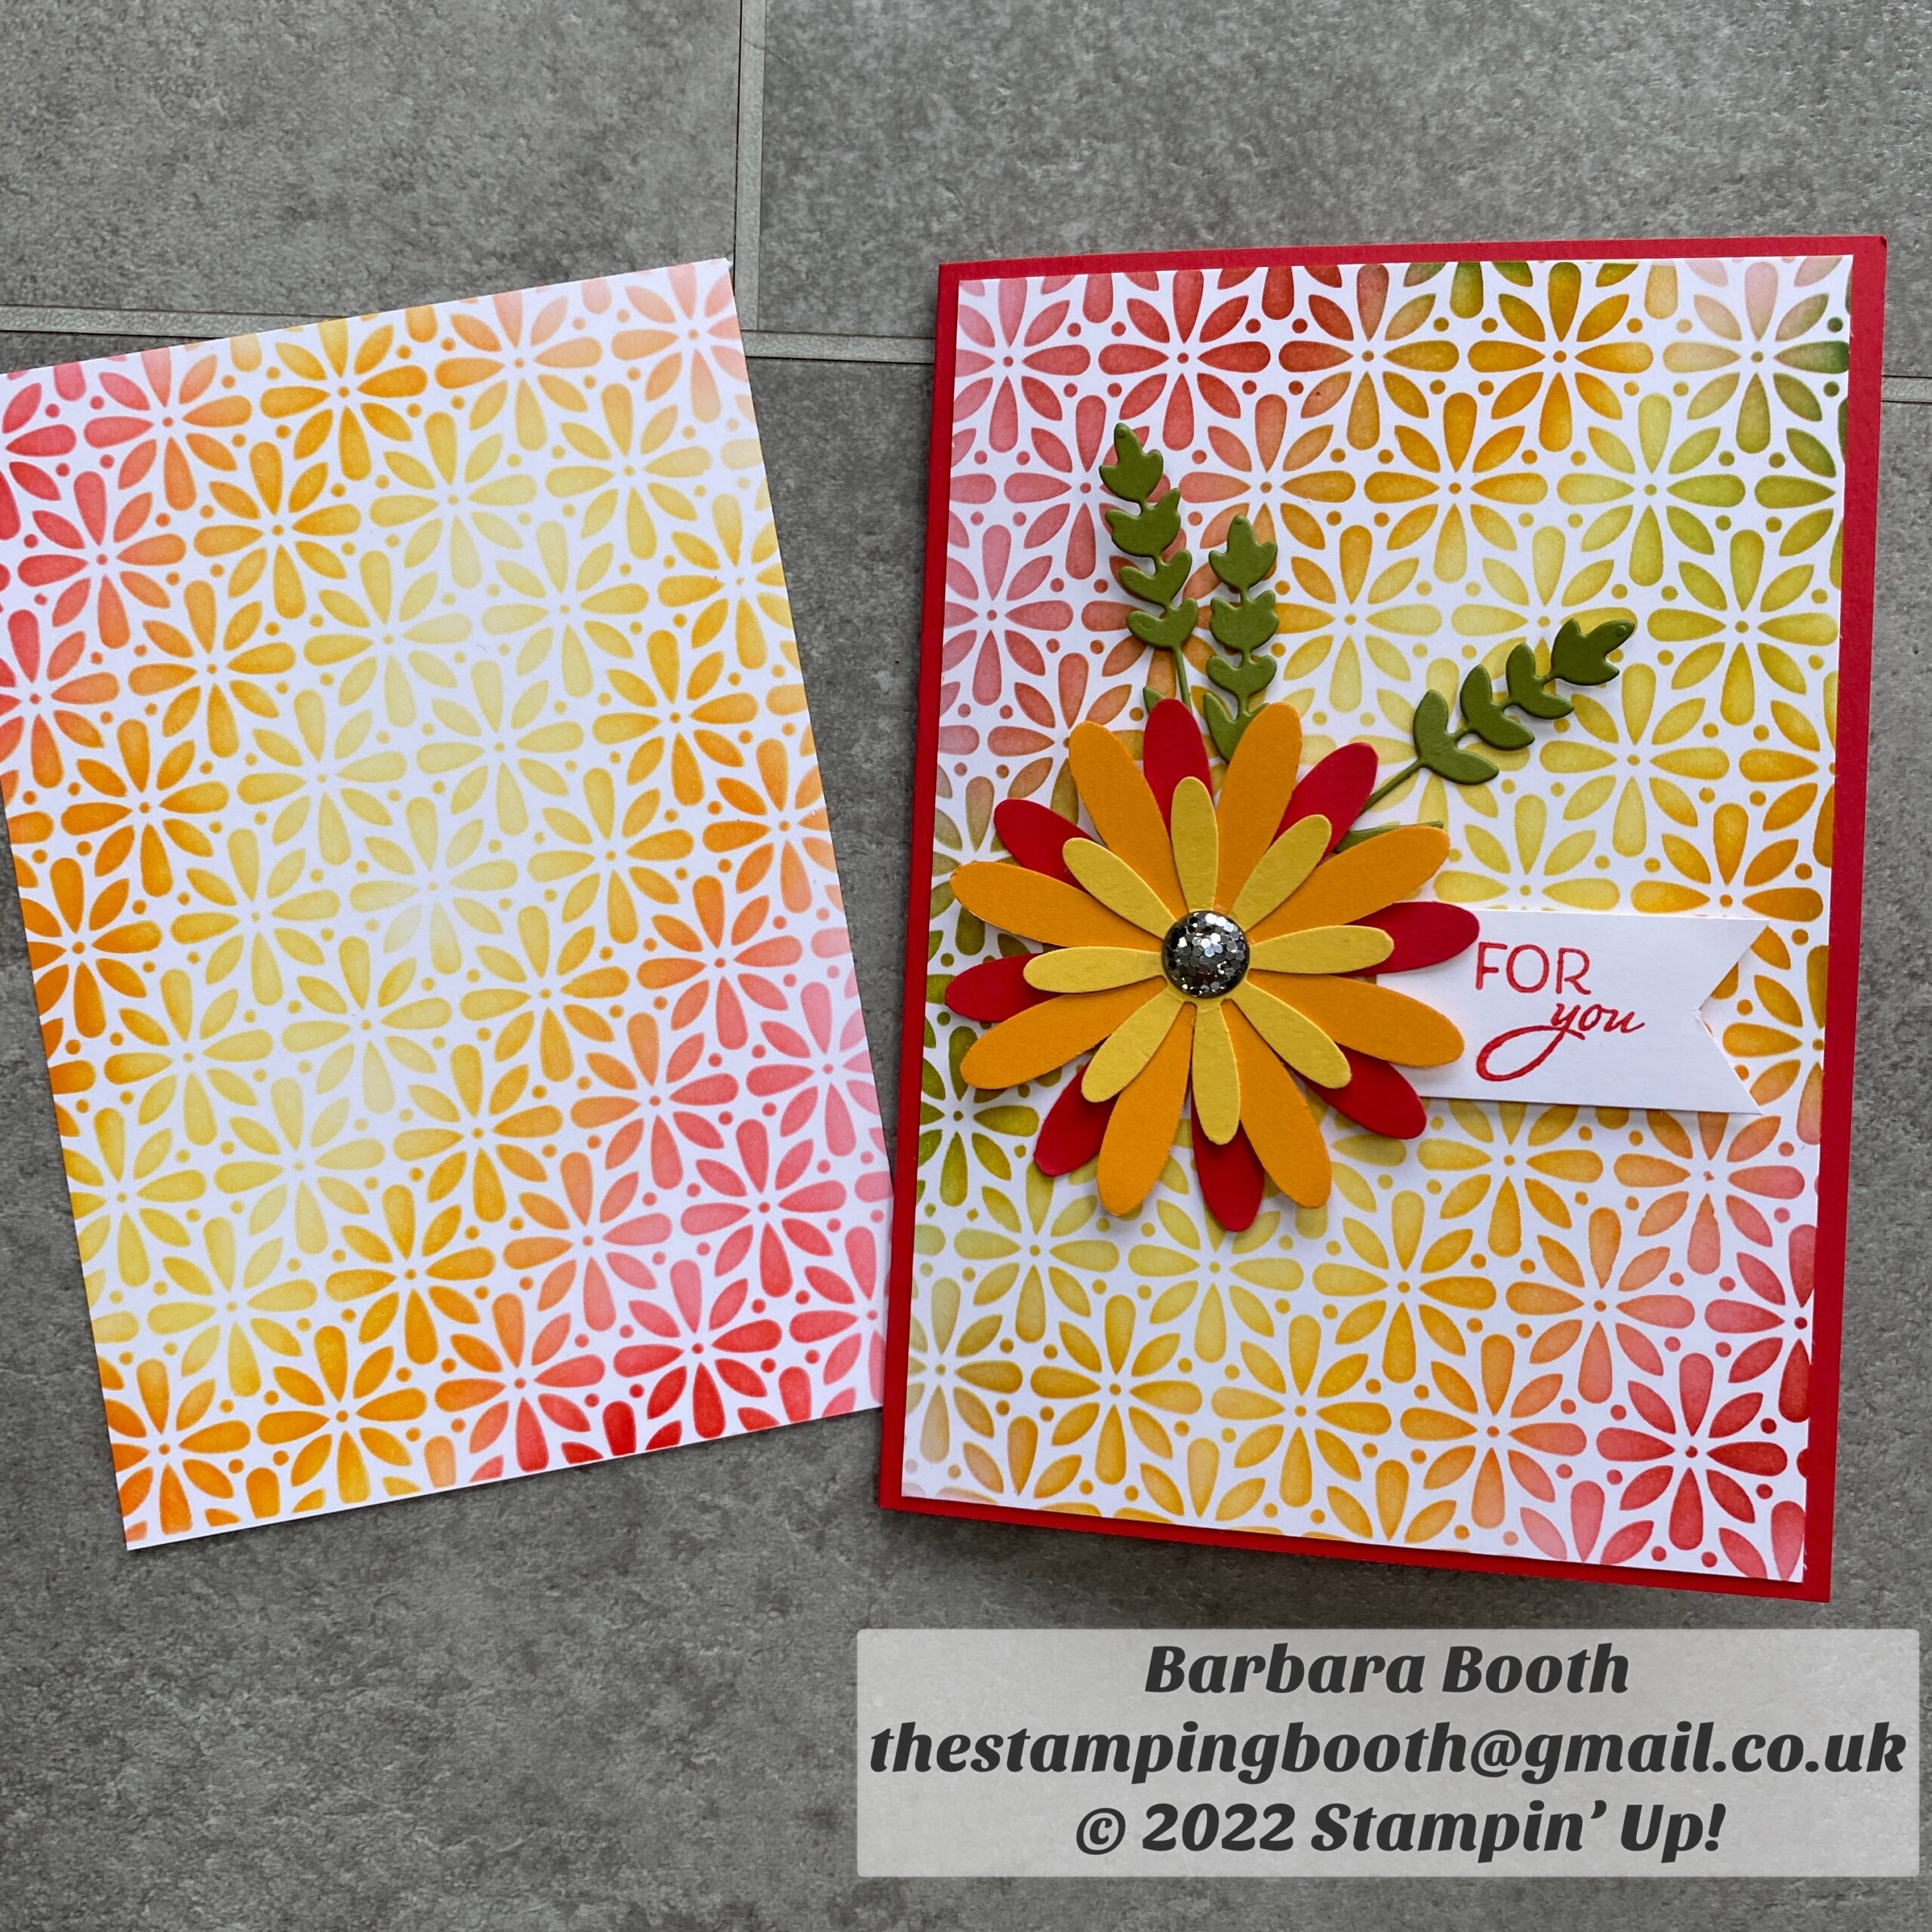
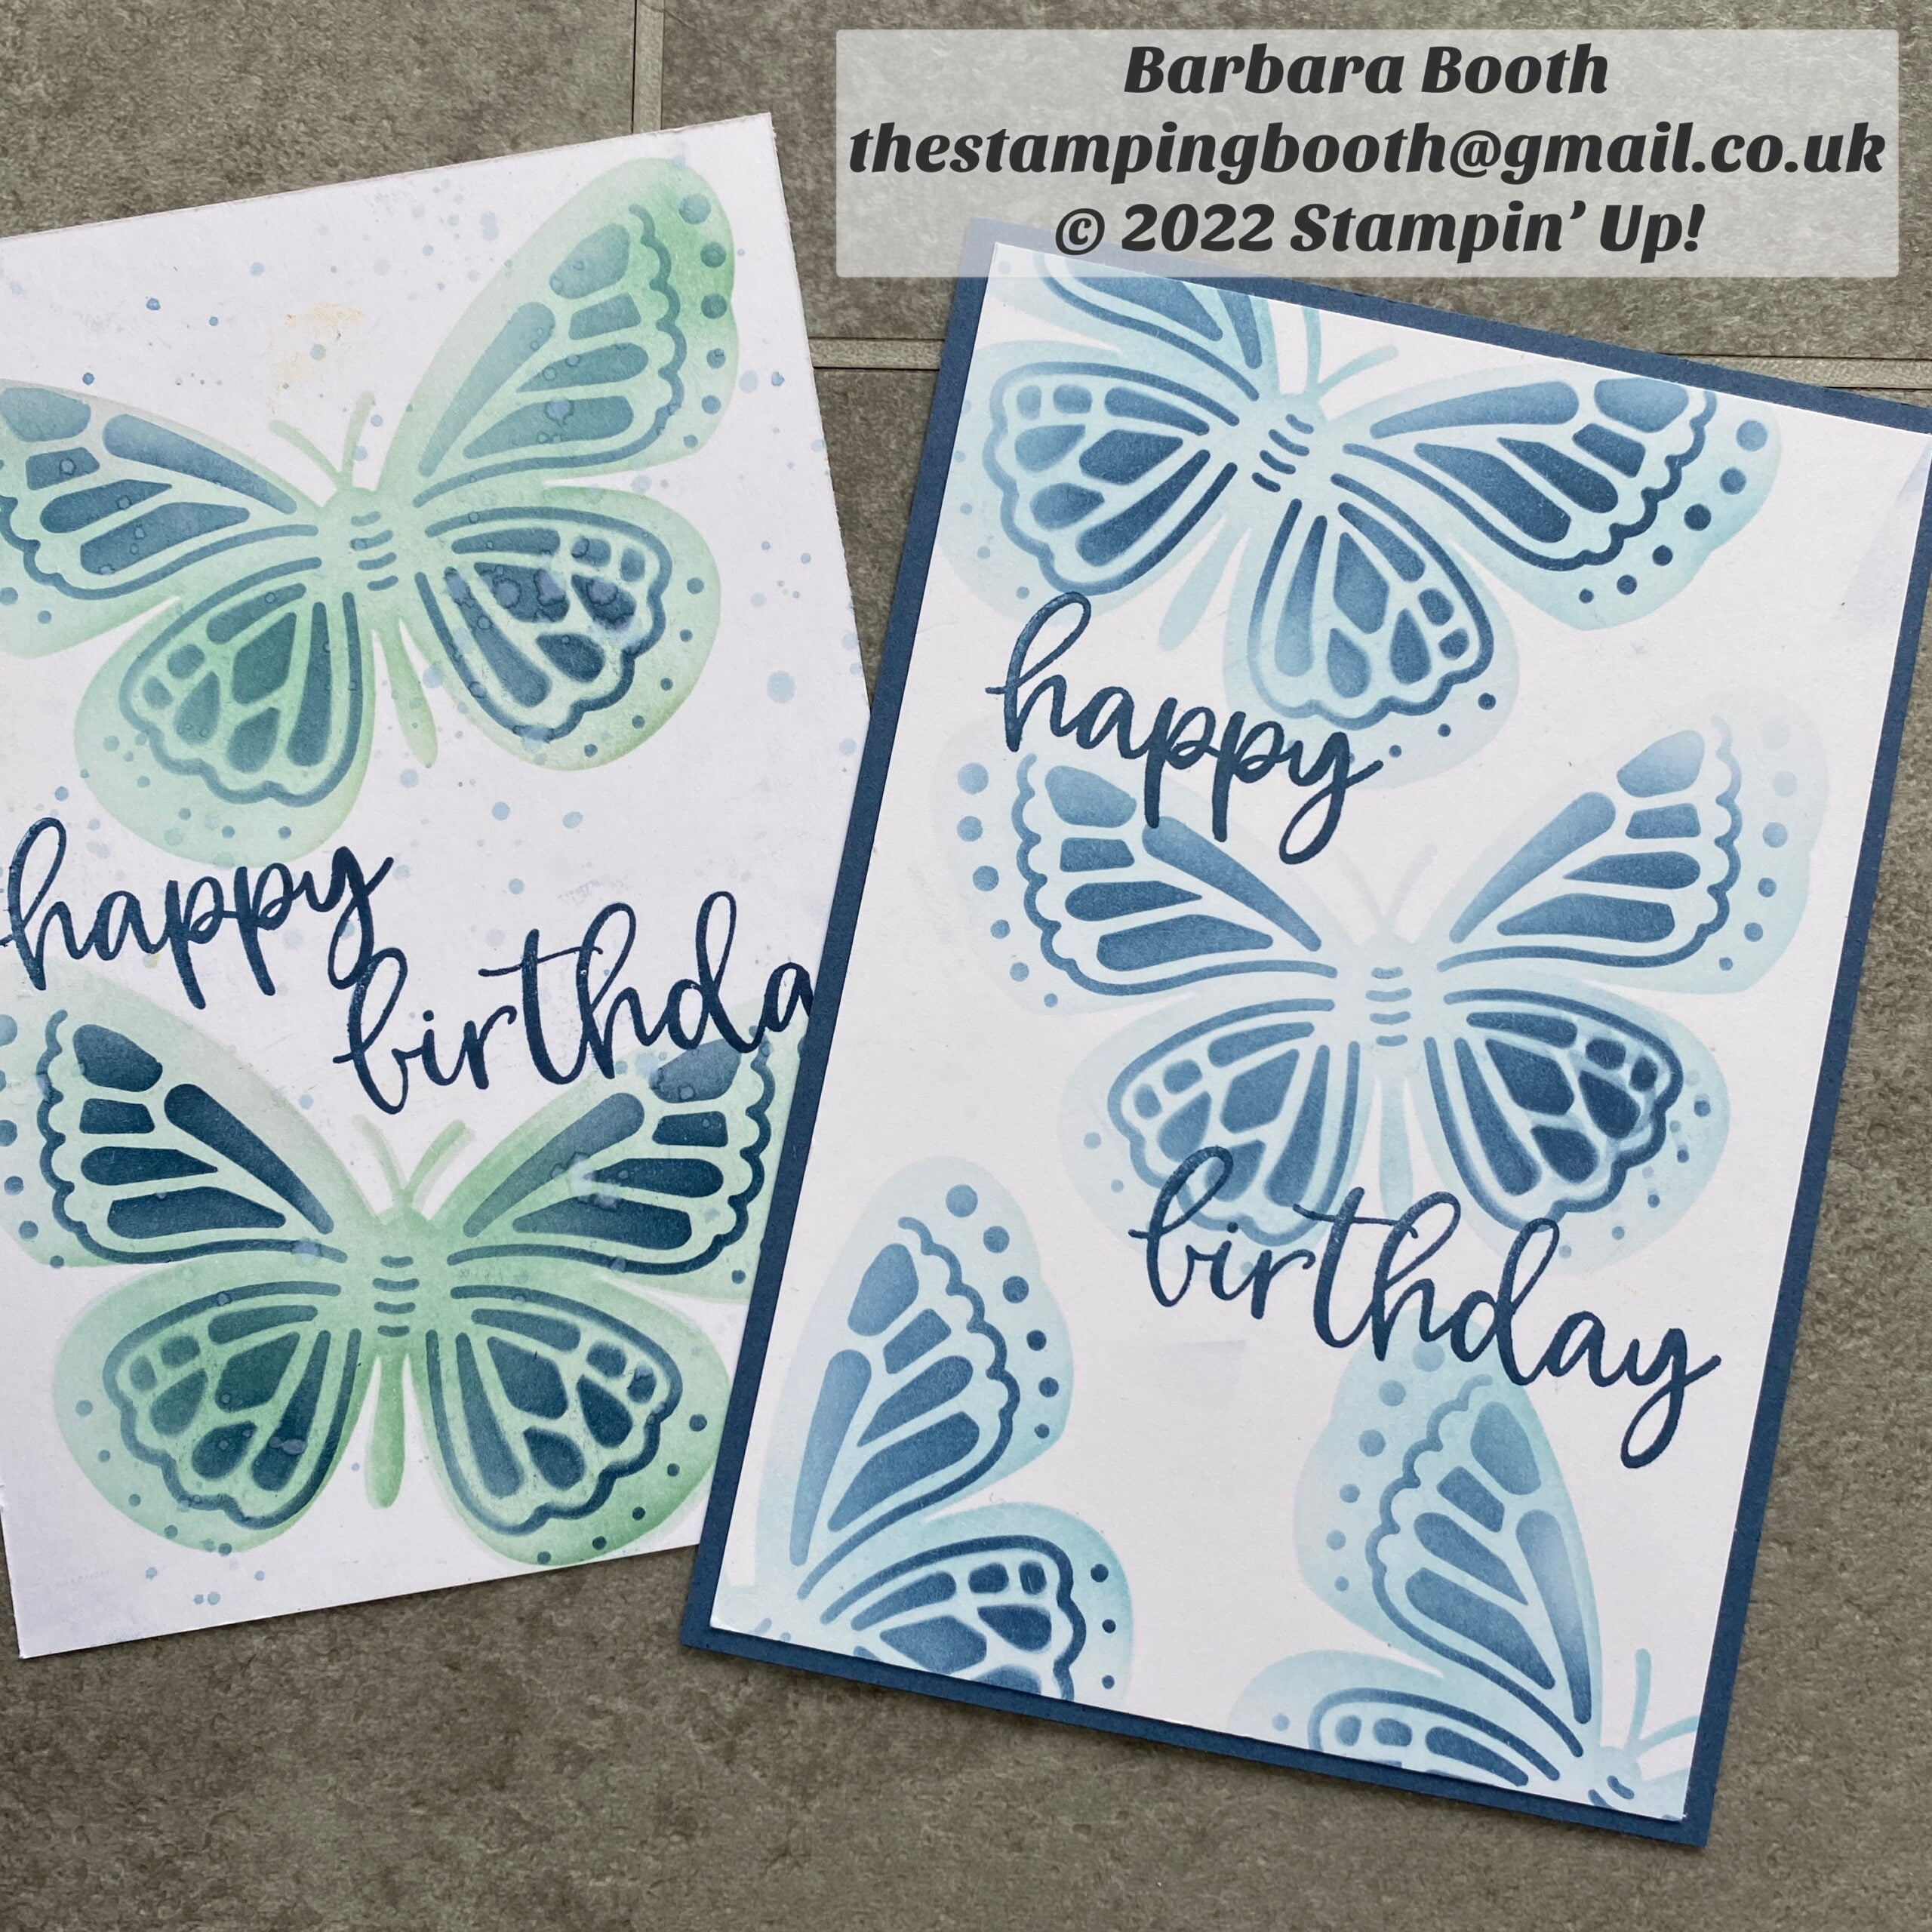
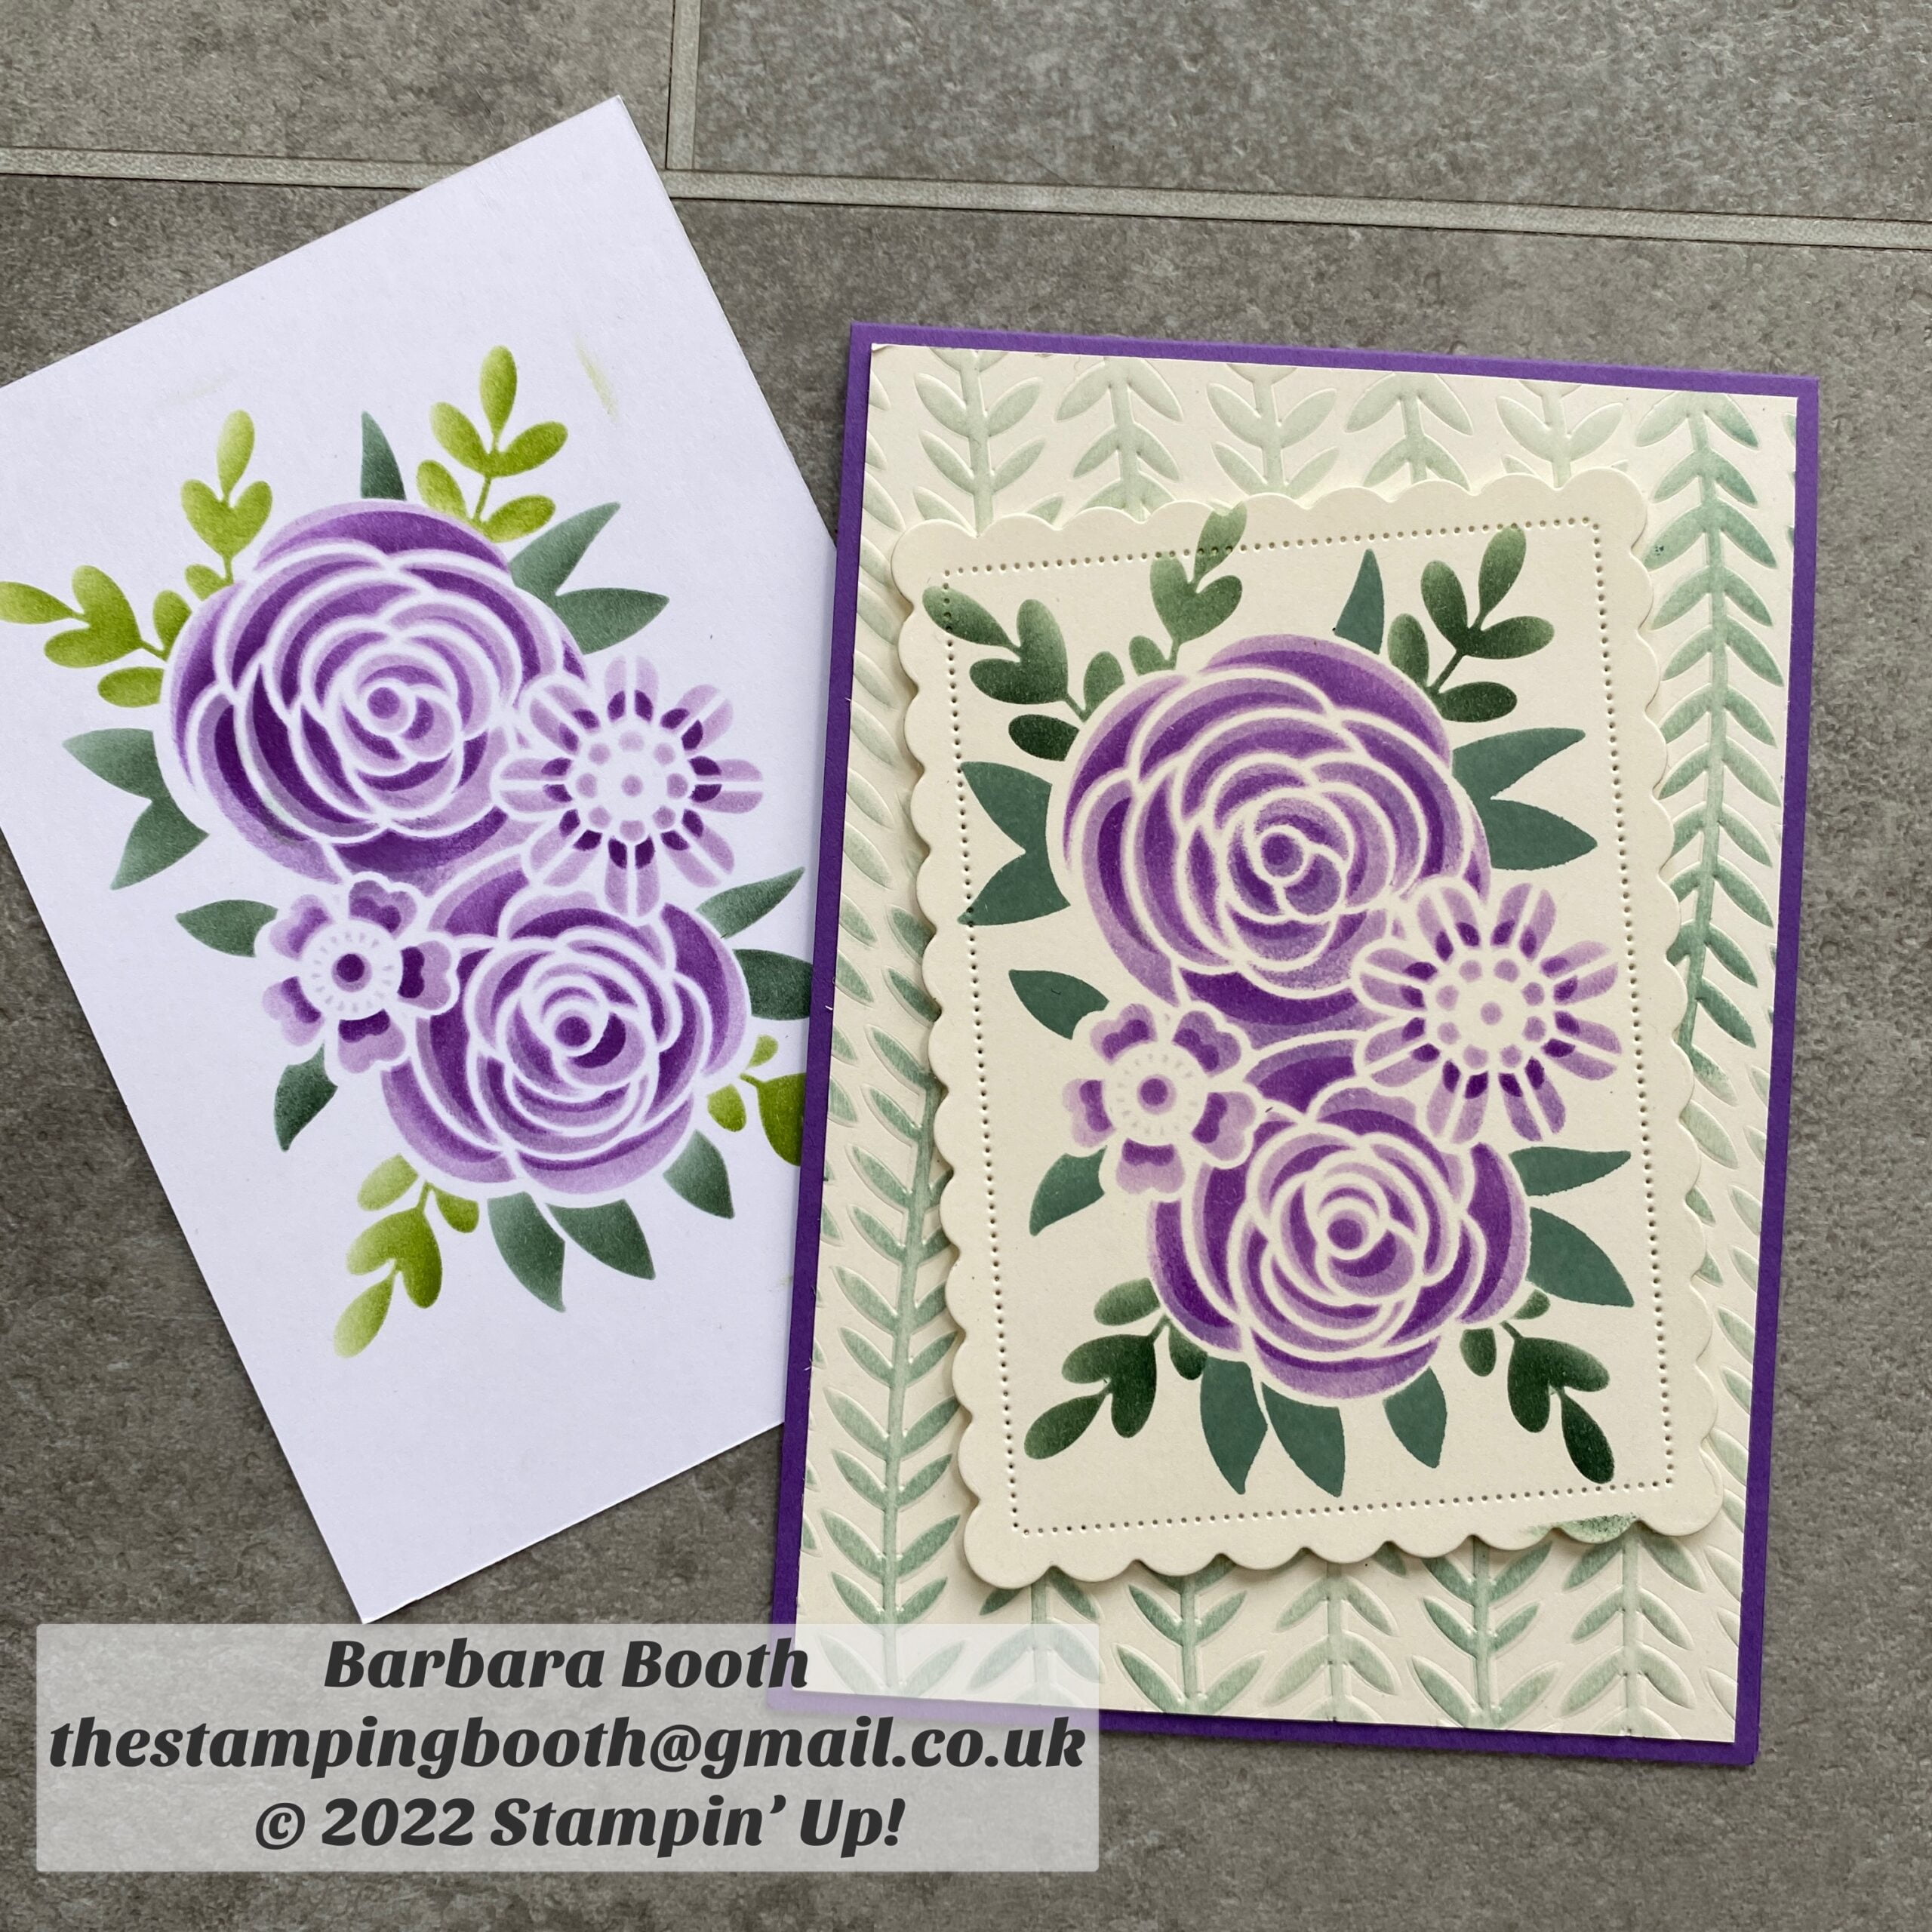
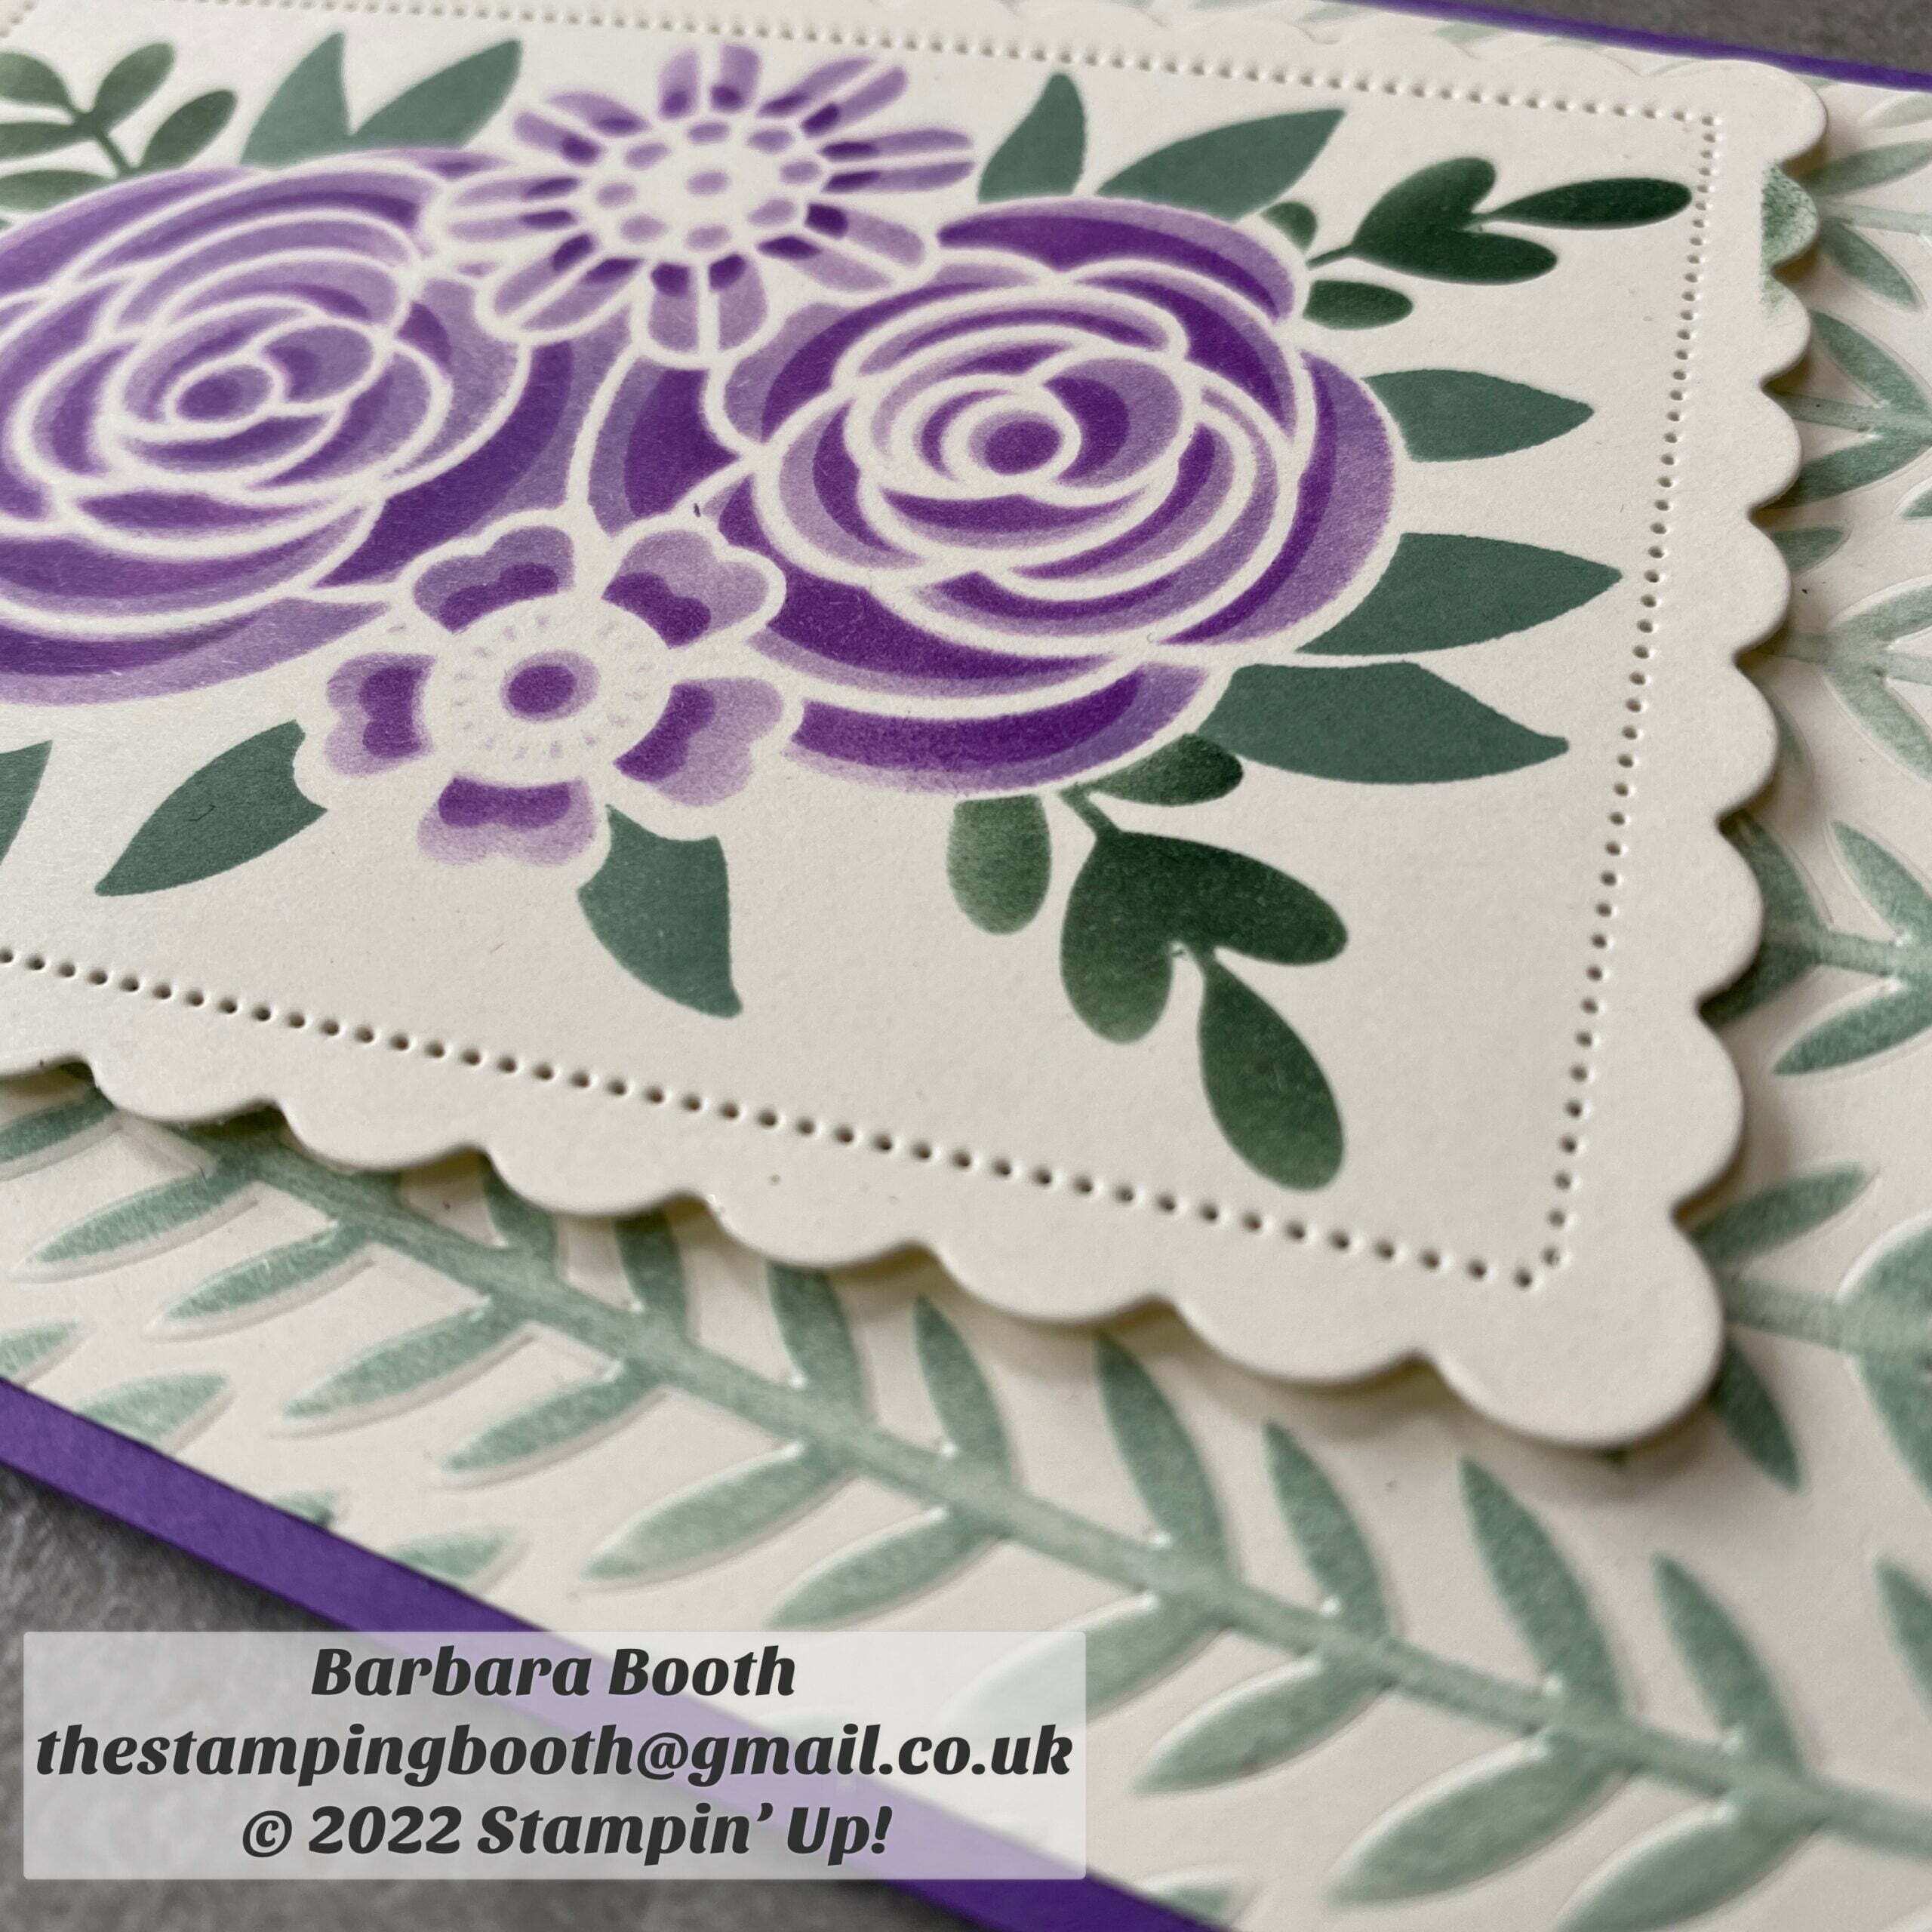
Today, I was due to hold a workshop demonstrating the different ways to use the new Butterflies and Flowers layering masks (from the January to June mini catalogue)., but unfortunately this had to be postponed due to storm Eunice! I wanted to show several different mask techniques.
All the sets of masks available from Stampin’ Up! are shown below and all of the techniques I was going to demonstrate (and will when I reschedule the event) can be used with any of the masks.
These were my first play with the masks. Its very much trial and error, working out colour combinations and which tools to use, but lots of fun!!
Blending brushes…
Simple blended backgroundsDaisy mask and Daisy punchesTwo step butterfly mask
Simply using one, two or three coloured inks to make some stunning backgrounds, and then embellish as needed.
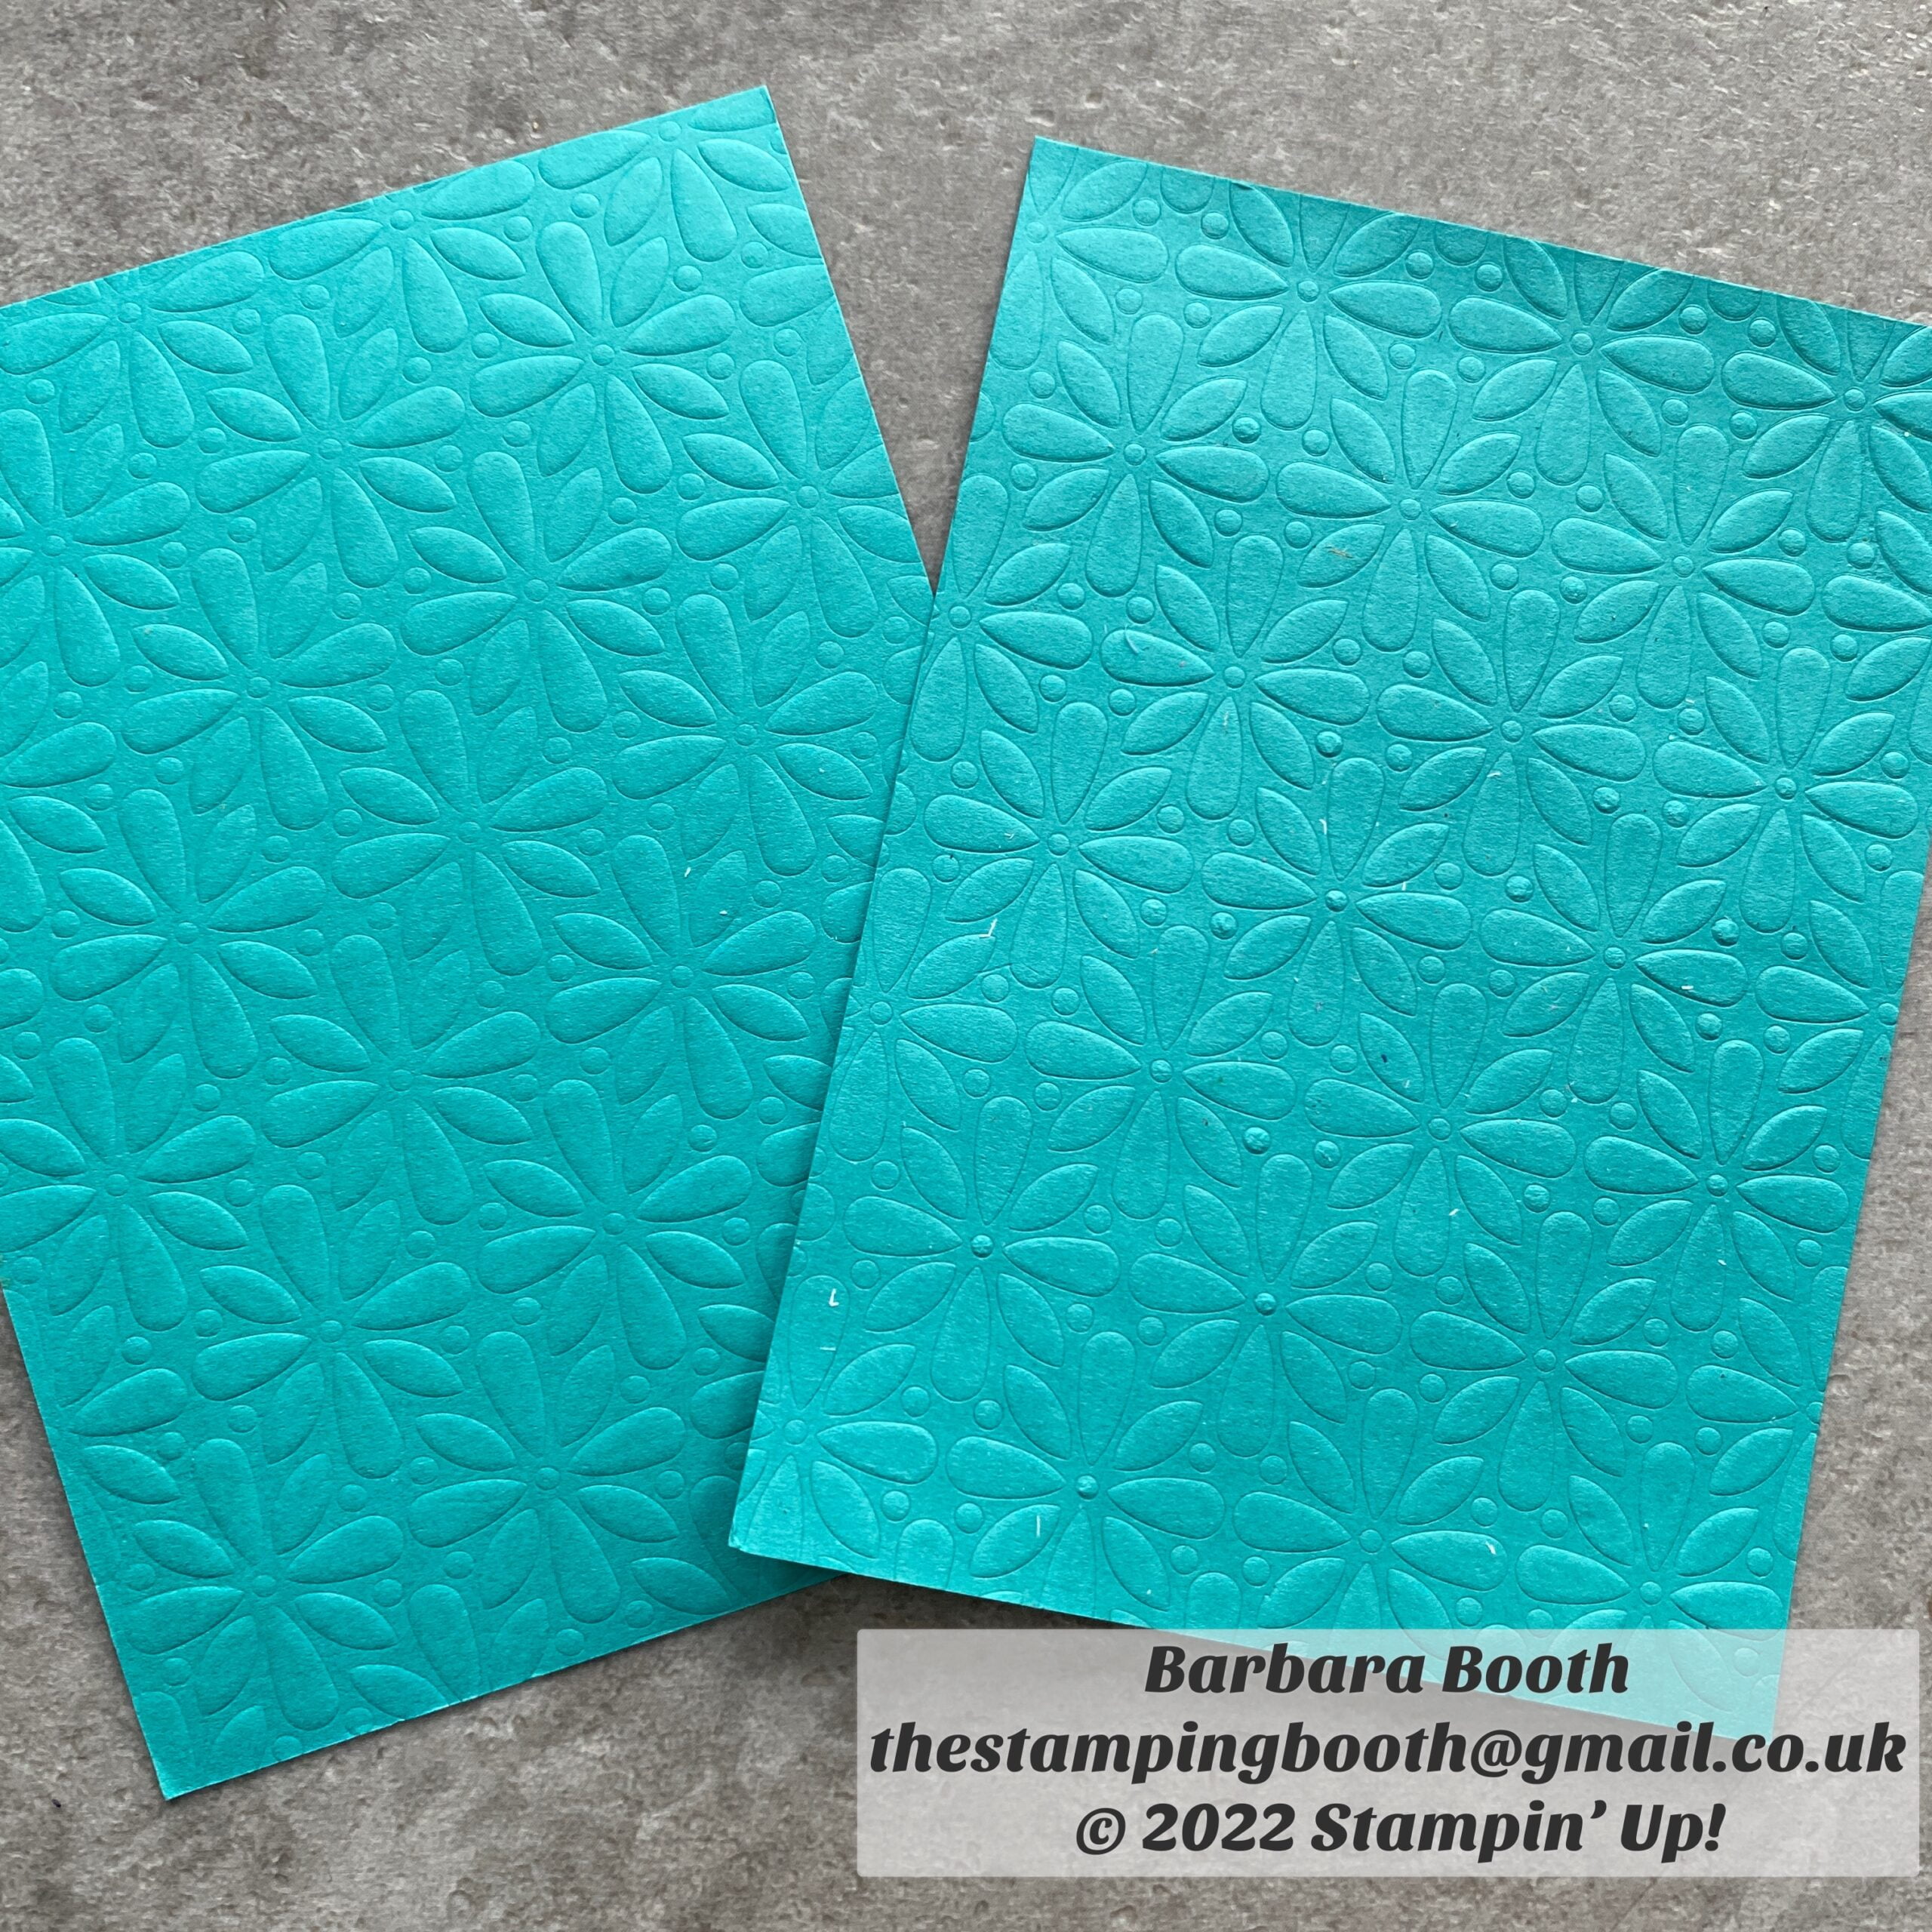
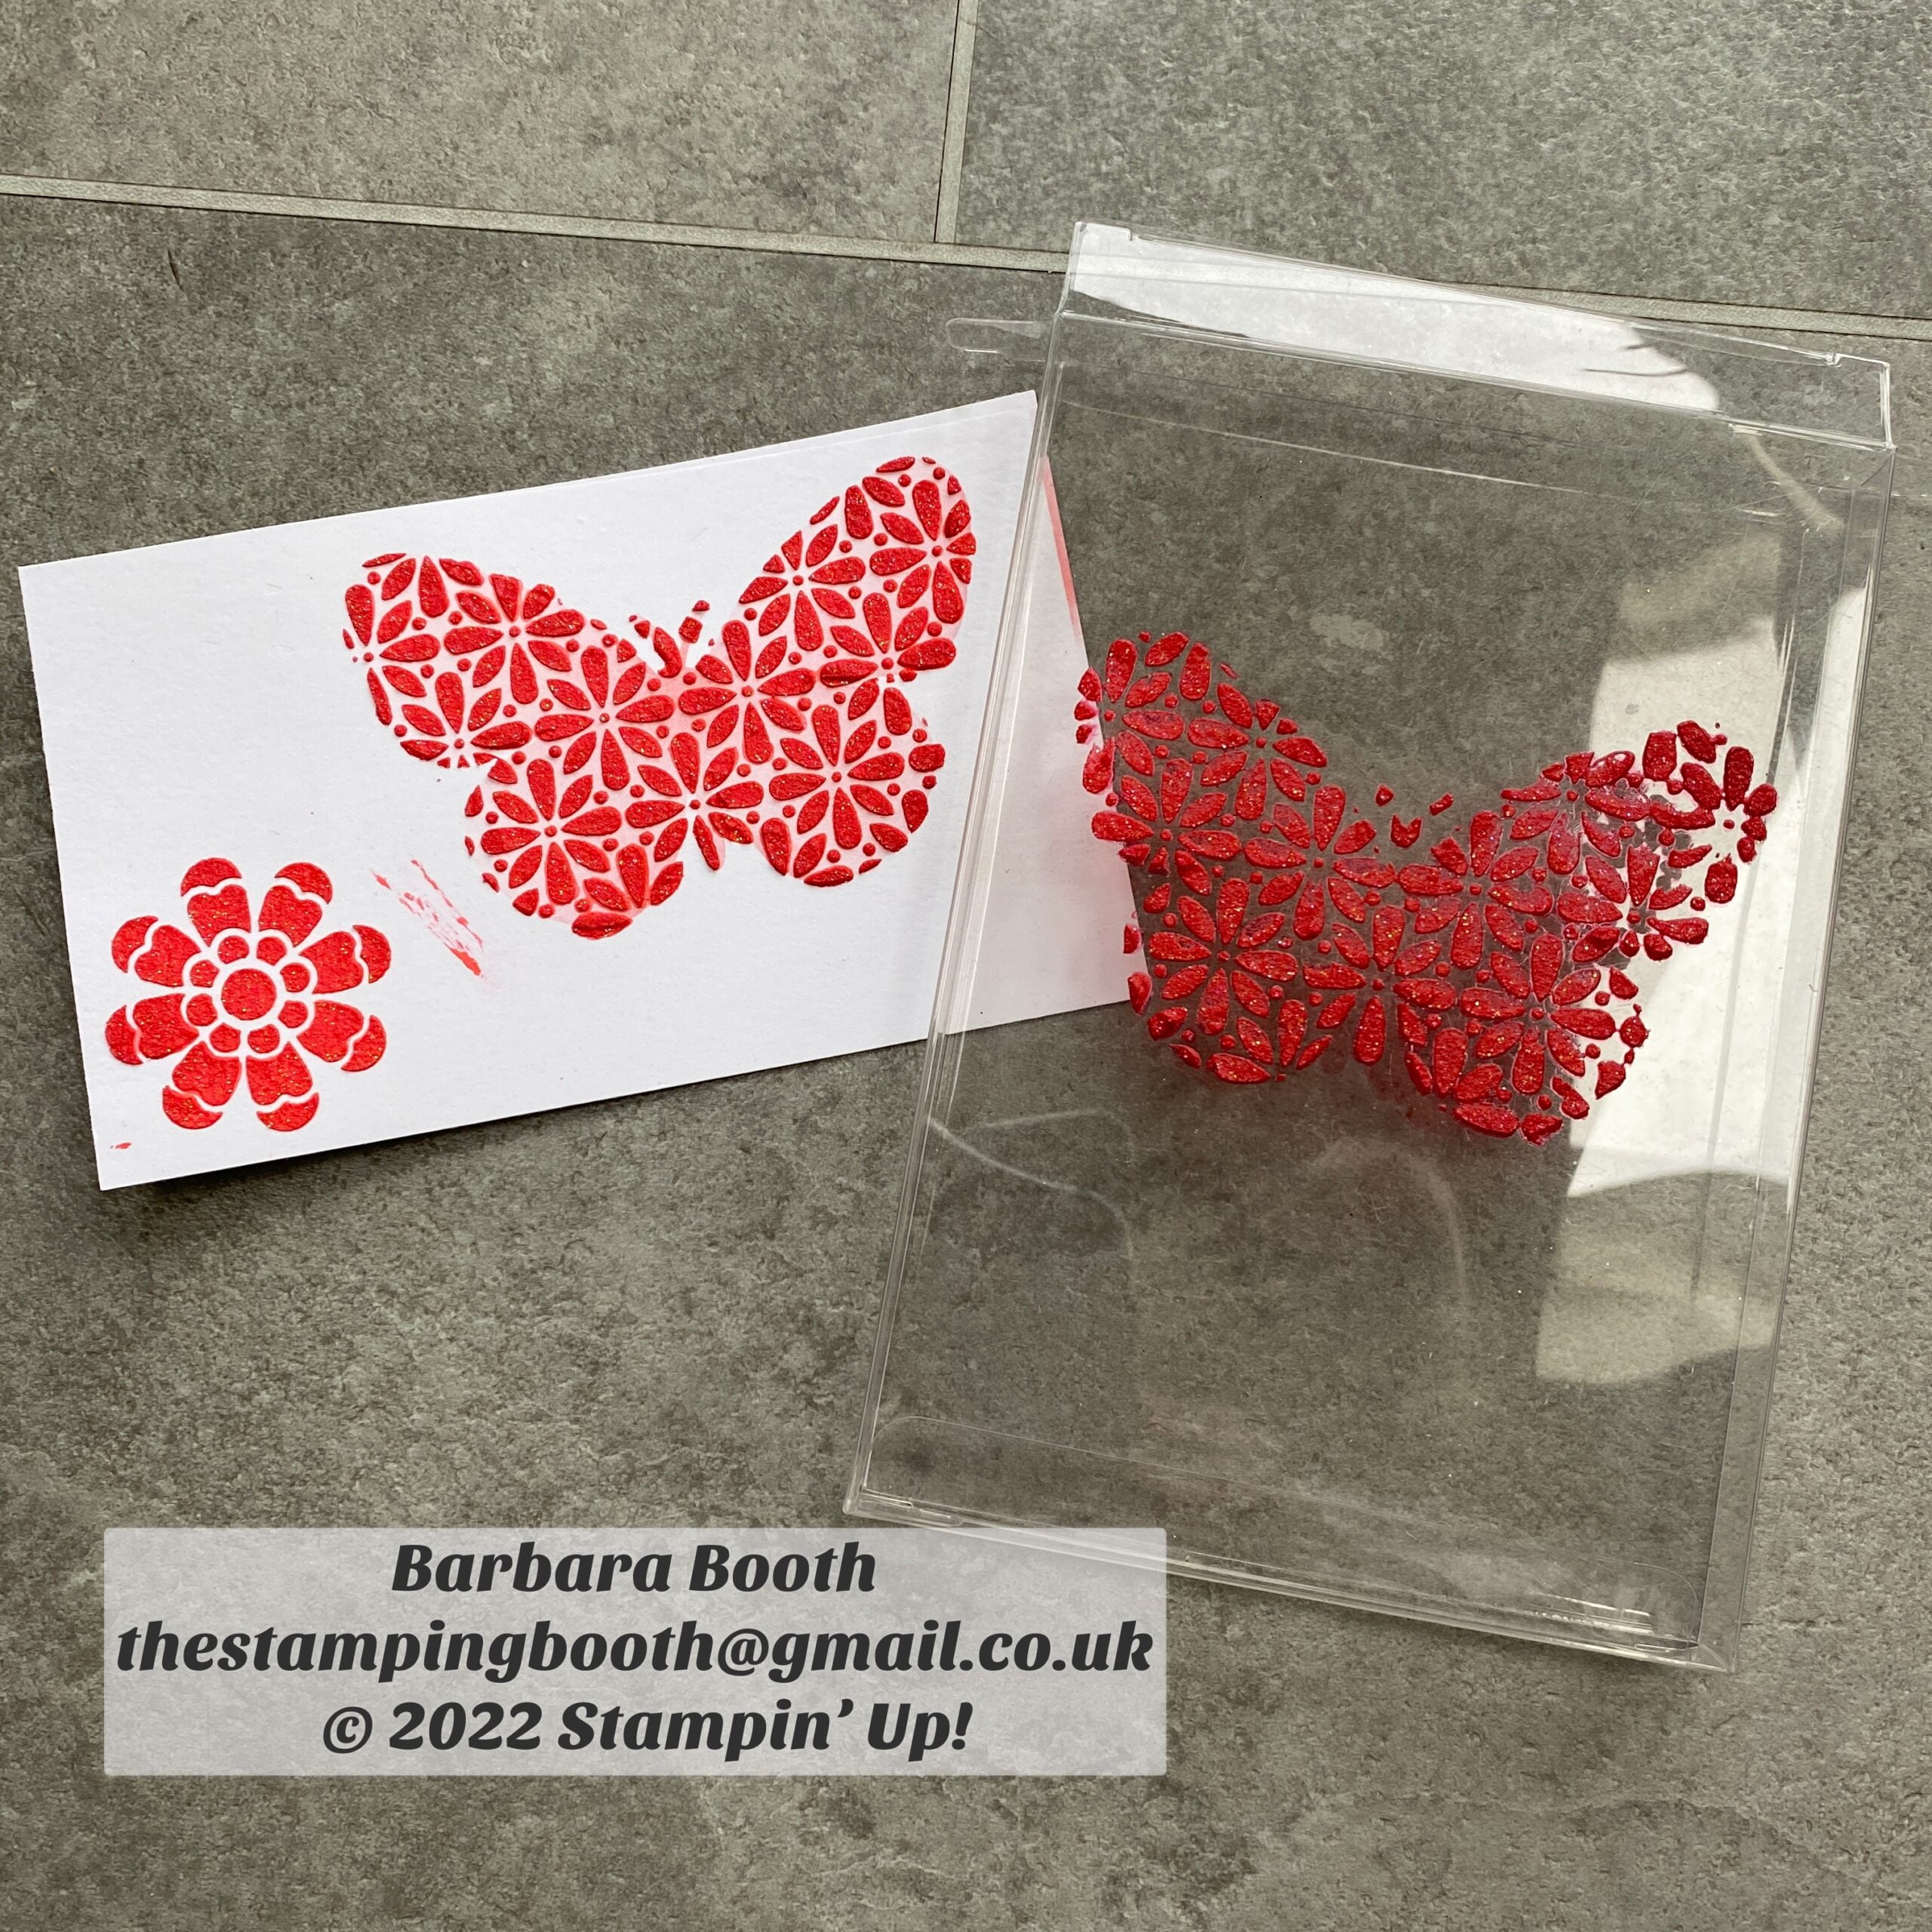
Die cutting machine…..
Embossed through die cutting machine…the image on the right was spritzed with alcohol and gives a deeper impression. Check your machine for which plate combination you need….and remember, if its very tight, then don’t force it…you have the wrong combination!!
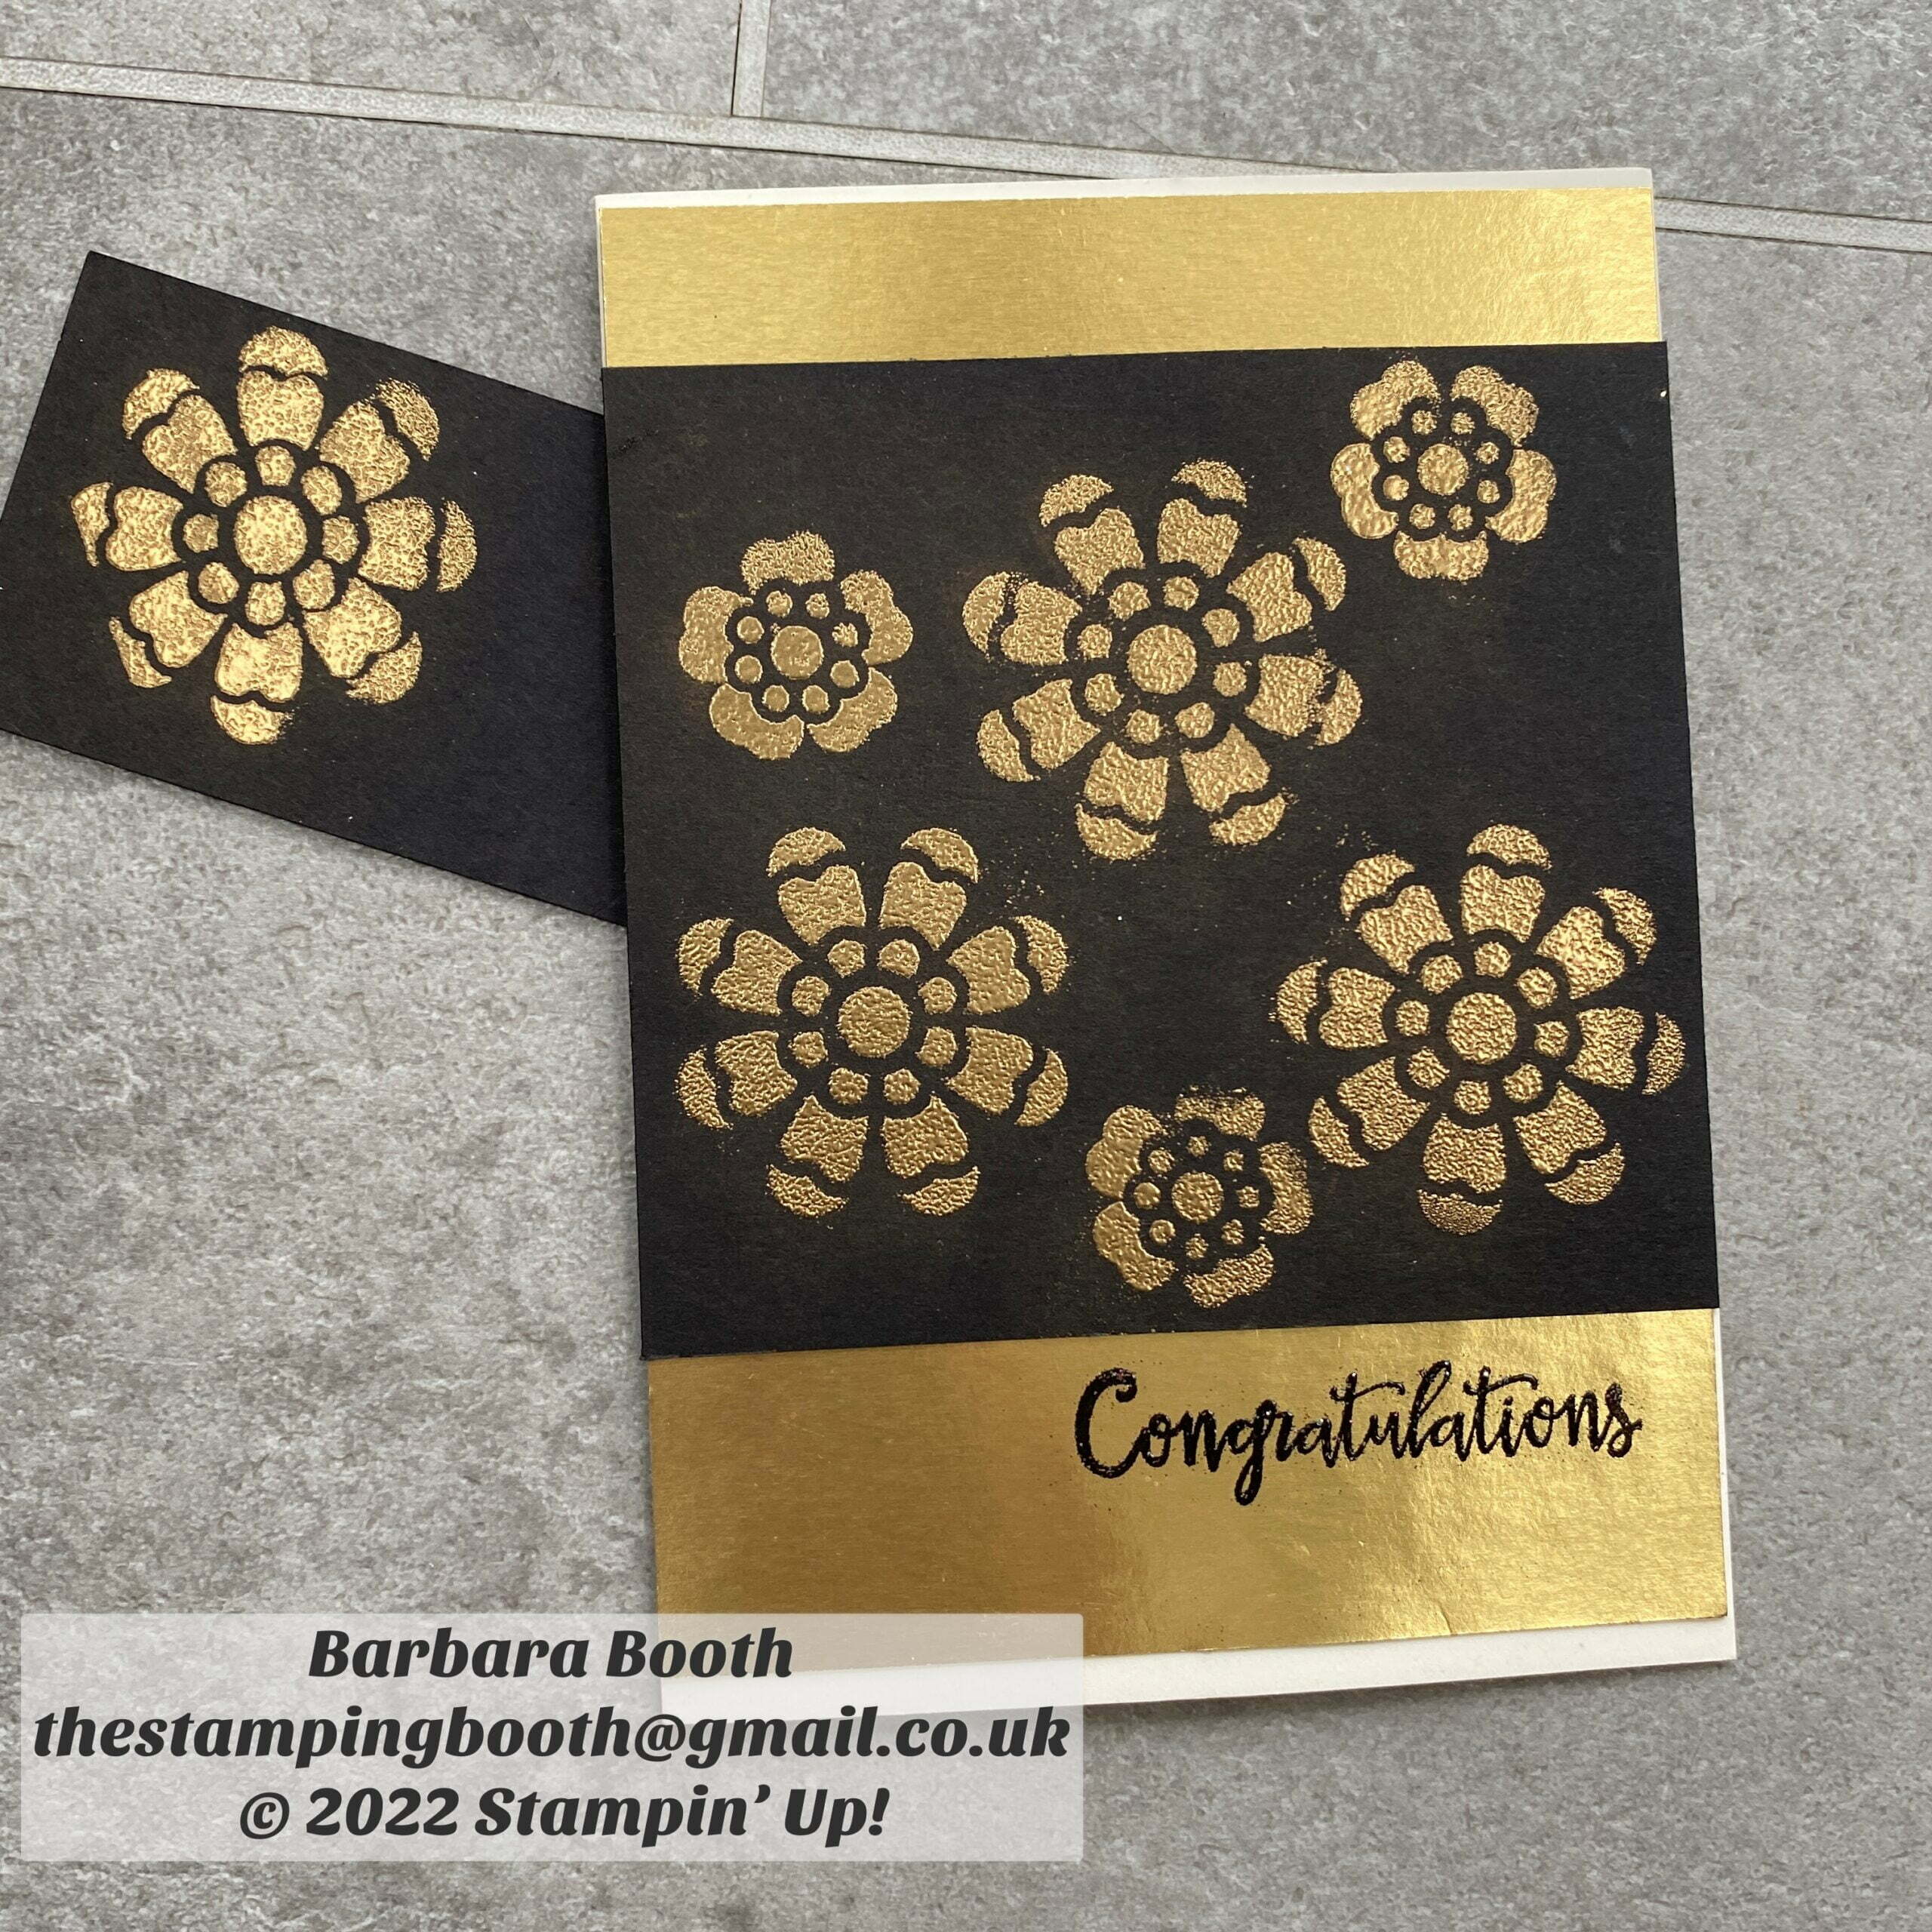
Heat embossing……..
Gold heat embossing on black background, Black embossed sentiment on gold background
Embossing paste and re inkers……
Layering two masks at the same time and applying embossing paste that is coloured with a reinker. Don’t forget to mask off around the image you are using. You can see from my photo that I didn’t on my first attempt! I used an acetate card box for the design on the right.
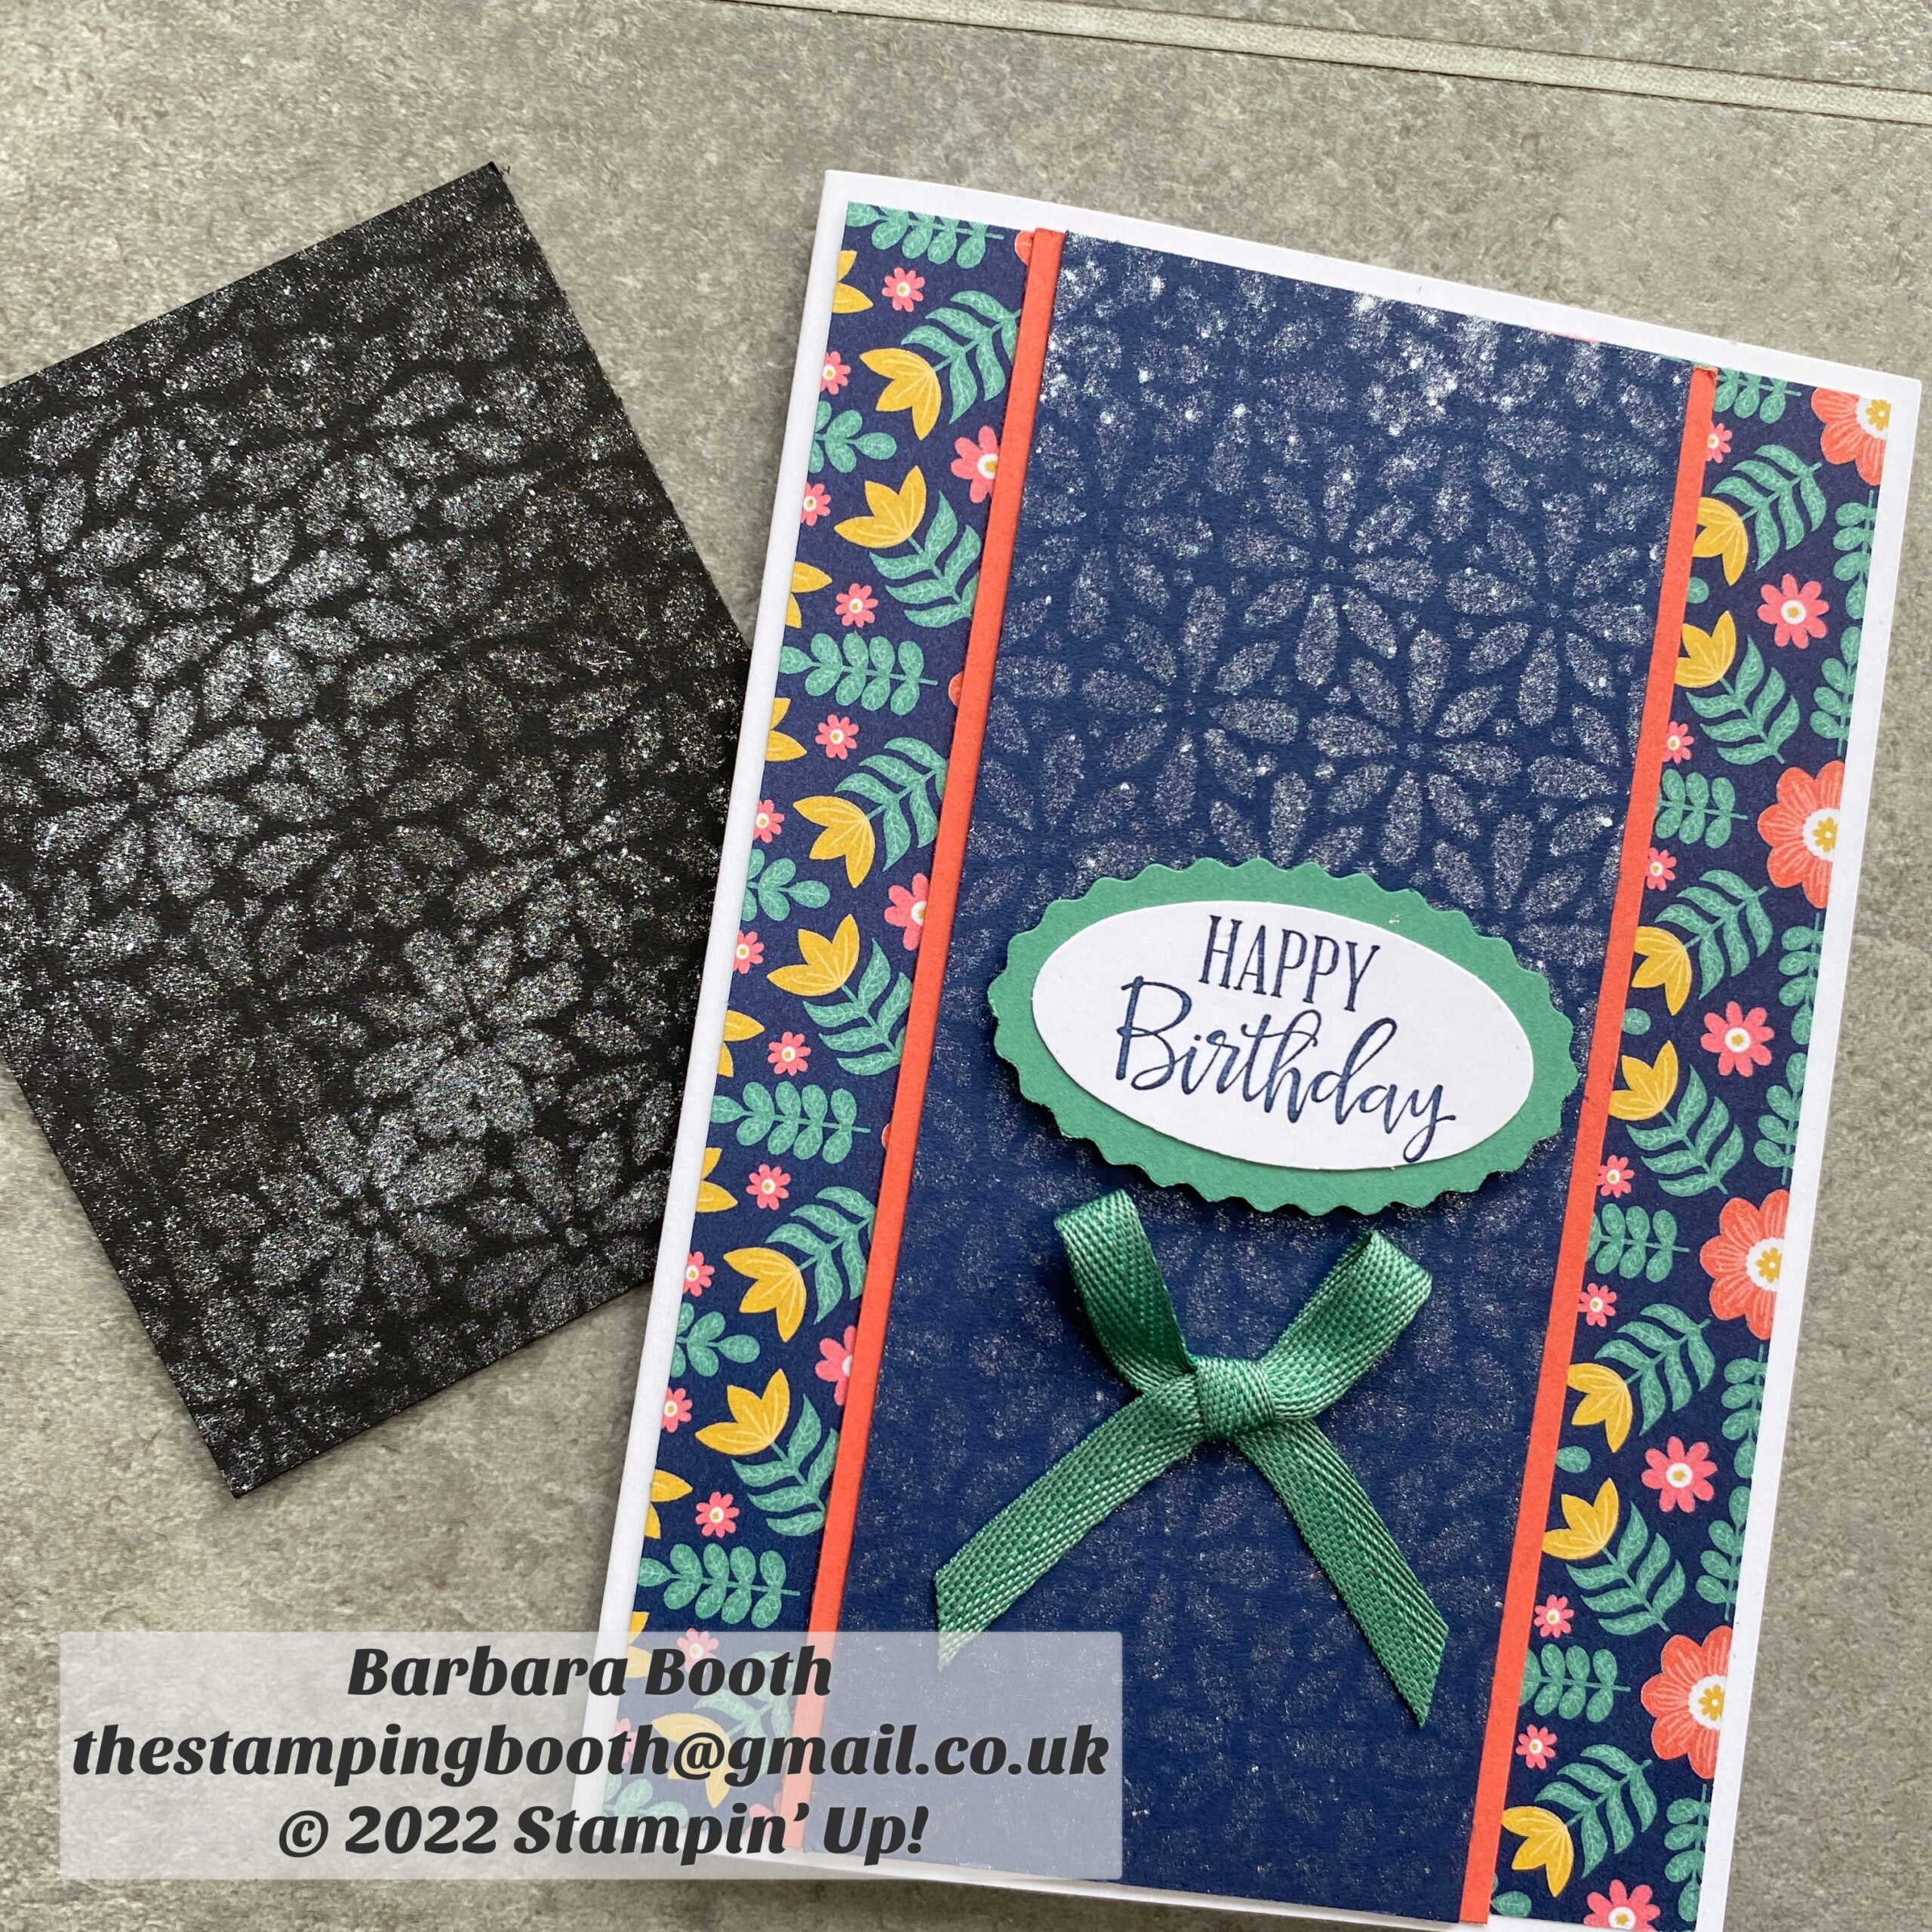
Rubbing alcohol, shimmer paste and a spritzer…..
Spritzed background through maskClose up to show the shimmer
I pulled out my old retired Shimmer Paint for this. After fastening the mask down I sprayed a mix of alcohol and shimmer paint onto Night of Navy card. Love the effect I got!
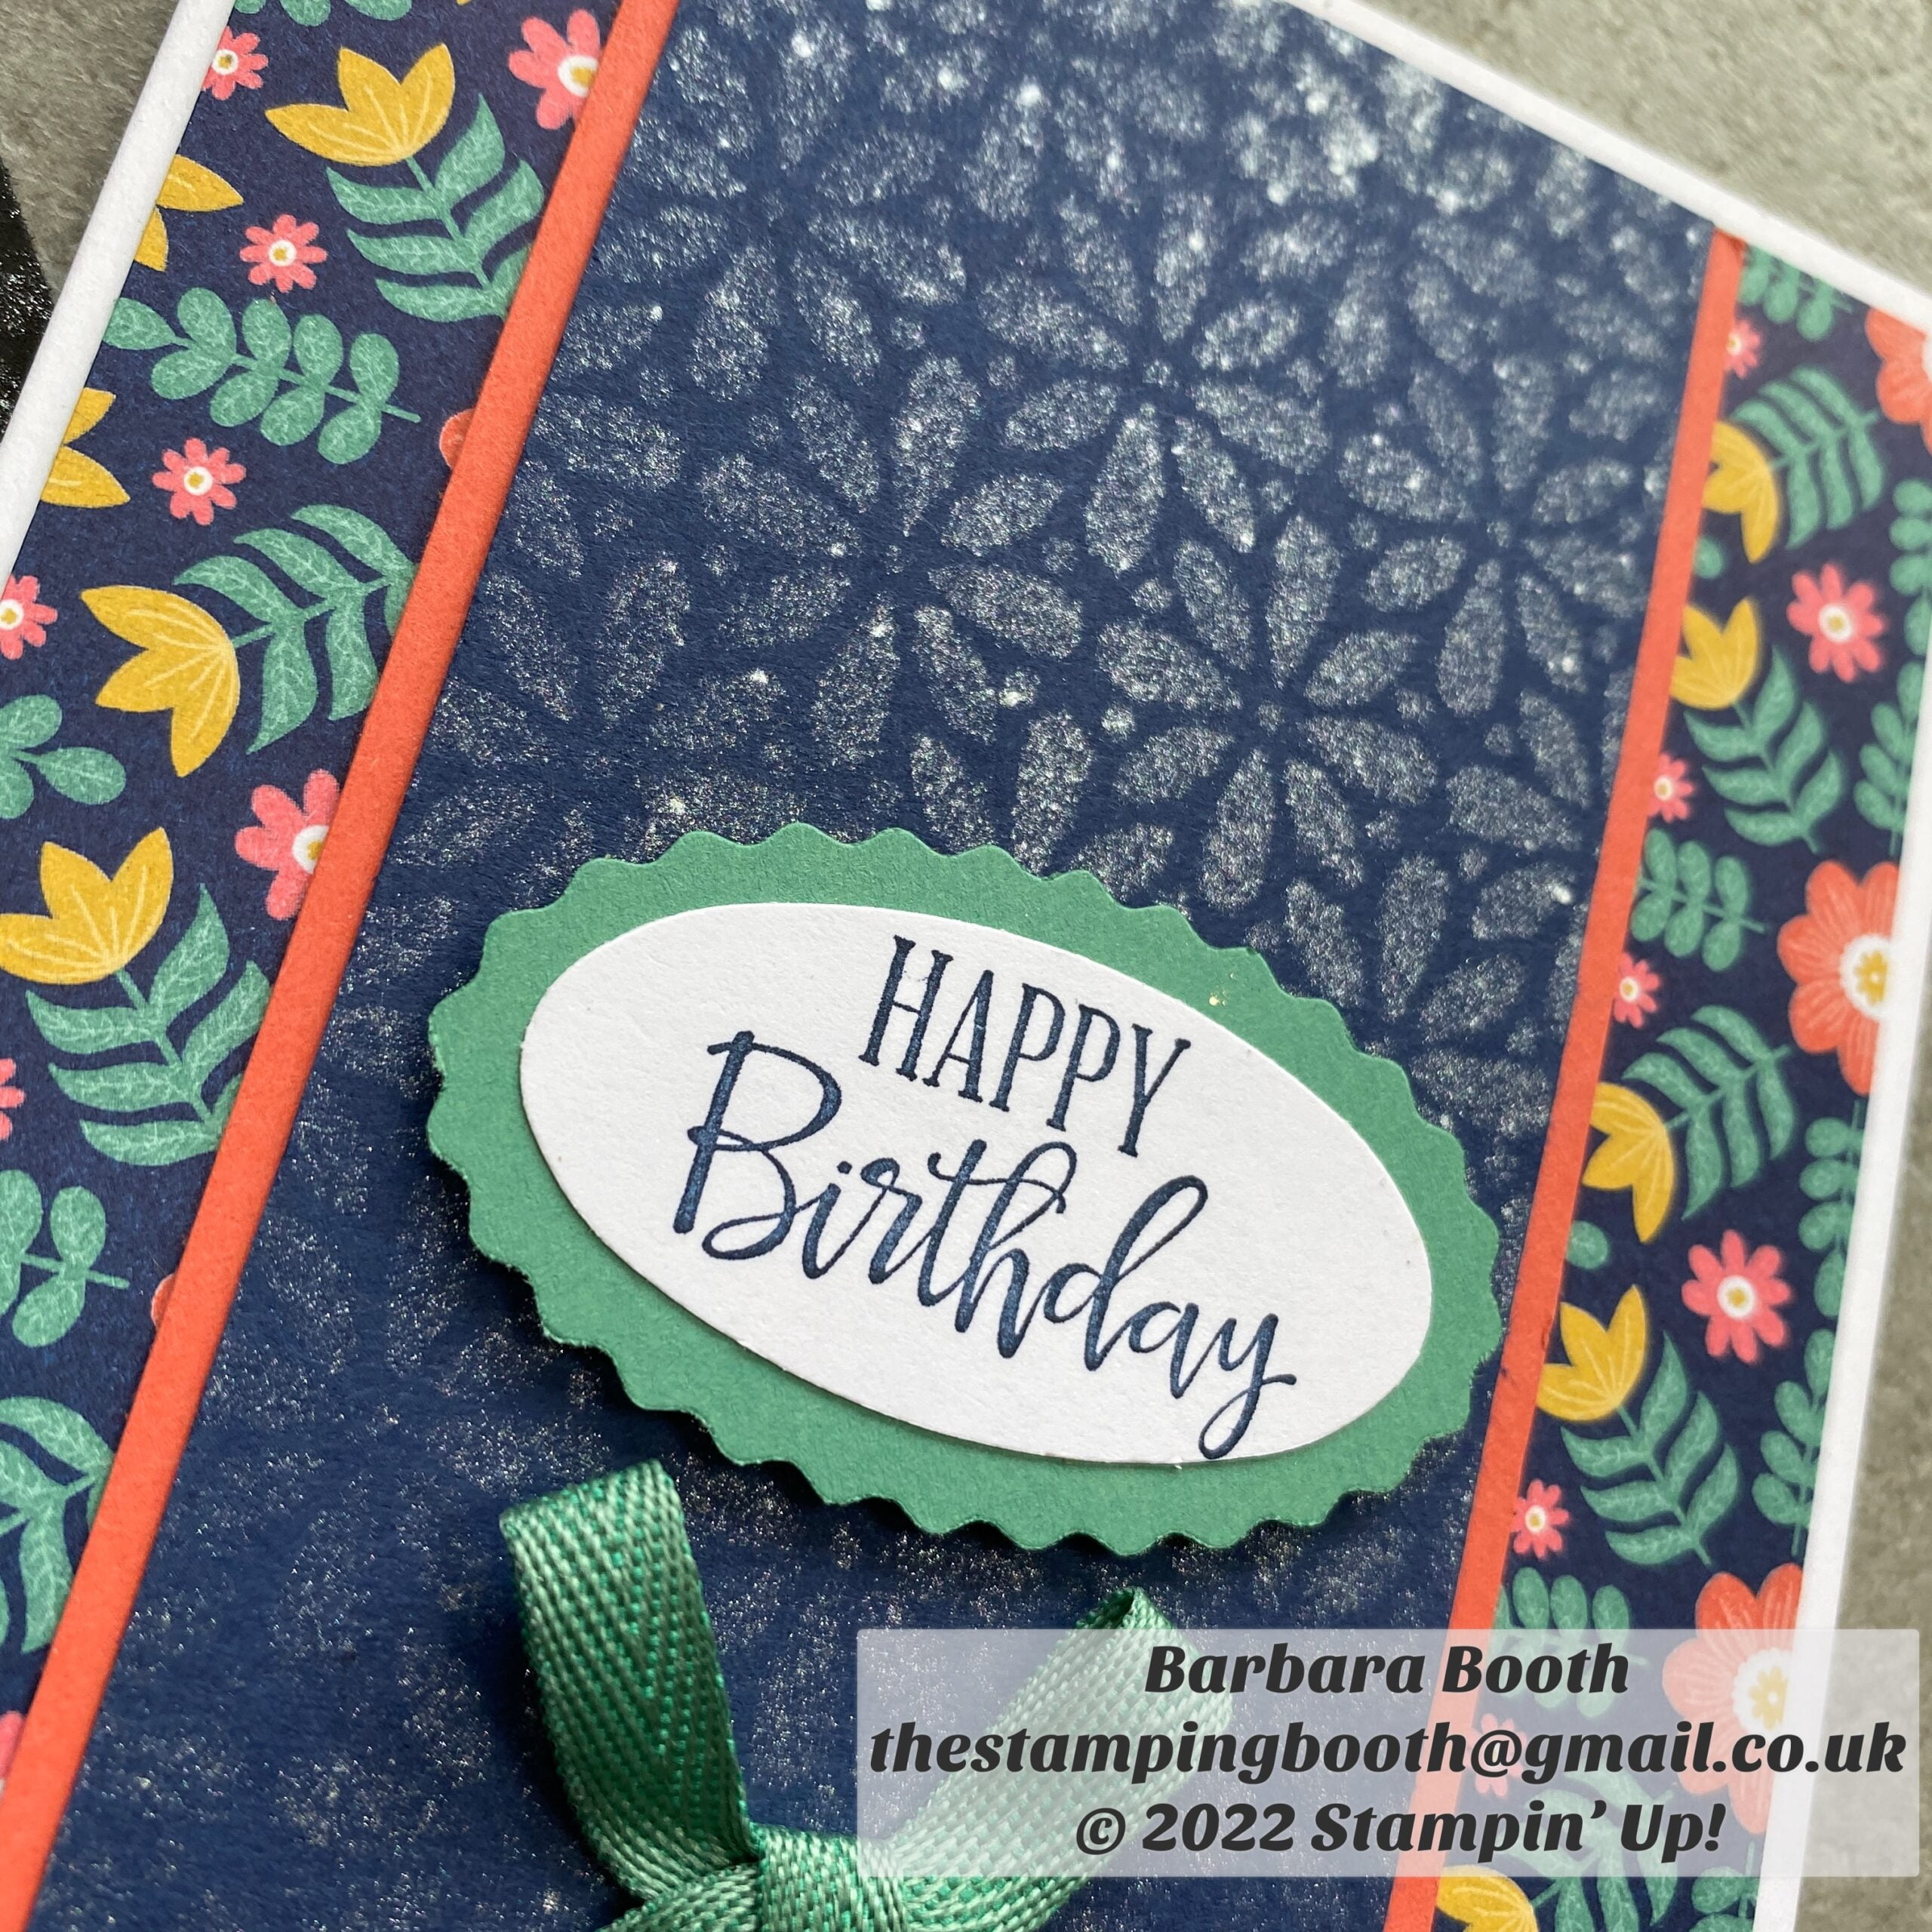
Then after lots of playing, this is my favourite!
Blending brushes, Embossed and sponge daubersClose up
The ‘leaves’ mask was put through the embossing folder and leaving the mask in place I used a sponge dauber to carefully put ink onto the raised leaves. TIP; hold the mask carefully and dab the sponge dauber onto the leaves going along each tendril one at a time – they bend quite easily.
The masks are cleverly designed so that the leaves that are on a separate mask fit perfectly around the flowers. I used Soft Succulent and Evening Evergreen for my leaves giving a subtle difference.
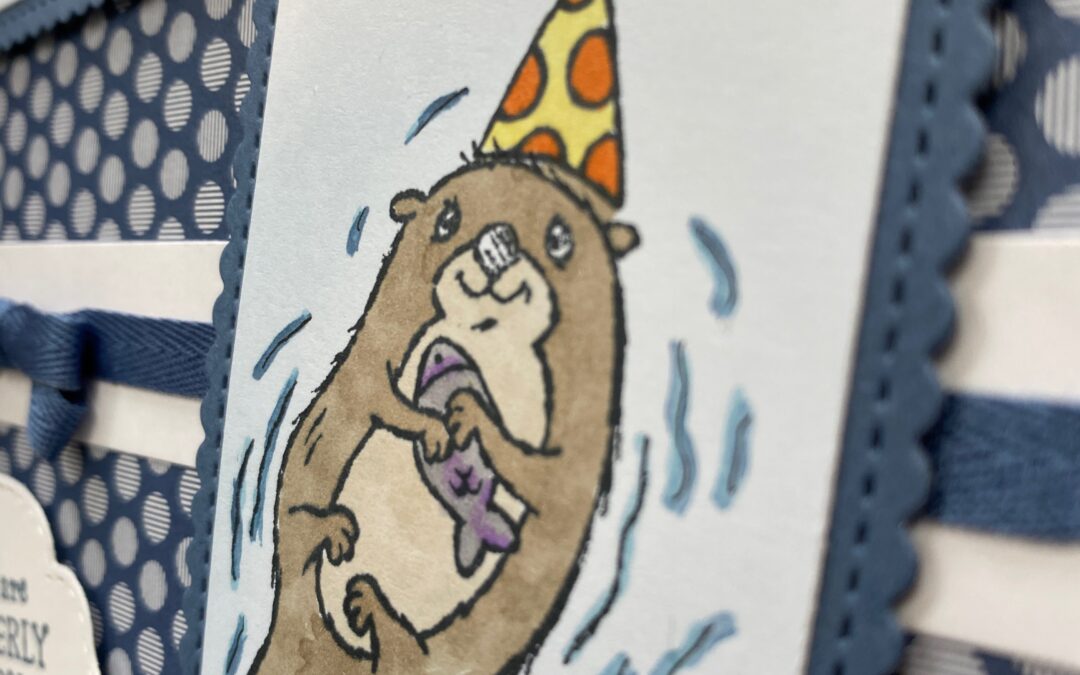
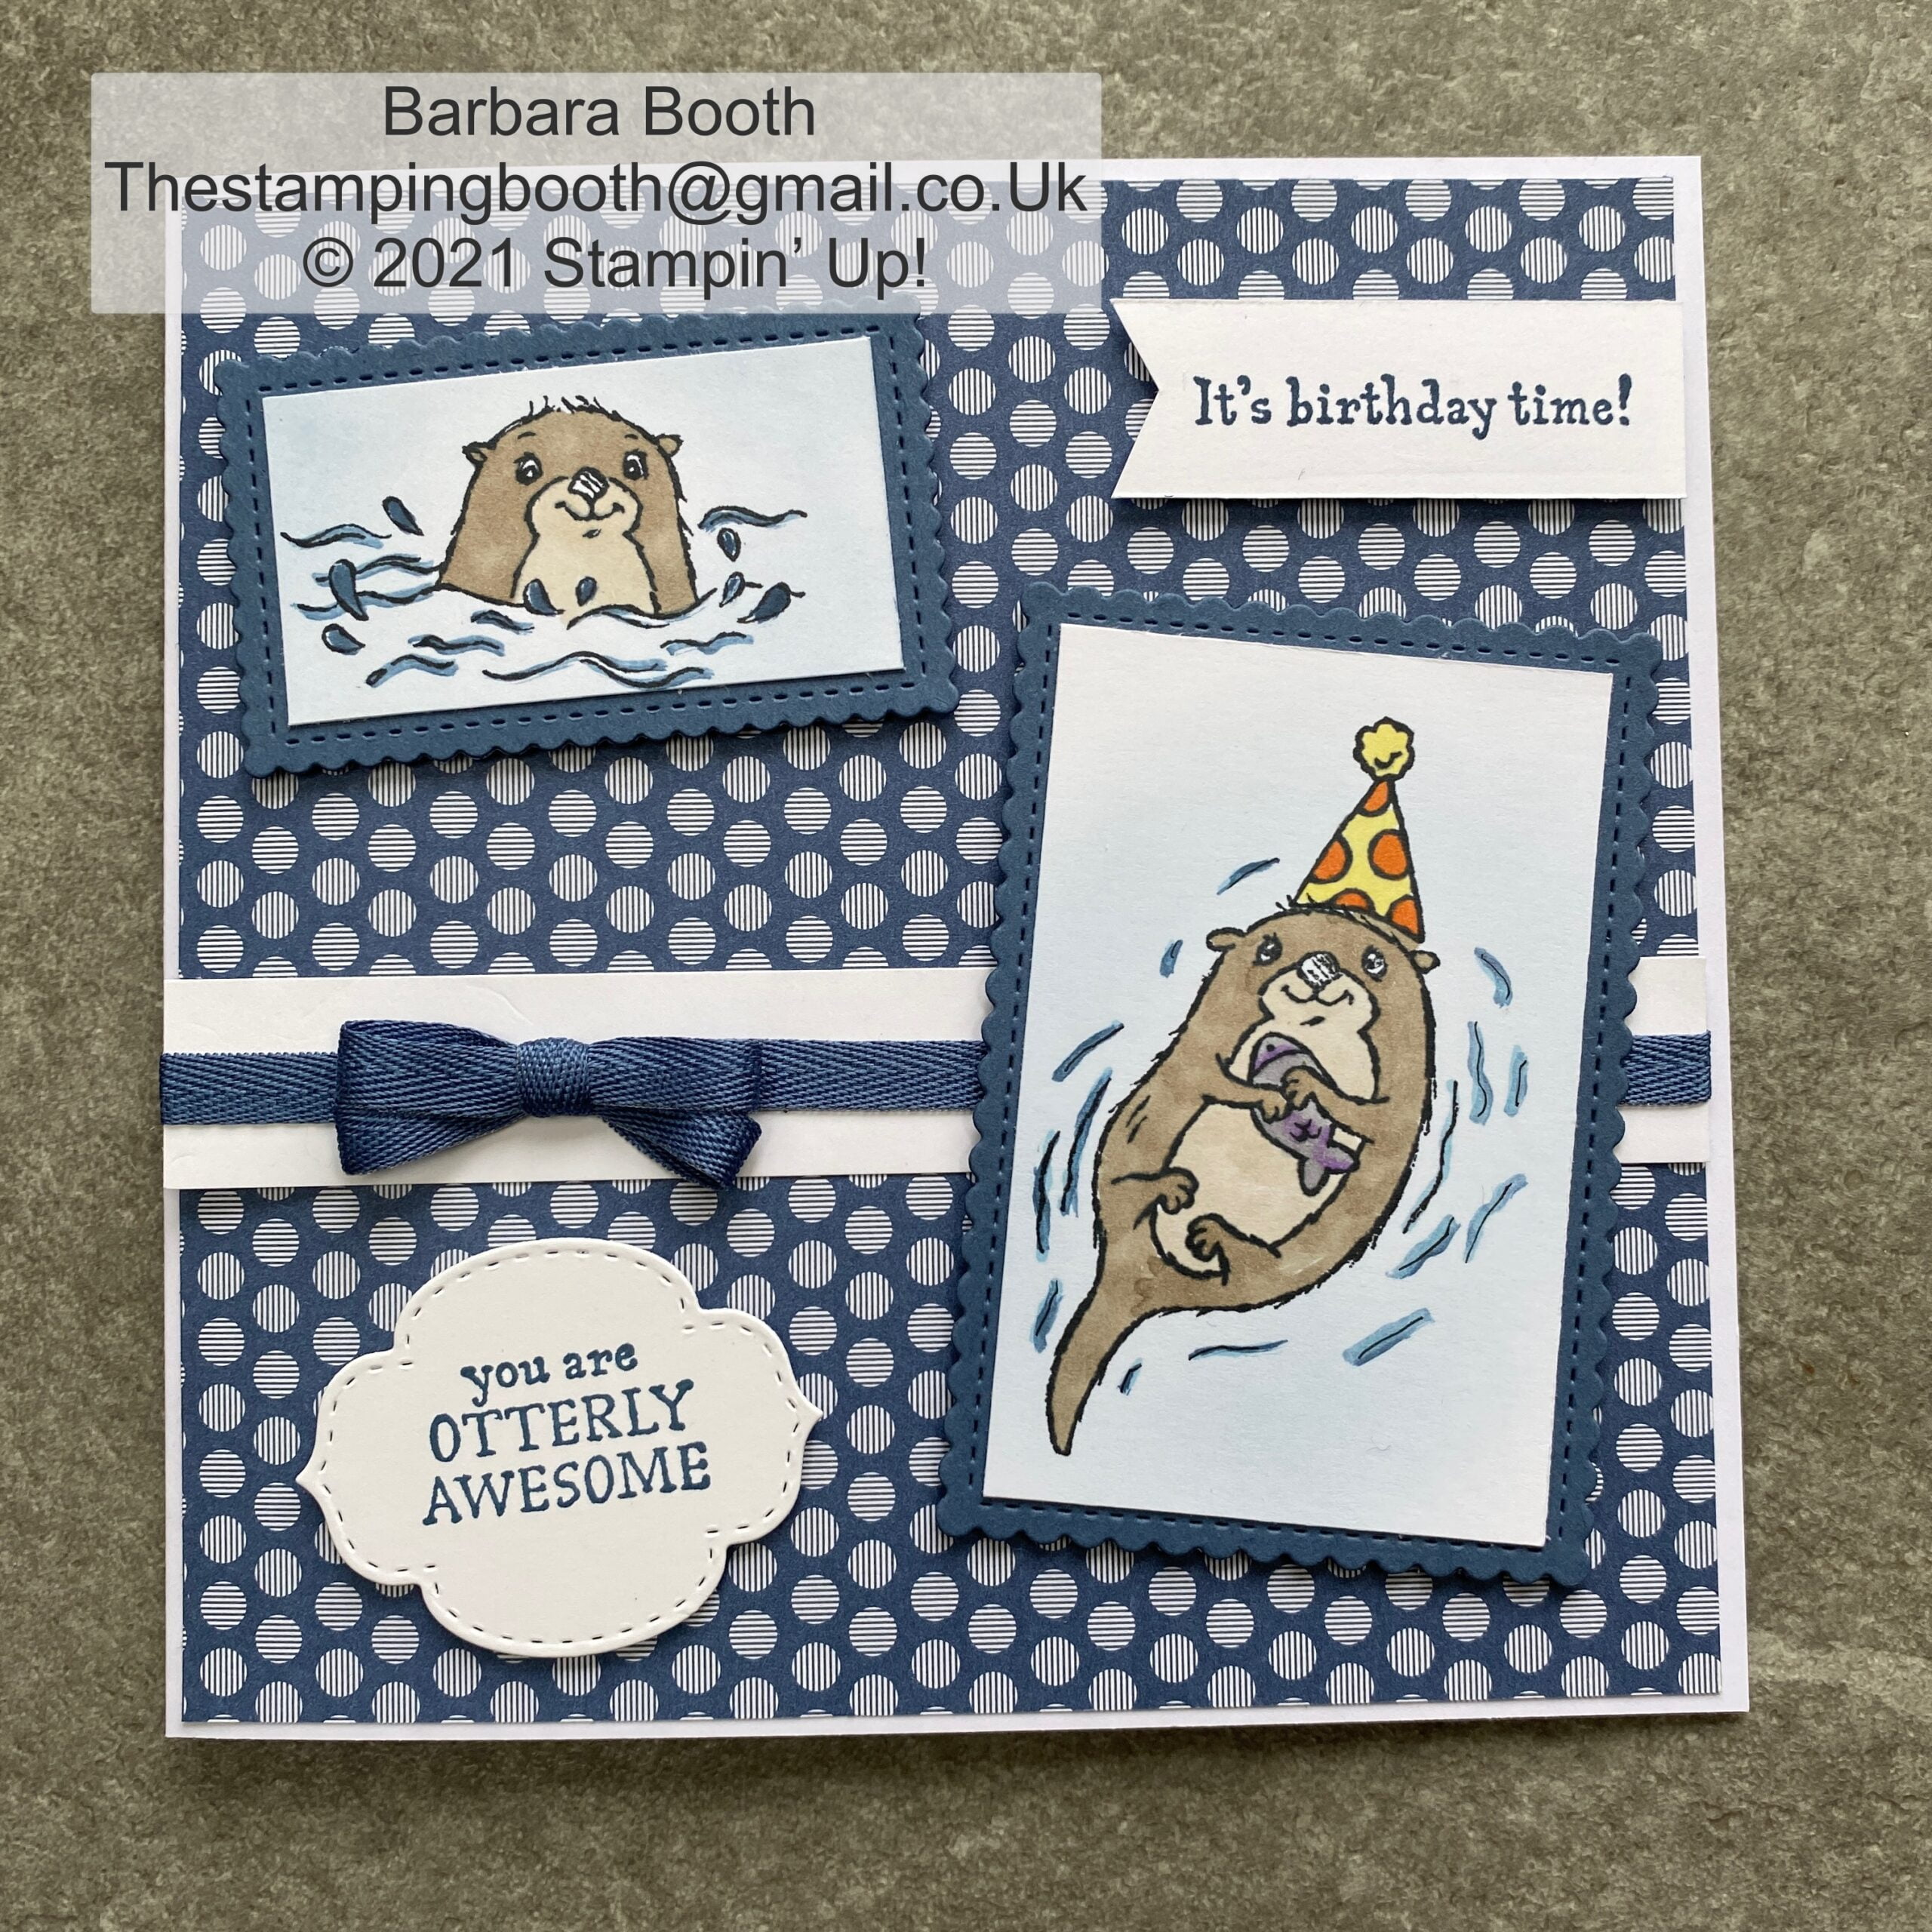
I made this card for my Granddaughter’s birthday using the gorgeous Awesome Otters stamp set. This is one of the items you can get for FREE with a £45 order! Yes, FREE!!
Once again Sale-a-bration has started, this time running from January 4th until February 28th. During this period, any purchase from current catalogues (annual, Jan to June mini or purchases for online exclusives ie kits) that exceed £45, entitles you to choose from a selection of products from the Sale-a-bration catalogue. Spend multiples of £45 and get 2 free items or a higher value item (catalogue price excluding shipping and handling).
Anyway, back to my Granddaughters birthday card. She particularly loves Sloths, but as I don’t have a sloth stamp, I figured a cuddly otter would make her just as happy…hope I’m right! This set is soo cute! Three different otters and sentiments that are actually pretty usable. I think so many sentiments are too Americanized and not what we use in the UK. (I wonder if the Americans actually do use them on their cards?)
Awesome Otters Sale-a-bration stamp
I used Stampin blends to colour the otters and used blending brushes to soften the water around them. The background paper is retired incolor papers although the colour (Misty Moonlight) is still current until June this year.
On the inside I used sentiments from ‘A Grand Kid’ stamp set and just had to pop another otter in their!
So, don’t forget if you love this Awesome Otter, you can get it for FREE with an order of £45 or more. So you too can make an Awesome Otters birthday card!! To find out more email me at [email protected].
If you don’t have the latest January to June Mini catalogue or Sale-a-bration catalogue and live in the UK, again drop me an email and I will get one to you [email protected]. Alternately, you can see everything in my online shop here
Anyone else have birthdays straight after Christmas? I now have son-in-laws card to make and post!!
We use cookies on our website to give you the most relevant experience by remembering your preferences and repeat visits. By clicking “Accept All”, you consent to the use of ALL the cookies. However, you may visit "Cookie Settings" to provide a controlled consent.
This website uses cookies to improve your experience while you navigate through the website. Out of these, the cookies that are categorized as necessary are stored on your browser as they are essential for the working of basic functionalities of the website. We also use third-party cookies that help us analyze and understand how you use this website. These cookies will be stored in your browser only with your consent. You also have the option to opt-out of these cookies. But opting out of some of these cookies may affect your browsing experience.
Necessary cookies are absolutely essential for the website to function properly. These cookies ensure basic functionalities and security features of the website, anonymously.
Cookie
Duration
Description
cookielawinfo-checkbox-analytics
11 months
This cookie is set by GDPR Cookie Consent plugin. The cookie is used to store the user consent for the cookies in the category "Analytics".
cookielawinfo-checkbox-functional
11 months
The cookie is set by GDPR cookie consent to record the user consent for the cookies in the category "Functional".
cookielawinfo-checkbox-necessary
11 months
This cookie is set by GDPR Cookie Consent plugin. The cookies is used to store the user consent for the cookies in the category "Necessary".
cookielawinfo-checkbox-others
11 months
This cookie is set by GDPR Cookie Consent plugin. The cookie is used to store the user consent for the cookies in the category "Other.
cookielawinfo-checkbox-performance
11 months
This cookie is set by GDPR Cookie Consent plugin. The cookie is used to store the user consent for the cookies in the category "Performance".
viewed_cookie_policy
11 months
The cookie is set by the GDPR Cookie Consent plugin and is used to store whether or not user has consented to the use of cookies. It does not store any personal data.
Functional cookies help to perform certain functionalities like sharing the content of the website on social media platforms, collect feedbacks, and other third-party features.
Performance cookies are used to understand and analyze the key performance indexes of the website which helps in delivering a better user experience for the visitors.
Analytical cookies are used to understand how visitors interact with the website. These cookies help provide information on metrics the number of visitors, bounce rate, traffic source, etc.
Advertisement cookies are used to provide visitors with relevant ads and marketing campaigns. These cookies track visitors across websites and collect information to provide customized ads.


")

")


 Designer Series Paper")
 Designer Series Paper")


 Metallic Woven Ribbon")


")


")


 2020–2022 In Color Ribbon")
 Designer Series Paper")
")

